React Native has a core component called TabBarIOS, which renders a tab bar at the bottom of the screen on iOS platform. But it doesn’t work on Android. If you want to have tabs in your app that look and work the same on both, iOS and Android, follow this tutorial, and in 15 minutes you’ll learn how to build them.
If you don’t have any experience with React Native check out 3 Steps to Build Your First Mobile App with React Native. It explains the basics and how to set up required software to get started.
Table of contents
What We Will Be Building
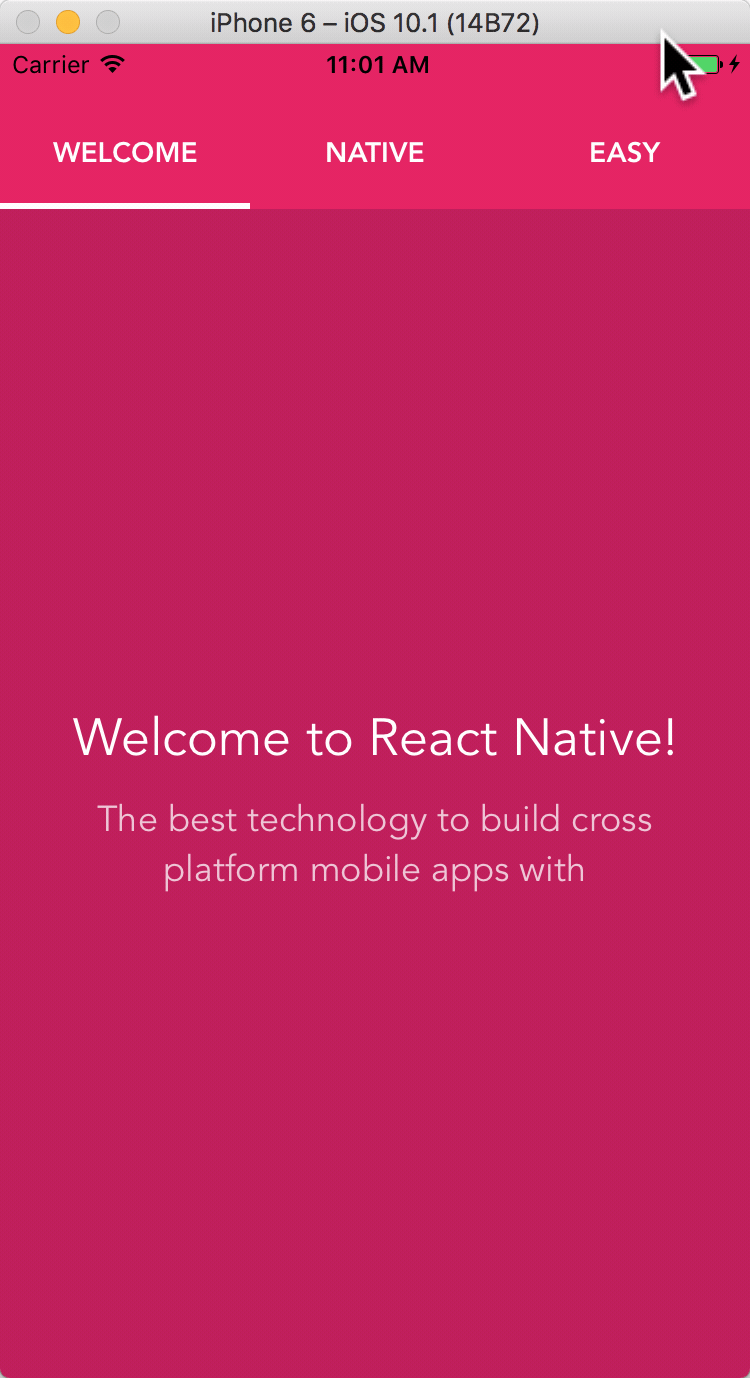
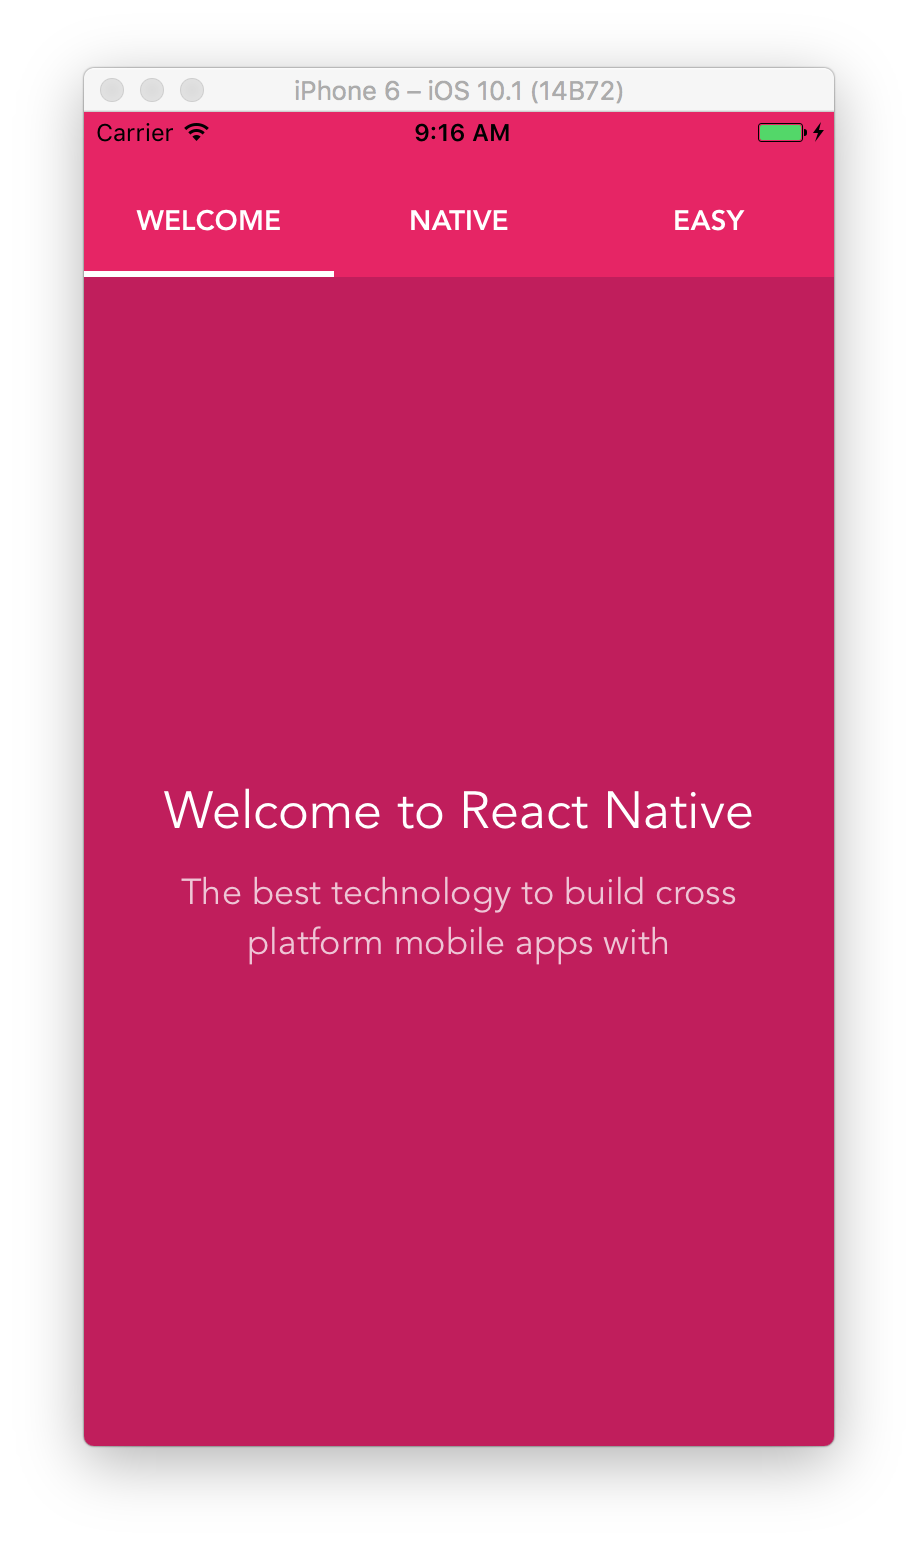
We’re going to build an app that has a tab bar with three tabs at the top. And each tab has some content. That’s how it’s going to look like.
For your reference, the final code for the app we’re building can be found in this GitHub repo.
What Do You Need To Know
Here is a list of all different things we’re going to use to build the app. It includes various React Native core components, other features, such as state or props, and various JavaScript methods or expressions, such as .map() or object destructuring.
- View. View is a fundamental container component for building app’s UI. It can be nested inside other views and have children of any type. Read more
- Text. Text is a component for displaying text. Read more
- StyleSheet. With React Native you can style your components with CSS-like styles. Style names and values usually match CSS styles, except names are written like
backgroundColorinstead of likebackground-color. Read more - Custom Components. You’re not limited to using React Native core components. You can create you own. Read more
- Props. Props are used to customize React Native components, both core, and your own components. You can use the same component in different parts of your app with different props to customize how it would look or behave. Read more
- State. Components in React Native use state for data that changes over time. Most of your components should not use state, but take some data from props and render it. However, sometimes you need to respond to user input. Read more
- TouchableOpacity. A wrapper component that allows views to respond to touches. Read more
- Javascript .map() Iterator. The
map()method creates a new array with the results of calling a provided function on every element in this array. Read more - JavaScript ES6 Object Destructuring. We’ll use this ES6 feature to pull fields from objects passed as function parameter. Read more
- JavaScript ES6 Arrow Functions. An arrow function expression (also known as fat arrow function) has a shorter syntax compared to function expressions and lexically binds the this value. Arrow functions are always anonymous. For example a shorter version of
function times2(value) { return value * 2; }, using fat arrow function would bevalue => value * 2. Read more
You can always get back to this list as you go if you find yourself having a hard time understanding how some of these things work.
Initialize New Project
Let’s start off by creating a new app. Open Terminal App and run these commands to initialize a new project and run it in an emulator.
react-native init Tabs;
cd Tabs;
react-native run-ios;
Enable Hot Reloading
Once your app is up and running, press ⌘D and select Enable Hot Reloading. This will save you some time having to reload the app manually every time you make a change.
Index Files
We’re going to re-use the same code for both, iOS and Android, so we don’t need two different index files. We’re going to create a file called app.js to store our code and import that file in index.ios.js and index.android.js files.
Open index.ios.js file and scrap all of the React Native boilerplate code to start from scratch. Do the same for index.android.js. And add to both of them the following code.
import { AppRegistry } from 'react-native';
import App from './app';

AppRegistry.registerComponent('Tabs', () => App);
This code imports App component from app.js file and registers it as main app container. If you took at look at the emulator at this point, you would see an error screen. That’s because app.js doesn’t exist yet, and therefore can’t be imported. So, let’s fix it.
App Component
Let’s start off by creating just a single screen with no tabs first. Create a new file and call it app.js.
Import Components
First, import all component we’re going to use.
import React, { Component } from 'react';
import {
  StyleSheet,   // CSS-like styles
  Text,         // Renders text
  View          // Container component
} from 'react-native';
Define App Class
Next, define App component class, which has required render() method that returns a View with a header and some text.
export default class App extends Component {
  render() {
    return (
      <View style={styles.container}>
        <View style={styles.content}>
          <Text style={styles.header}>
            Welcome to React Native
          </Text>
          <Text style={styles.text}>
            The best technology to build cross platform mobile apps with
          </Text>
        </View>
      </View>
    );
  }
}
Add Styles
And lastly, add styles to change text size, color, background color, center it all on the screen, and stuff like that.
const styles = StyleSheet.create({
  // App container
  container: {
    flex: 1,                            // Take up all screen
    backgroundColor: '#E91E63',         // Background color
  },
  // Tab content container
  content: {
    flex: 1,                            // Take up all available space
    justifyContent: 'center',           // Center vertically
    alignItems: 'center',               // Center horizontally
    backgroundColor: '#C2185B',         // Darker background for content area
  },
  // Content header
  header: {
    margin: 10,                         // Add margin
    color: '#FFFFFF',                   // White color
    fontFamily: 'Avenir',               // Change font family
    fontSize: 26,                       // Bigger font size
  },
  // Content text
  text: {
    marginHorizontal: 20,               // Add horizontal margin
    color: 'rgba(255, 255, 255, 0.75)', // Semi-transparent text
    textAlign: 'center',                // Center
    fontFamily: 'Avenir',
    fontSize: 18,
  },
});
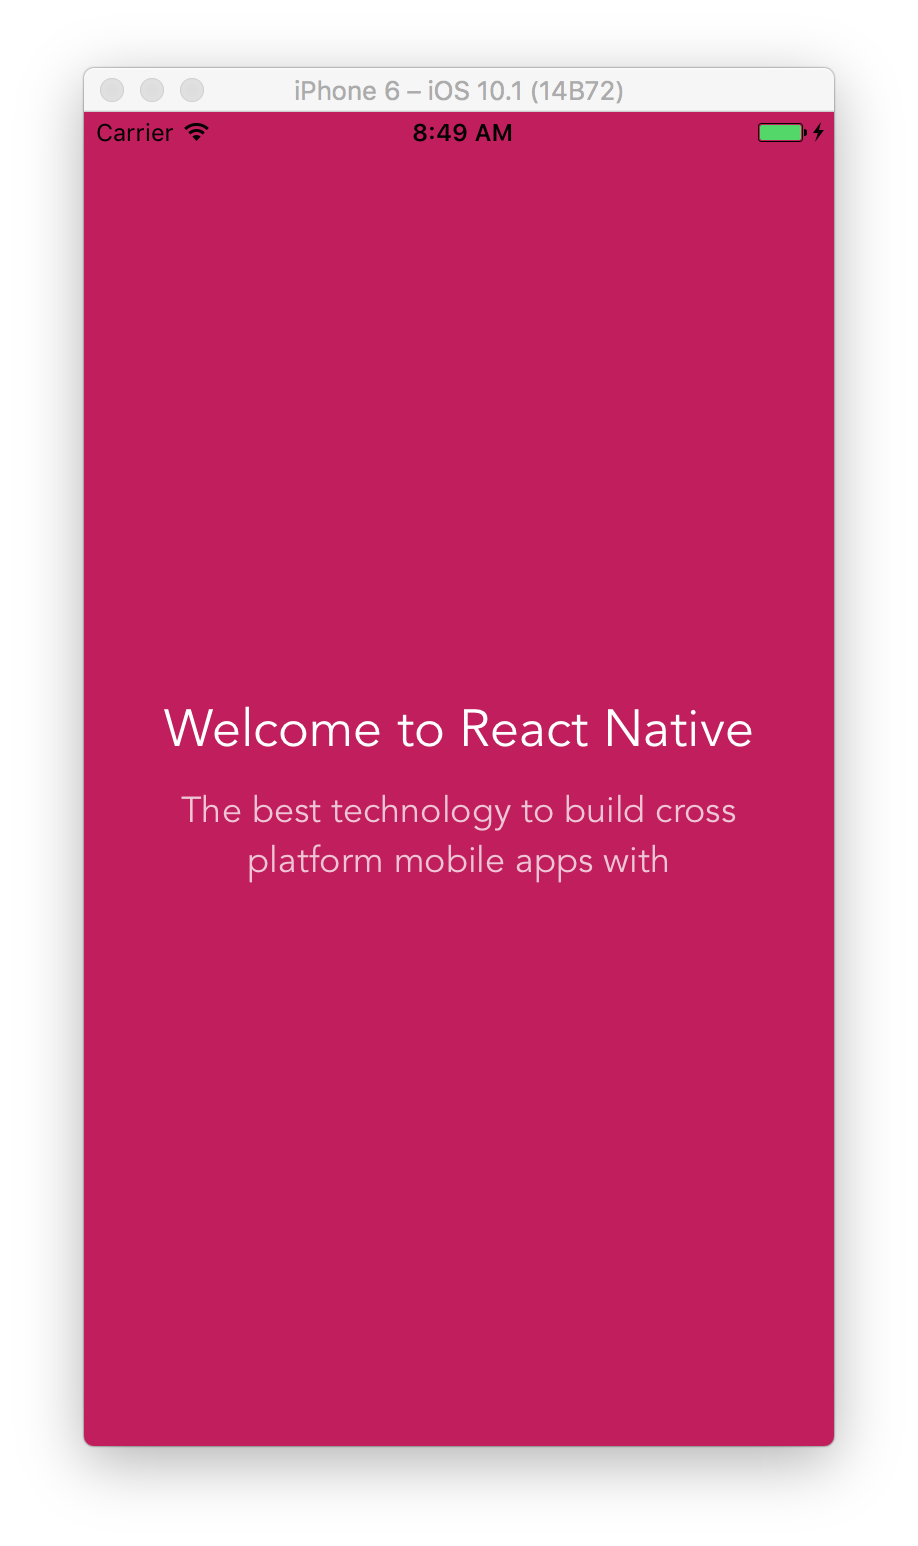
Check Our Progress
Bring up the emulator window and see what we’ve got so far. Looks pretty good so far, but there is no tabs yet. Let’s deal with this next.
Adding Tabs
Fist, add the import statement for Tabs component that we’re about to create.
import Tabs from './tabs';
And change render() method to have multiple screens for different tabs, and wrap them into Tabs component.
  render() {
    return (
      <View style={styles.container}>
        <Tabs>
          {/* First tab */}
          <View title="WELCOME" style={styles.content}>
            <Text style={styles.header}>
              Welcome to React Native
            </Text>
            <Text style={styles.text}>
              The best technology to build cross platform mobile apps with
            </Text>
          </View>
          {/* Second tab */}
          <View title="NATIVE" style={styles.content}>
            <Text style={styles.header}>
              Truly Native
            </Text>
            <Text style={styles.text}>
              Components you define will end up rendering as native platform widgets
            </Text>
          </View>
          {/* Third tab */}
          <View title="EASY" style={styles.content}>
            <Text style={styles.header}>
              Ease of Learning
            </Text>
            <Text style={styles.text}>
              It’s much easier to read and write comparing to native platform’s code
            </Text>
          </View>

        </Tabs>
      </View>
    );
  }
We’ve just added two more Views, title prop to each of three, and wrapped them into Tabs component. The title prop is not a prop supported by View component itself. We’re going to read this prop value in Tabs component and use to display a tab title on a tab bar.
Tabs Component
And finally, let’s create Tabs component. As you noticed it’s going to receive multiple View components with title prop for tab title, and tab content inside it.
Create a new file and call it tabs.js.
Import Components
First, import all component we’re going to use.
import React, { Component } from 'react';
import {
  StyleSheet,         // CSS-like styles
  Text,               // Renders text
  TouchableOpacity,   // Pressable container
  View                // Container component
} from 'react-native';
Define Tabs Class
Next, define Tabs component class.
export default class Tabs extends Component {

  // Initialize State
  state = {
    // First tab is active by default
    activeTab: 0
  }

  // Pull children out of props passed from App component
  render({ children } = this.props) {
    return (
      <View style={styles.container}>
        {/* Tabs row */}
        <View style={styles.tabsContainer}>
          {/* Pull props out of children, and pull title out of props */}
          {children.map(({ props: { title } }, index) =>
            <TouchableOpacity
              style={[
                // Default style for every tab
                styles.tabContainer,
                // Merge default style with styles.tabContainerActive for active tab
                index === this.state.activeTab ? styles.tabContainerActive : []
              ]}
              // Change active tab
              onPress={() => this.setState({ activeTab: index }) }
              // Required key prop for components generated returned by map iterator
              key={index}
            >
              <Text style={styles.tabText}>
                {title}
              </Text>
            </TouchableOpacity>
          )}
        </View>
        {/* Content */}
        <View style={styles.contentContainer}>
          {children[this.state.activeTab]}
        </View>
      </View>
    );
  }
}
It has state with activeTab value, which is 0 by default, what means that first tab is active when you launch the app. You might be wondering why is it 0 and not 1. That’s because javascript array element indexes start with 0, so the first element always has index 0, the second one has index 1, and so on.
In render() it loops through children prop, which is an array of those three Views that we wrapped into Tabs component in app.js, and returns tappable TouchableOpacity component for each tab. When it’s tapped it updates activeTab in state.
And then it renders active tab’s content from children array, using this.state.activeTab index.
Add Styles
And lastly, add styles to style how tabs look.
const styles = StyleSheet.create({
  // Component container
  container: {
    flex: 1,                            // Take up all available space
  },
  // Tabs row container
  tabsContainer: {
    flexDirection: 'row',               // Arrange tabs in a row
    paddingTop: 30,                     // Top padding
  },
  // Individual tab container
  tabContainer: {
    flex: 1,                            // Take up equal amount of space for each tab
    paddingVertical: 15,                // Vertical padding
    borderBottomWidth: 3,               // Add thick border at the bottom
    borderBottomColor: 'transparent',   // Transparent border for inactive tabs
  },
  // Active tab container
  tabContainerActive: {
    borderBottomColor: '#FFFFFF',       // White bottom border for active tabs
  },
  // Tab text
  tabText: {
    color: '#FFFFFF',
    fontFamily: 'Avenir',
    fontWeight: 'bold',
    textAlign: 'center',
  },
  // Content container
  contentContainer: {
    flex: 1                             // Take up all available space
  }
});
And There It Is
Bring up the emulator window and play around with the app. Try tapping tabs and see how the app works.
Takeaways
You’ve just built a component that you can re-use in your apps for both, iOS and Android platforms. This way your apps will look consistent on both platforms, and you won’t have to worry about building and maintaining two different tab components for each platform.