Any app written with React Native in JavaScript consist of at least one component.
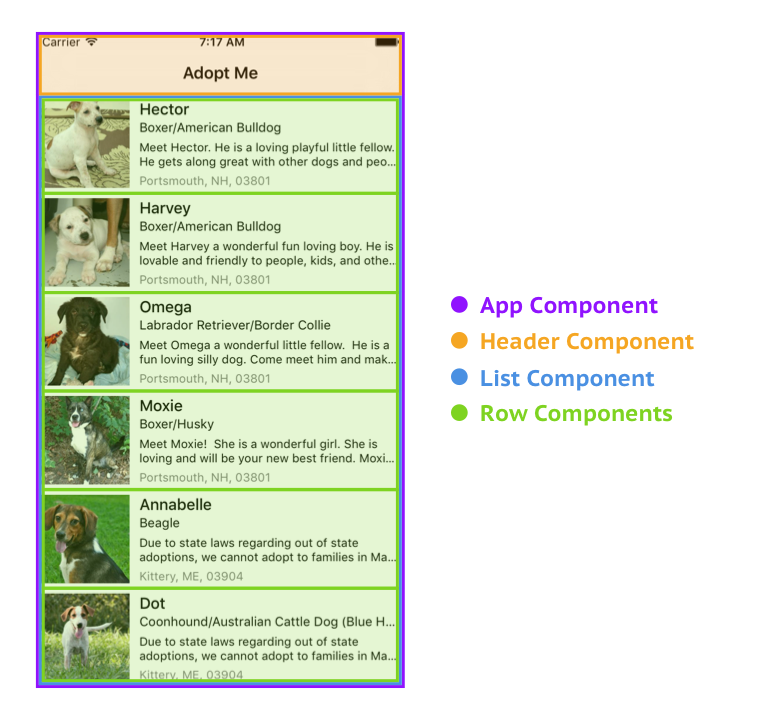
That’s how your app looks like if we break everything down to components.
Table of contents
Defining Component
To define a component we need to import React and Component classes from react module.
import React, { Component } from 'react’;
Then import other components if we’re going to use any in our component.
import {
  Text
} from 'react-native';
And define our component class by extending Component class.
class AwesomeComponent extends Component {
  ...
}
Exporting and Importing Components
To export out component, so other components can import and use it we need to add export before class declaration.
export class AwesomeComponent extends Component {
We can also export our components as a default one, using export default.
export default class AwesomeComponent extends Component {
Imagine if you had a component we just defined in a file called AwesomeComponent.js, then you could import it in another file by either importing it by component and file names
import AwesomeComponent from './AwesomeComponent';
or by importing default and assigning any name to it
import { default as AnyName } from './AwesomeComponent';
There can only be one default class exported per file. But you can export as many classes and variables and import them in other files as you want.
Render Method
Every React Native component has to have at least one method called render. This method gets executed when your component needs to be rendered on the screen.
render() {
  return <Text>That's a component</Text>;
}
JSX
In order to use other components in render method we need to use JSX tags. That means we just need to put component name in angle brackets like so <Component />, if component does’t have any children components, or use open <Component> and close </Component> tag with children components in between. You can also pass any number of properties (or props) to a components <Component prop={value} anotherProp="string value" />.
Let’s take a look at the example.
render() {
  return <Text>That's a component</Text>;
}
In the code above we return <Text>That's a component</Text> component in render method, which means that when React Native renders our component it goes to Text controller, invokes its render method and passes this text That's a component between <Text> tags as a prop to Text component.
AwesomeComponent.js
Let’s create a file called AwesomeComponent.js for our component and put it all together.
import React, { Component } from 'react';
import {
  Text
} from 'react-native';

export default class AwesomeComponent extends Component {
  render() {
    return <Text>That's an awesome component</Text>;
  }
}
It’s a good practice to name your files the same as default exported components in those files.
Methods
You can have other methods besides render in a component. For example, you can define text method
text() {
  return <Text>That's an awesome component</Text>
}
And reference it in render method by using this, which references the component itself.
render() {
  return this.text();
}
State
Components in React Native can also have state for the data that changes over time. To define component state use state = { key: value } notation. That’s just a key-value object with one or more comma separated key-values.
class AwesomeComponent extends Component {
  state = {
    counter: 1
  }
  render() { ... }
}
To access data in the state use this.state.KEY.
render() {
  return (
    <Text>
      The counter is {this.state.counter}
    </Text>
  );
}
Notice how we put {this.state.counter} in curly braces. That’s required when you want to inject any JavaScript expression, including state values, other variables or methods and conditions into JSX tags.
To change state data we can use this.setState({ KEY: VALUE })
updateCounter() {
  this.setState({ counter: 2 });
}
Whenever you update the state your component gets re-rendered automatically.
Props
You can pass any number of props from parent component down to child component
render() {
  return (
    <Text numberOfLines={1}>
      That's an awesome component
    </Text>
  );
}
In this example we passed value of 1 to a prop named numberOfLines.
All of the props passed to a components are stored in this.props object. And we can access those props in any of Text component methods.
render() {
  const lines = this.props.numberOfLines;
}
The text That's an awesome component that we passed between <Text> and </Text> is actually a prop as well. You can access is as this.props.children
It’s a good practice to define props that you’re going to use in beginning of your method as const variables.
render() {
  const lines = this.props.numberOfLines;
  const children = this.props.children;
}
You can make it a little bit shorter by keeping first const and omitting all later ones and using commas to separate different declarations.
render() {
  const lines = this.props.numberOfLines,
    children = this.props.children;
}
To make it even more shorter you can do
render() {
  const { numberOfLines, children } = this.props;
}
Which means get numberOfLines and children properties of this.props object and turn them into constants.
You can even do this inside render() declaration
render({ numberOfLines, children } = this.props) {
  ...
}
Nesting Components
Methods in React Native can return only one top level JSX component. Let’s say we want to return 3 different Text component as a result of render method. In this case we hate wrap those 3 component into a single one. Otherwise it would throw an error. Usually you would wrap other components into View component like so
render() {
  return (
    <View>
      // method we defined earlier, which returns JSX component
      {this.text()}
      <Text numberOfLines={1}>
        The counter is {this.state.counter}
      </Text>
      <Text>More text</Text>
    </View>
  );
}
You can nest as many components as you want inside other components.
Final Example
Let’s put everything that we’ve learned together and create a new app to see it in action. Open Terminal App and run these commands.
react-native init LearnignComponents;
cd LearnignComponents;
Open index.ios.js file and change its content with the following code.
import React, { Component } from 'react';
import {
  AppRegistry,
  StyleSheet,
  Text,
  View
} from 'react-native';

class LearnignComponents extends Component {

  state = {
    counter: 1
  }

  text() {
    return <Text>That's an awesome component</Text>;
  }

  updateCounter() {
    this.setState({ counter: 2 });
  }

  render() {
    return (
      <View style={styles.container}>
        {this.text()}
        <Text numberOfLines={1}>
          The counter is {this.state.counter}
        </Text>
      </View>
    );
  }
}

const styles = StyleSheet.create({
  container: {
    flex: 1,
    justifyContent: 'center',
    alignItems: 'center'
  },
});

AppRegistry.registerComponent('LearnignComponents', () => LearnignComponents);
And run the app.
react-native run-ios;
And here they are. Two Text components nested inside View component. One rendered as JSX, another by text() method. And both centered on the screen inside View component, which we styled with flex: 1 to take the whole screen and instructed to center content inside id both vertically and horizontally with justifyContent: 'center', alignItems: 'center'.

I hope you enjoyed the tutorial. Subscribe to find out about new tutorials and learn how to build amazing apps!


Pingback: State in React Native Components | Rational App Development()
Pingback: Universal Tab Bar in React Native | Rational App Development()