Table of contents
What We Will Be Building
This post is the second part of Offline First Apps with React Native and Redux. We’re going to improve the app we built before by adding Like button and making it work even if the user goes offline. We’ll use Redux to handle actions and Redux Persist to persist queued actions when the user goes offline and closes the app.
Let’s Get Started
To get started, pull up the code from Offline First Apps with React Native and Redux tutorial and let’s make some changes to add Like button and handle actions.
API Backend
First of all, let’s update our backend. Previously API returned JSON response that looked like:
{
  "gif": "data:image/gif;base64,...",
}
Since we want to add Like button we’re going to need and ID for images. So, we want the response to have the image ID and look like:
{
  "id": "p4xp4BjHIdane",
  "gif": "data:image/gif;base64,..."
}
- Open
server.jsfile frombackendfolder to make a couple of changes.
- Update
fetchGiffunction to return JSON with an image ID instead of just the image itself.
- Find this code:
export const fetchGif = async () => {
  const item = await giphyapi().random('cat');
  return await encode(await download(item.data.image_url));
};
- And update return statement to the following:
export const fetchGif = async () => {
  const item = await giphyapi().random('cat');
  return {
    id: item.data.id,
    gif: await encode(await download(item.data.image_url))
  };
};
- Update
/gifroute handler to returnfetchGifsince it returns JSON now.
- Find this code:
app.get('/gif', async (req, res) => {
  res.json({
    gif: await fetchGif(),
  });
});
- And change it with the following:
app.get('/gif', async (req, res) => {
  res.json(await fetchGif());
});
That’s all for the backend. Let’s continue with the mobile app.
Mobile App
For the mobile app we’re going to add Like button, add a network status change event listener, and update Redux configuration to handle like events immediately if the user is online or store them in a queue otherwise.
Redux Reducer and Actions
Let’s start with Redux configuration.
- Open
redux.jsfile fromsrcfolder to make a few changes.
- Import
withoutfromlodash:
// ... existing imports
import without from 'lodash/without';
- Add
queuetoinitialState:
export const initialState = {
  image: null,
  next: [],
  queue: [], // add this
};
- Add
CONNECTION_STATUS,ADD_TO_ACTION_QUEUEandREMOVE_FROM_ACTION_QUEUEhandlers toreducerfunction:
    case 'CHANGE_IMAGE':
    // ... existing handlers
    // Change network connection status
    case 'CONNECTION_STATUS':
      return {
        ...state,
        isConnected: action.isConnected,
      };
    case 'ADD_TO_ACTION_QUEUE':
      return {
        ...state,
        queue: [...state.queue, action.imageId], // push to the queue
      };
    case 'REMOVE_FROM_ACTION_QUEUE':
      return {
        ...state,
        queue: without(state.queue, action.imageId), // remove from the queue
      };
    // ... existing handlers continue
    case 'ERROR':
- Add
updateConnectionStatusaction that updates user’s internet connection status.
// Change network connection status
export const updateConnectionStatus = (status) => (dispatch, getState) => {
  dispatch({ type: 'CONNECTION_STATUS', isConnected: status });
};
- Add
likeImageaction that makes API call to/likeendpoint if the user is online or puts it in the queue by dispatchingADD_TO_ACTION_QUEUEaction otherwise.
export const likeImage = (imageId, queued = false) => async (dispatch, getState) => {
  const { isConnected } = getState();
  // Make fake API call if user is online
  if (isConnected) {
    const response = await fetch(`${API}/like`);
    dispatch({ type: 'IMAGE_LIKED', payload: response.imageId });
    // Remove the action from the queue if it was dispatch from the queue
    if (queued) {
      dispatch({ type: 'REMOVE_FROM_ACTION_QUEUE', imageId });
    }
  }
  // Store in the queue if user is offline
  else {
    dispatch({ type: 'ADD_TO_ACTION_QUEUE', imageId });
  }
};
Container Component
Next, let’s make use of those actions that we added in the previous step and add Like button.
- Open
container.jsfile fromsrcfolder to make a few changes.
- Import
NetInfofromreact-native:
import {
  Image,
  NetInfo, // add this
  StyleSheet,
  Text,
  TouchableOpacity,
  View
} from 'react-native';
- Import
updateConnectionStatusandlikeImageactions.
import { fetchImage, changeImage, updateConnectionStatus, likeImage } from './redux';
- Map
queueand the new actions from Redux storage to the props.
@connect(
  state => ({
    image: state.image,
    queue: state.queue, // add me
  }),
  dispatch => ({
    actions: { ...bindActionCreators({ fetchImage, changeImage, updateConnectionStatus, likeImage }, dispatch) }
  }),
)
- Add network status event listener and
likefunction toContainerclass definition.
export default class Container extends Component {

  // ... existing funtions

  // Listen for network status changes
  componentDidMount() {
    NetInfo.isConnected.addEventListener('change', this.networkConnectionChange);
  }

  // Remove listener when component unmounts
  componentWillUnmount() {
    NetInfo.isConnected.removeEventListener('change', this.networkConnectionChange);
  }

  // Network status change handler
  networkConnectionChange = (isConnected) => {
    const { queue } = this.props;
    this.props.actions.updateConnectionStatus(isConnected);
    // Process queued actions
    if (isConnected && queue.length > 0) {
      queue.forEach(imageId => {
        this.props.actions.likeImage(imageId, true);
      });
    }
  };

  // Like image
  like = () => {
    this.props.actions.likeImage(this.props.image.id);
  };

  // ... existing funtions
}
- Add Like button in
renderfunction.
- Find this code:
		<View style={styles.buttonContainer}>
          <TouchableOpacity style={styles.button} onPress={this.toggle}>
            <Text style={styles.text}>
              {this.state.paused ? "RESUME" : `PAUSE (${this.state.countDown})`}
            </Text>
          </TouchableOpacity>
        </View>
- And replace with the following:
		<View style={styles.buttonContainer}>
          <View style={styles.buttons}>
            <TouchableOpacity style={styles.button} onPress={this.like}>
              <Text style={styles.text}>
                LIKE
              </Text>
            </TouchableOpacity>
            <TouchableOpacity style={styles.button} onPress={this.toggle}>
              <Text style={styles.text}>
                {this.state.paused ? "RESUME" : `PAUSE (${this.state.countDown})`}
              </Text>
            </TouchableOpacity>
          </View>
        </View>
- Add
buttonsstyles to keep both buttons in a row:
const styles = StyleSheet.create({
  // ... exising styles
  buttons: {
    flexDirection: 'row',
    justifyContent: 'space-between',
  },
});
And that’s all!
Let’s See How It Works
Run the app in the simulator by executing the following command in the Terminal:
react-native run-ios;
Now we have Like button that dispatches likeImage action.
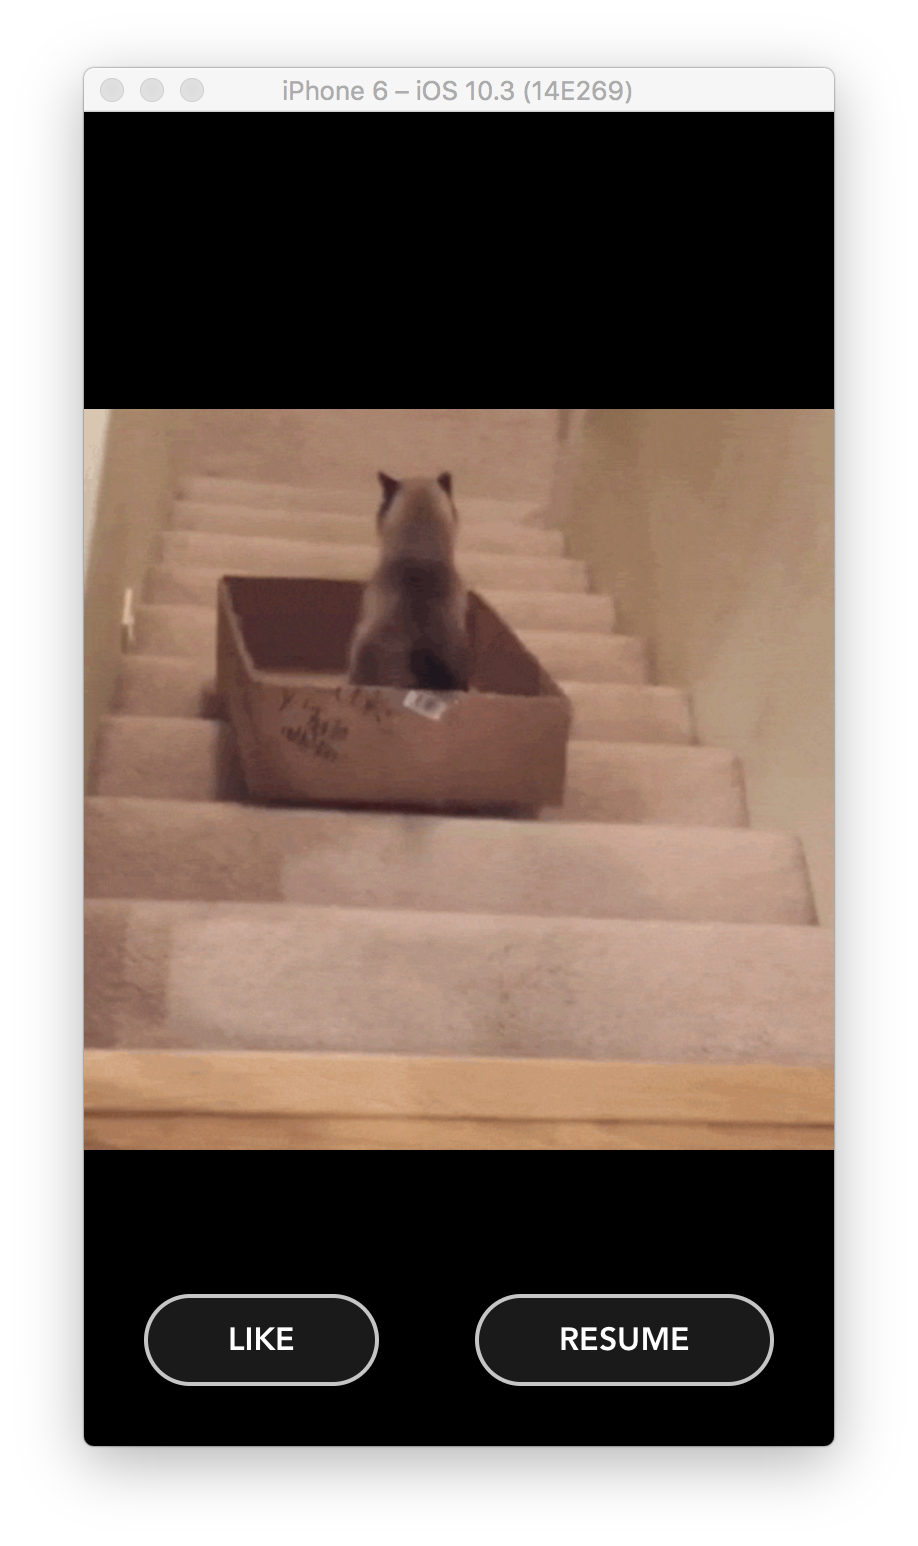
Let’s make sure it works offline.
Press ⌘D and select Debug JS Remotely. That should open Chrome window.
Next, press ⌘⌥D in Chrome to open up Developer Console.
Now, turn off you internet connection, and click Like button couple of times. Then turn it back on. You should see something similar to this in your Developer Console:

You can see that when we turned off the internet connection, CONNECTION_STATUS action was dispatched and changed isConnected to false.
Next, when we clicked Like button, ADD_TO_ACTION_QUEUE was dispatched with the imageId of the active image at the moment.
Then once we turned the internet connection back on, CONNECTION_STATUS action changed isConnected to true and triggered the execution of queued up actions. And after IMAGE_LIKED was executed it removed the action from the queue by dispatching REMOVE_FROM_ACTION_QUEUE action.
Wrapping Up
Hopefully, you’ve learned a lot and will be able to use that knowledge when building your apps! Subscribe to get notified about new tutorials. And if you have any questions or ideas for new tutorials, just leave a comment below the post.