Table of contents
The series
Welcome to the final part of the series. Here is the list of the previous parts:
- Part 1. Setting up a new project and dependencies. Building presentational chart component.
- Part 2. Building the list of coins and fetching the prices using API.
- Part 3. Final part. Using real data for the chart and date ranges and adding new coins.
What we will be building
In this final part, we’re going to upgrade chart component, so it uses real historical data using API and shows data for different date ranges. We’re also going to create a new component that shows a list of all available coins and allows adding new coins to the main list.
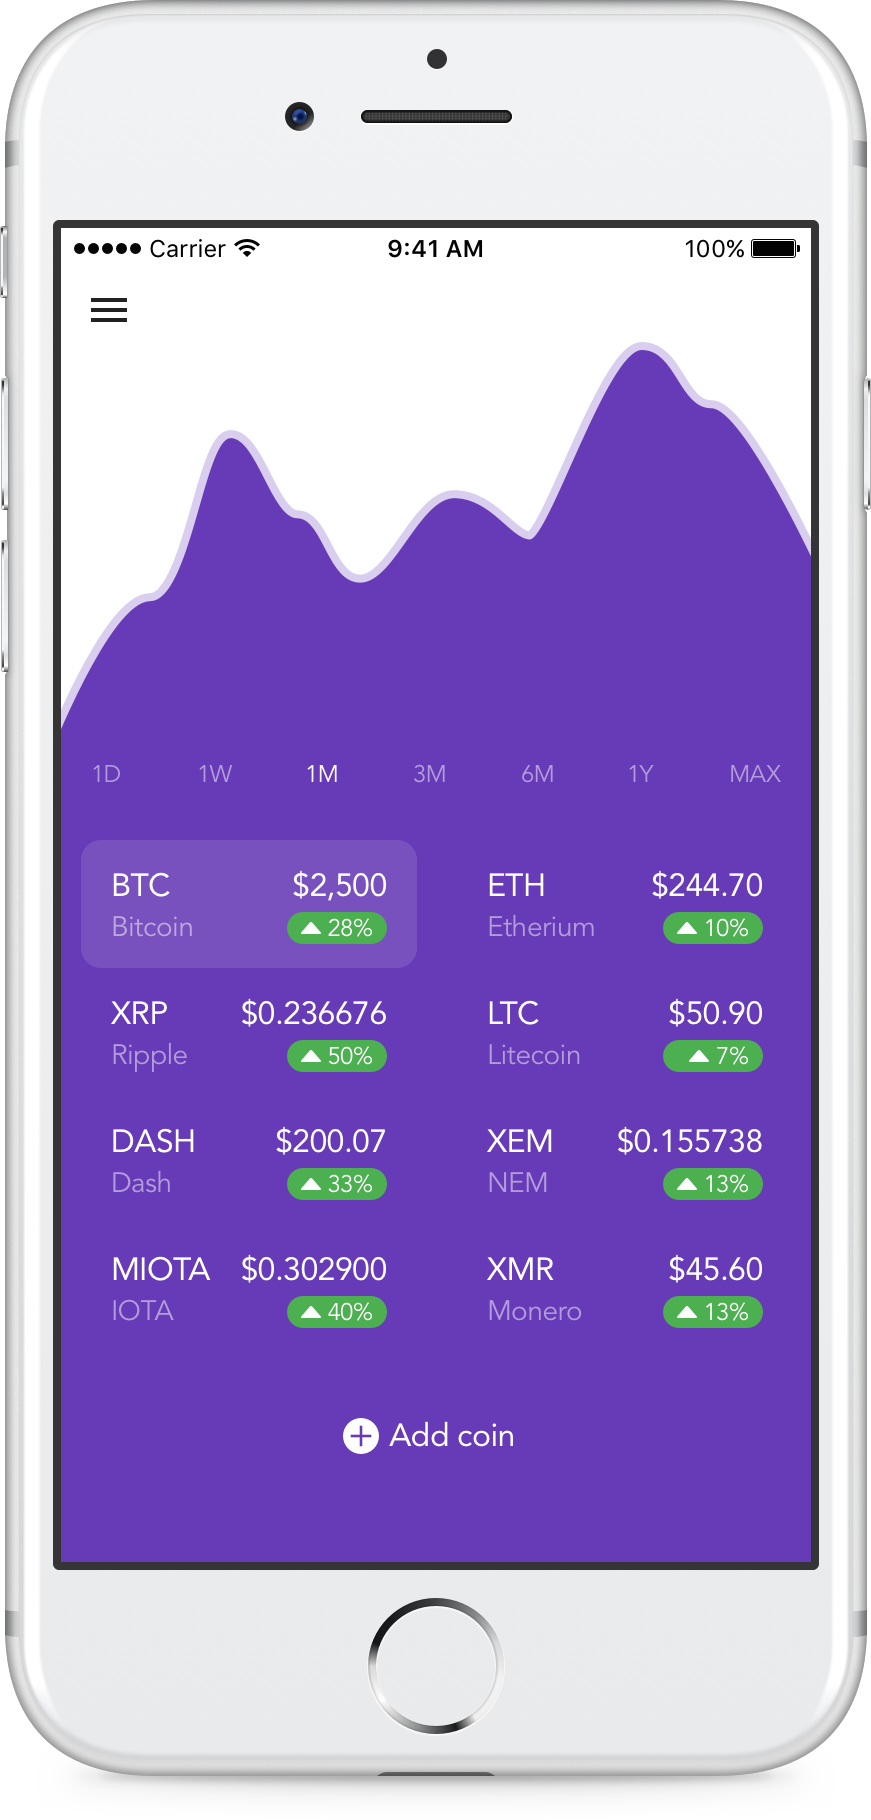
By the end of this tutorial, you’ll have a fully functional app on the screenshot.
For your reference, find the final code for the app we’re building in this GitHub repo.
Previous part code
We’ll continue building upon the code we wrote in the previous part. If you haven’t been following up and you don’t have the code you can check it out from GitHub. Open Terminal App and execute these commands:
git clone --branch part-2 https://github.com/rationalappdev/react-native-charts-tutorial.git;
cd react-native-charts-tutorial;
npm install;
Design layout breakdown
Let’s take a look at the design layout breakdown from the previous part again to remind us into what components we decided to break the app down.
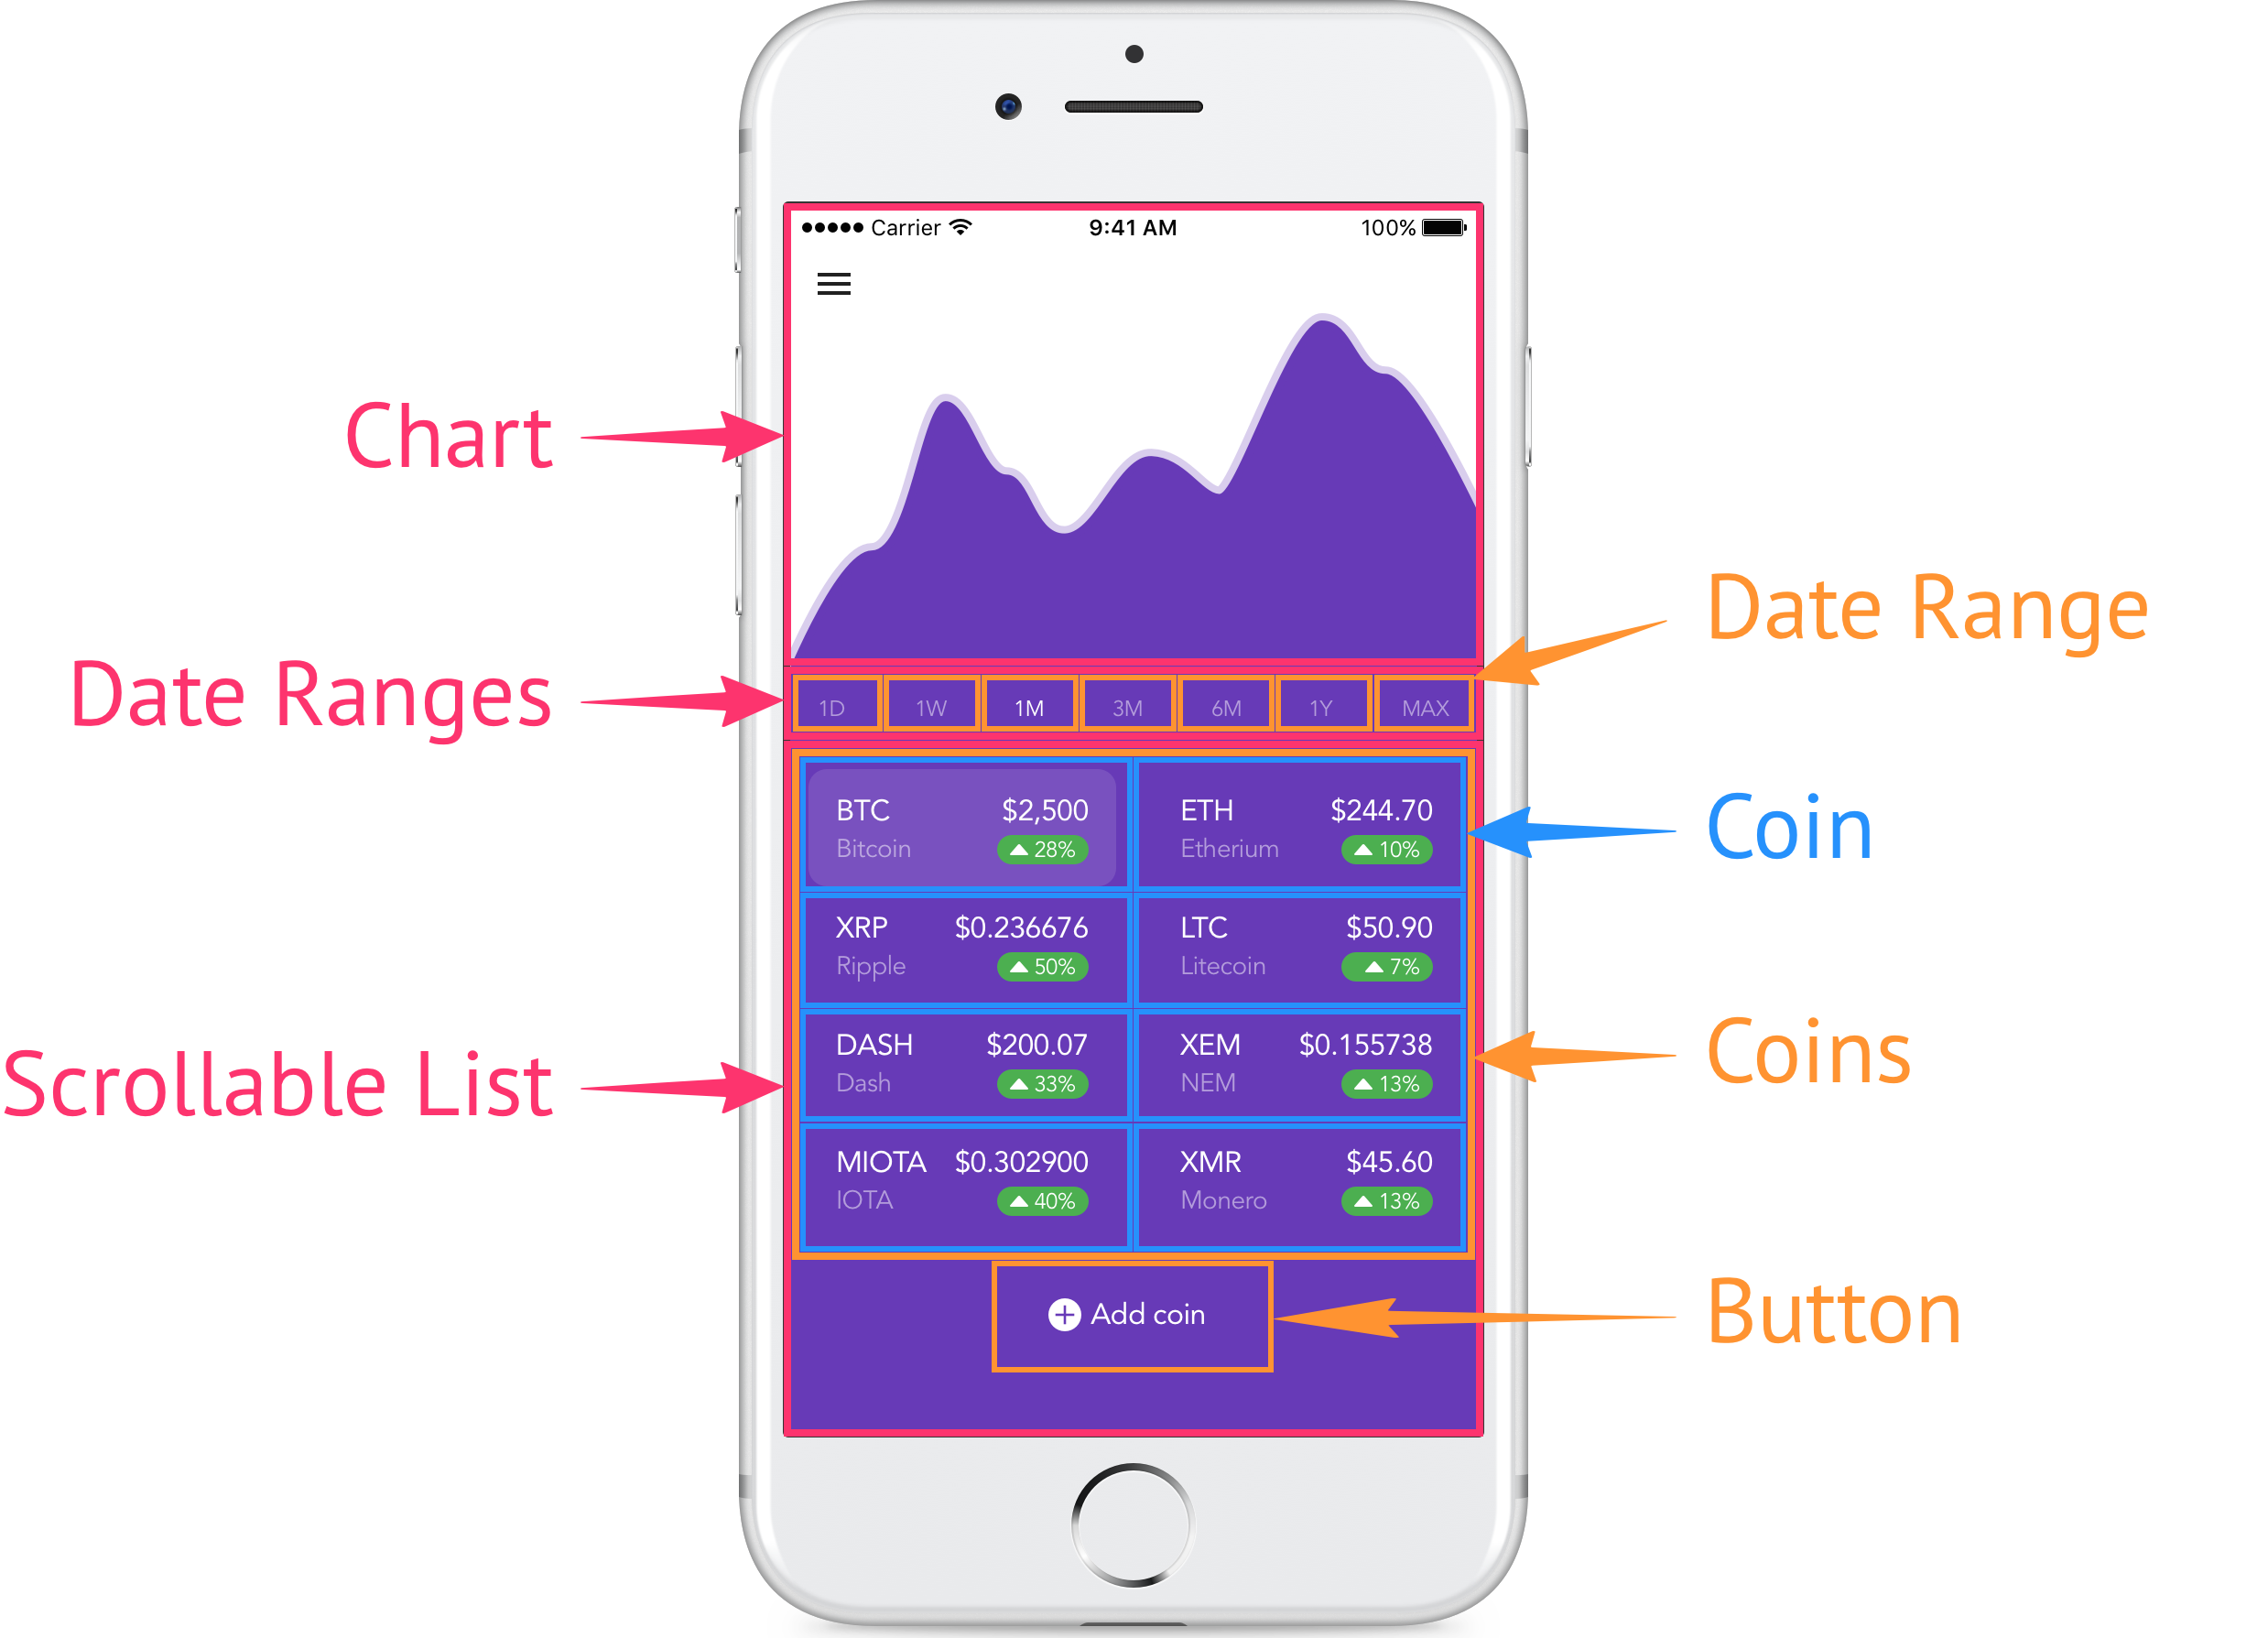
In this part, we’re going to be working on Chart, Date Ranges and Add Coin Button components.
Setting up Redux for Chart container
Let’s start off by setting up actions and reducer for fetching historical prices for the chart using API, and managing date ranges.
Adding actions and reducer
- Create a new file called
chart.jswithinsrc/reduxfolder.
// @flow

import { get } from '../api';
import type { Store } from './index';

// -----------------------------------------------------------------------------
// Constants
// -----------------------------------------------------------------------------

export const RANGE_1D = '1D';
export const RANGE_1W = '1W';
export const RANGE_1M = '1M';
export const RANGE_3M = '3M';
export const RANGE_6M = '6M';
export const RANGE_1Y = '1Y';
export const RANGE_MAX = 'MAX';
export const RANGES = [RANGE_1D, RANGE_1W, RANGE_1M, RANGE_3M, RANGE_6M, RANGE_1Y, RANGE_MAX];

// -----------------------------------------------------------------------------
// Types
// -----------------------------------------------------------------------------

export type Range = typeof RANGE_1D
  | typeof RANGE_1W
  | typeof RANGE_1M
  | typeof RANGE_3M
  | typeof RANGE_6M
  | typeof RANGE_1Y
  | typeof RANGE_MAX;

export type State = {
  +loading: boolean,      // activity indicator flag
  +range: Range,          // current date range
  +prices: Array<number>, // historical prices
};

type Action =
  | { type: 'LOADING_CHART_PRICES' }
  | { type: 'SELECTED_CHART_RANGE', range: Range }
  | {
  type: 'UPDATED_CHART_PRICES',
  response: {
    Data: Array<{
      close: number,
      high: number,
      low: number,
      open: number,
      time: number,
      volumefrom: number,
      volumeto: number,
    }>,
    TimeFrom: number,
    TimeTo: number,
  }
}
  ;

type GetState = () => Store;
type PromiseAction = Promise<Action>;
type ThunkAction = (dispatch: Dispatch, getState: GetState) => any;
type Dispatch = (action: Action | ThunkAction | PromiseAction | Array<Action>) => any;

// -----------------------------------------------------------------------------
// Initial state
// -----------------------------------------------------------------------------

const initialState: State = {
  loading: true,  // show activity indicator on first load
  range: '1D',    // default to one day range
  prices: [],     // no price data initially
};

// -----------------------------------------------------------------------------
// Actions
// -----------------------------------------------------------------------------

// Change current date range
export const selectRange = (range: Range): Action => ({
  type: 'SELECTED_CHART_RANGE',
  range
});

// Fetch prices using API and dispatch the data to reducer
export const updateChartPrices = (): ThunkAction => async (dispatch, getState) => {
  dispatch({ type: 'LOADING_CHART_PRICES' });
  const {
    coins: { current },
    chart: { range },
  } = getState();
  const response = await get(buildAPIQuery(current, range));

  dispatch({
    type: 'UPDATED_CHART_PRICES',
    response,
  });
};

// Build API query based on symbol of interest and current date range
const buildAPIQuery = (symbol: string, range: Range): string => {

  let endpoint = 'histohour';
  let aggregate = 1;
  let limit = 24;

  switch (range) {
    case RANGE_1D:
      endpoint = 'histohour';
      aggregate = 1;
      limit = 24;
      break;
    case RANGE_1W:
      endpoint = 'histoday';
      aggregate = 1;
      limit = 7;
      break;
    case RANGE_1M:
      endpoint = 'histoday';
      aggregate = 1;
      limit = 30;
      break;
    case RANGE_3M:
      endpoint = 'histoday';
      aggregate = 3;
      limit = 30;
      break;
    case RANGE_6M:
      endpoint = 'histoday';
      aggregate = 6;
      limit = 30;
      break;
    case RANGE_1Y:
      endpoint = 'histoday';
      aggregate = 12;
      limit = 30;
      break;
    case RANGE_MAX:
      endpoint = 'histoday';
      aggregate = 200;
      limit = 2000; // maximum allowed limit
      break;
  }

  return `data/${endpoint}?fsym=${symbol}&tsym=USD&aggregate=${aggregate}&limit=${limit}`;
};

// -----------------------------------------------------------------------------
// Reducer
// -----------------------------------------------------------------------------

export default function reducer(state: State = initialState, action: Action) {
  switch (action.type) {

    case 'LOADING_CHART_PRICES': {
      return {
        ...state,
        loading: true,
      };
    }

    case 'UPDATED_CHART_PRICES': {
      const { response: { Data } } = action;
      return {
        ...state,
        loading: false,
        prices: !!Data ? Data.map(item => item.close) : [] // use closing prices
      };
    }

    case 'SELECTED_CHART_RANGE': {
      const { range } = action;
      return {
        ...state,
        range,
      };
    }

    default: {
      return state;
    }
  }
}
- Open
index.jsfile withinsrc/reduxfolder and replace its content with the following to combinechartreducer we just created withcoinsreducer.
// @flow

import { combineReducers } from 'redux';
// import reducers
import chart from './chart';
import coins from './coins';
// import types
import type { State as Chart } from './chart';
import type { State as Coins } from './coins';

export type Store = {
  +chart: Chart,
  +coins: Coins,
};

export default combineReducers({
  chart,
  coins,
});
Updating Chart container
Next, let’s make use of those actions and reducer we just created and update Chart container to use real data instead of the fake data that we currently have.
- Open
chart.jsfile withinsrc/containersfolder and replace its content with the following.
import React, { Component } from 'react';
import {
  ActivityIndicator,
  StyleSheet,
  View
} from 'react-native';
import { connect } from 'react-redux';
import { bindActionCreators } from 'redux';
import { updateChartPrices } from '../redux/chart';
import Line from '../components/chart/line';

@connect(
  (state) => {
    const {
      coins: {
        current: symbol,
      },
      chart: {
        range,
        prices,
        loading,
      },
    } = state;
    return {
      symbol,
      range,
      prices,
      loading,
    };
  },
  (dispatch) => bindActionCreators({ updateChartPrices }, dispatch)
)
export default class Chart extends Component {

  state = {
    viewHeight: 0,
    prices: [],
  };

  componentWillMount() {
    this.props.updateChartPrices();
  }

  componentWillReceiveProps(nextProps) {
    // Update chart data if current symbol or range were changed
    if (nextProps.symbol !== this.props.symbol
      || nextProps.range !== this.props.range) {
      this.props.updateChartPrices();
    }
    this.setState({ prices: nextProps.prices });
  }

  render() {
    const {
      loading,
      prices,
    } = this.props;

    return (
      <View style={styles.container}>
        {loading && <View pointerEvents="box-none" style={styles.loading}>
          <ActivityIndicator size="large" />
        </View>}
        {prices.length > 0 && <Line
          values={this.state.prices}
        />}
      </View>
    );
  }

}

const styles = StyleSheet.create({
  container: {
    flex: 38, // take 38% of the screen height
    backgroundColor: '#FFFFFF',
  },
  loading: {
    ...StyleSheet.absoluteFillObject, // overlay the chart
    alignItems: 'center',             // center horizontally
    justifyContent: 'center',         // center vertically
    zIndex: 1,                        // show in front of the chart
  },
});
Checking out the progress
Let’s pull up the simulator to see how the chart is being updated with real historical prices when we switch between different coins.
Adding Range component
Next, let’s build date range switcher.
- Create a new folder called
rangewithinsrc/componentsfolder.
Building presentational components
- Create a new file called
range.jswithinsrc/components/rangefolder.
// @flow

import React, { Component } from 'react';
import {
  StyleSheet,
  Text,
  TouchableOpacity,
} from 'react-native';

export default class Range extends Component {

  props: {
    name: string,
    active: boolean,
    onPress: (range: string) => void,
  };

  onPress = () => {
    const {
      name,
      onPress
    } = this.props;
    onPress(name);
  };

  render() {
    const {
      name,
      active,
    } = this.props;
    return (
      <TouchableOpacity style={styles.container} onPress={this.onPress}>
        <Text style={[styles.text, active ? styles.active : {}]}>{name}</Text>
      </TouchableOpacity>
    );
  }

}

const styles = StyleSheet.create({
  container: {
    padding: 15,
  },
  text: {
    color: 'rgba(255,255,255,0.5)',
    fontFamily: 'Avenir',
    fontSize: 12,
  },
  active: {
    color: '#FFFFFF',
  },
});
- Create a new file called
switcher.jswithinsrc/components/rangefolder.
import React, { Component } from 'react';
import {
  StyleSheet,
  View
} from 'react-native';
import Range from './range';

export default class Switcher extends Component {

  render() {
    const {
      ranges,
      current,
      onSelectRange,
    } = this.props;
    return (
      <View style={styles.container}>
        {ranges.map((name, index) =>
          <Range
            name={name}
            active={current === name}
            onPress={onSelectRange}
            key={index}
          />)}
      </View>
    );
  }

}

const styles = StyleSheet.create({
  container: {
    flexDirection: 'row',
    justifyContent: 'space-between',
  },
});
Updating Ranges container
Now, let’s update Ranges container.
- Open
ranges.jsfile withinsrc/containersfolder and replace its content with the following.
import React, { Component } from 'react';
import {
  StyleSheet,
  View
} from 'react-native';

import { connect } from 'react-redux';
import { bindActionCreators } from 'redux';
import { selectRange } from '../redux/chart';
import Switcher from '../components/range/switcher';
import { RANGES } from '../redux/chart';

@connect(
  (state) => {
    const {
      chart: {
        range,
      },
    } = state;
    return {
      range,
    };
  },
  (dispatch) => bindActionCreators({ selectRange }, dispatch)
)
export default class Ranges extends Component {

  render() {
    const {
      range,
      selectRange,
    } = this.props;
    return (
      <View style={styles.container}>
        <Switcher
          ranges={RANGES}
          current={range}
          onSelectRange={selectRange}
        />
      </View>
    );
  }

}

const styles = StyleSheet.create({
  container: {
    backgroundColor: '#673AB7',
  },
});
Checking out the progress
Let’s pull up the simulator to see how the chart is being updated when we switch between different date ranges.
Adding new coins
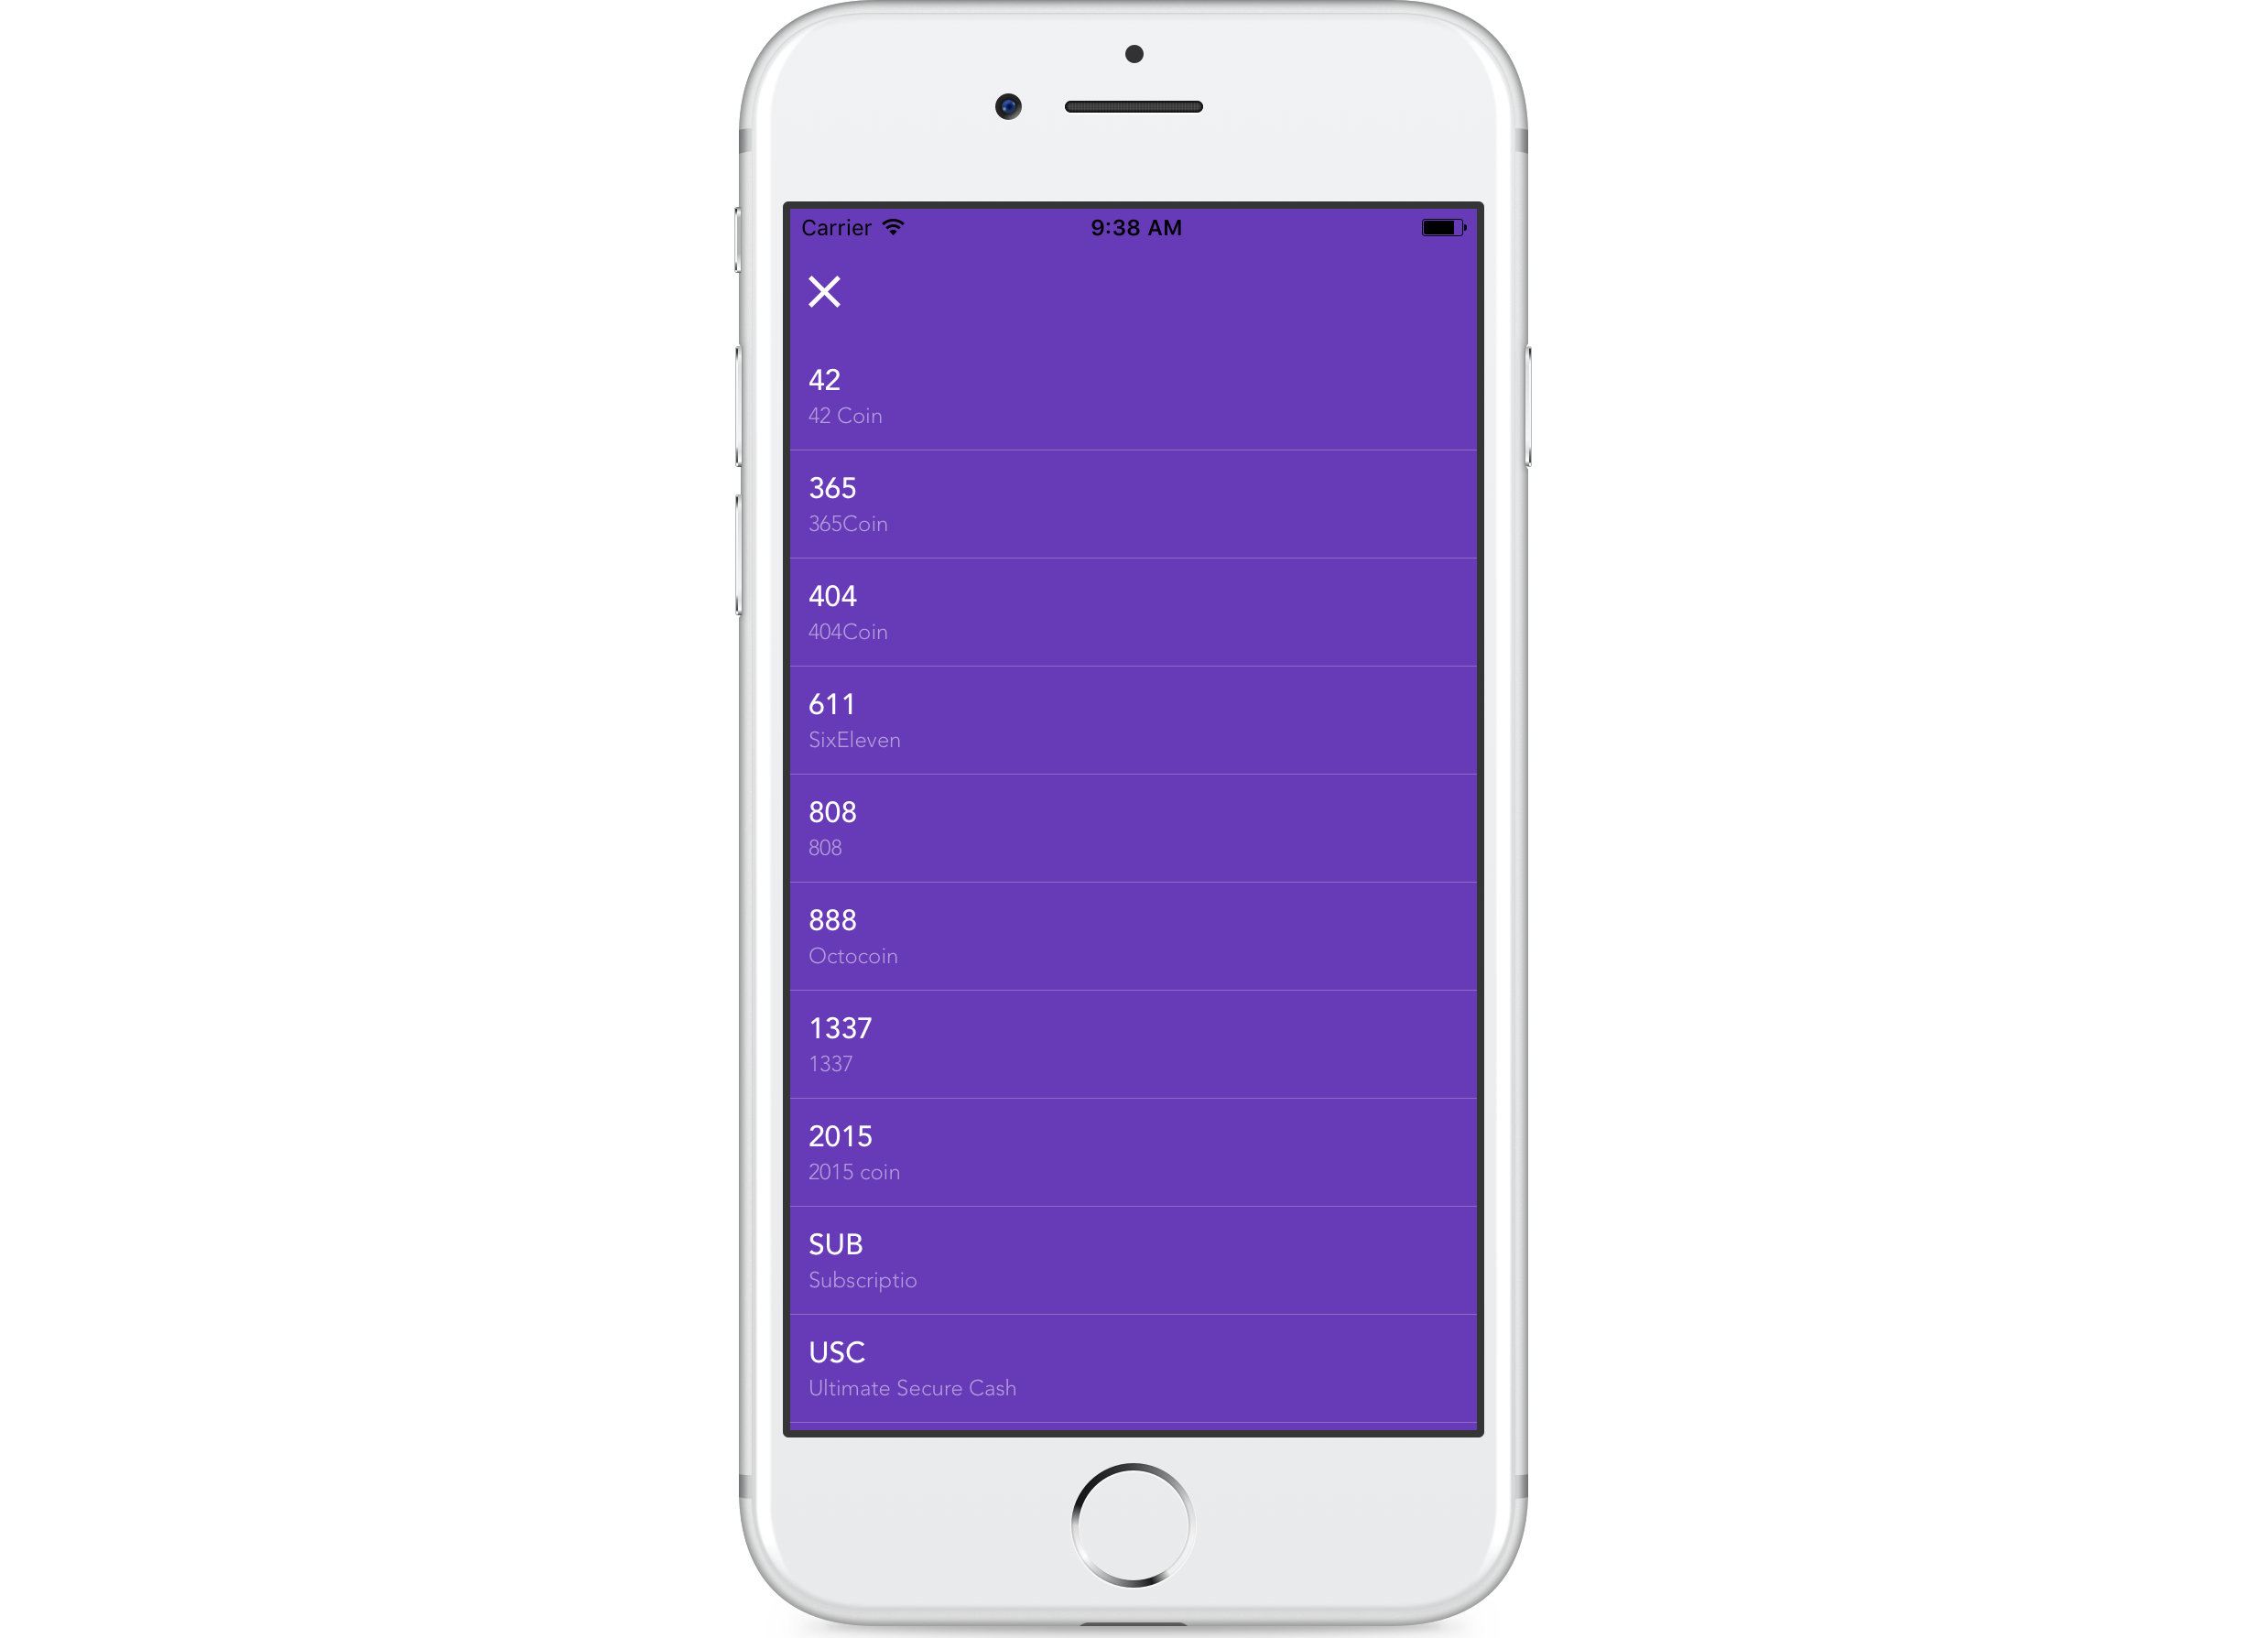
Next, we want to add a button at the bottom of the list, which when pressed opens a modal screen with a list of all coins available for adding to the main list. The list will look somewhat like this.
First of all, we’re going to need to add a new dependency to implement navigation between different screens. We haven’t though of this before, which is fine. You can’t plan everything 100% in advance.
- Install react-navigation by executing in terminal:
npm install --save react-navigation
We’re going to reorganize the app a little bit since there’s going to be two screens: list for the current screen with the chart and list, and add for the new screen with a list of all available coins.
- Create a new folder called
screenswithinsrcfolder.
Adding List screen
Now, we’re going to move most of app.js into a new file called list.js within src/screens folder. Except for <Provider /> since we want both screens to have access to Redux store.
- Create a new file called
list.jswithinsrc/screensfolder.
// @flow

import React, { Component } from 'react';
import {
  StyleSheet,
  View
} from 'react-native';
import Chart from '../containers/chart';
import Ranges from '../containers/ranges';
import List from '../containers/list';
import type { Navigation } from '../app';

export default class extends Component {

  props: {
    navigation: Navigation,
  };

  onAddCoin = () => {
    const { navigation } = this.props;
    navigation.navigate('add');
  };

  render() {
    return (
      <View style={styles.container}>
        <Chart />
        <Ranges />
        <List onAddCoin={this.onAddCoin} />
      </View>
    );
  }

}

const styles = StyleSheet.create({
  container: {
    flex: 1,        // take up the whole screen
    paddingTop: 20, // put content below status bar
    backgroundColor: 'white',
  },
});
The main difference here is navigation prop which is an object that being passed to every screen by react-navigation. It has navigate(screen: string) and goBack() functions that we’re going to use. navigate changes the current screen to the one that you pass as a parameter and goBack goes back to the previous screen.
Adding Add Coin screen
Next, let’s add a screen that will be showing a list of all available coins. We don’t have a list container set up yet, so we’ll just leave a todo note inside render() to add it later.
- Create a new file called
add.jswithinsrc/screensfolder.
// @flow

import React, { Component } from 'react';
import {
  StyleSheet,
  TouchableOpacity,
  View,
} from 'react-native';
import Icon from 'react-native-vector-icons/Ionicons';
import type { Navigation } from '../app';

export default class extends Component {

  props: {
    navigation: Navigation,
  };

  onClose = () => {
    const { navigation } = this.props;
    navigation.goBack();
  };

  render() {
    return (
      <View style={styles.container}>
        <TouchableOpacity style={styles.button} onPress={this.onClose}>
          <Icon
            name="md-close"
            size={30}
            color="#FFFFFF"
          />
        </TouchableOpacity>
        {/* TODO: Add list here */}
      </View>
    );
  }

}

const styles = StyleSheet.create({
  container: {
    flex: 1,
    paddingTop: 20, // put content below status bar
    // backgroundColor: 'white',
    backgroundColor: '#673AB7',
  },
  button: {
    margin: 10,
  },
});
Updating app.js
And finally, let’s update app.js to set up navigation between the two screens that we just added.
- Open
app.jsfile withinsrcfolder and replace its content with the following.
import React, { Component } from 'react';
import { createStore, applyMiddleware } from 'redux';
import { Provider } from 'react-redux';
import { composeWithDevTools } from 'redux-devtools-extension';
import thunk from 'redux-thunk';
import reducer from './redux';
import List from './screens/list';
import Add from './screens/add';
import { StackNavigator } from 'react-navigation';

// Type navigation object that's being passed to every screen by react-navigation
export type Navigation = {
  navigate: (screen: string, params?: Object) => void,
  goBack: () => void,
  state: {
    routeName: string,
    params?: Object,
  }
};

const store = createStore(
  reducer,
  composeWithDevTools(applyMiddleware(thunk)),
);

// Configure navigation
const Screens = StackNavigator({
  list: { screen: List }, // list with the chart
  add: { screen: Add },   // add new coin screen
}, {
  mode: 'modal',      // Add screen slides up from the bottom
  headerMode: 'none', // disable headers
});

export default class App extends Component {
  render() {
    return (
      <Provider store={store}>
        <Screens />
      </Provider>
    );
  }
}
Now, let’s add that button and make it go to the modal screen.
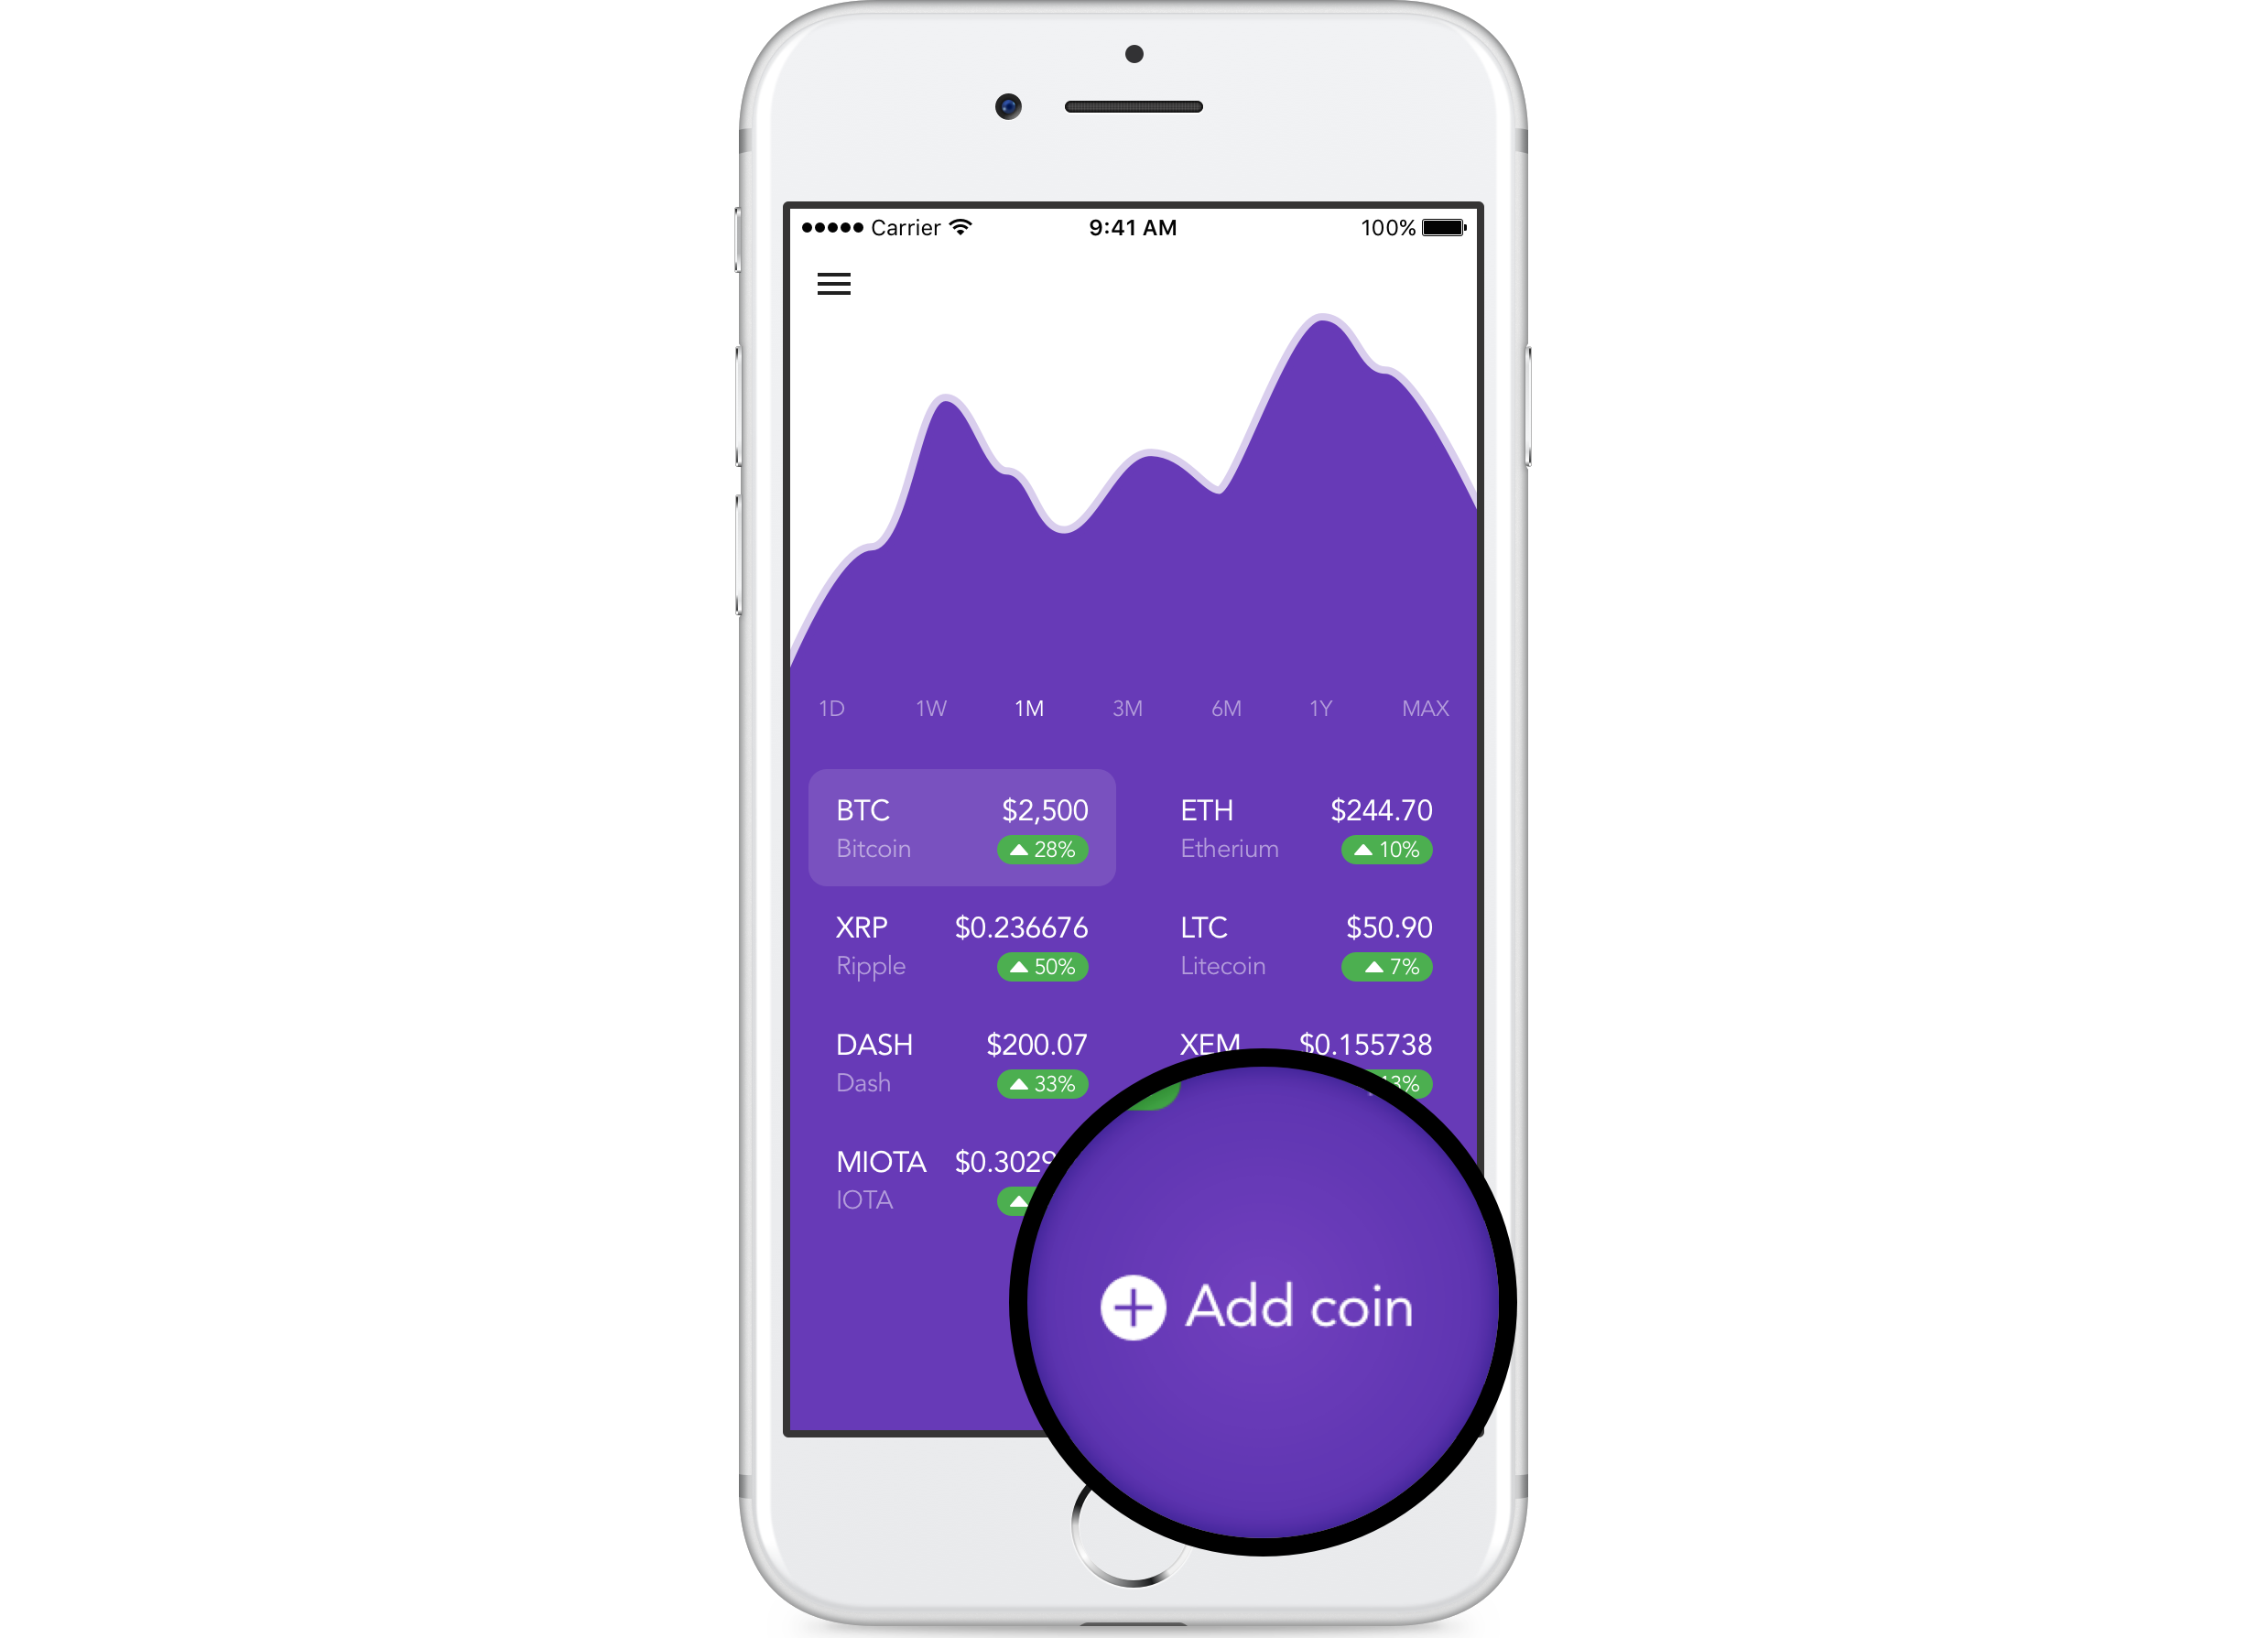
Creating presentational component
First, let’s create a presentational component that renders the button itself.
- Create a new file called
add.jswithinsrc/components/coinfolder.
// @flow

import React, { Component } from 'react';
import {
  Dimensions,
  StyleSheet,
  Text,
  TouchableOpacity,
  View,
} from 'react-native';
import Icon from 'react-native-vector-icons/Ionicons';

// Get screen width
const { width } = Dimensions.get('window');

export default class Add extends Component {

  props: {
    onPress: () => void,
  };

  render() {
    const { onPress } = this.props;
    return (
      <View style={styles.container}>
        <TouchableOpacity style={styles.button} onPress={onPress}>
          <Icon name={'md-add-circle'} style={styles.icon} />
          <Text>{' '}</Text>
          <Text style={styles.text}>Add coin</Text>
        </TouchableOpacity>
      </View>
    );
  }

}

const styles = StyleSheet.create({
  container: {
    alignItems: 'center', // center horizontally
    width: width,         // take the screen width
    marginTop: 15,
  },
  button: {
    flexDirection: 'row', // arrange icon and text in a row
    alignItems: 'center', // center vertically
    padding: 15,
  },
  icon: {
    fontSize: 24,
    color: '#FFFFFF',
  },
  text: {
    color: '#FFFFFF',
    fontFamily: 'Avenir',
    fontSize: 16,
  },
});
Updating List container
Next, let’s update List container and add the button we created in the previous step.
- Open
list.jsfile withinsrc/containersfolder to make a few changes. - Import
Addbutton component we created in the previous step.
// ... existing imports
import Add from '../components/coin/add';
- Pull
onAddCointhat we’re passing to the container fromListscreen out ofthis.props.
  // ...
  render() {
    const {
      current,
      list,
      loading,
      selectCoin,
      updatePrices,
      onAddCoin, // add this
    } = this.props;
  // ...
- Add
<Add onPress={onAddCoin} />JSX before closing</ScrollView>to render the button.
		      // ...
		  })}
          <Add onPress={onAddCoin} /> // add this
        </ScrollView>
        // ....
Let’s pull up the simulator and check out our modal. It looks like the navigation is working. The next step is to add that list of all available coins.
Adding Redux action
Let’s modify coins Redux config a little bit to allow adding new coins to the list.
- Open
coins.jsfile withinsrc/reduxfolder to make a few changes. - Add new action type
ADDED_COIN.
// ...

type Action =
  | { type: 'LOADING_PRICES' }
  | { type: 'SELECTED_COIN', symbol: string }
  | { type: 'ADDED_COIN', symbol: string, name: string } // add this
  | { type: 'UPDATED_24H_AGO_PRICE', symbol: string, price: number }
  | { type: 'UPDATED_PRICES',
      response: {
        [symbol: string]: {
          ['USD' | 'EUR' | 'BTC']: number
        }
      }
    };

// ...
- Add new action called
addCoinbefore existingselectCoinaction.
// ...

// Add a coin
export const addCoin = (symbol: string, name: string): ThunkAction => async dispatch => {
  dispatch({
    type: 'ADDED_COIN',
    symbol,
    name,
  });
  dispatch(updatePrices());
};

// ...
- Add new reducer handler for
ADDED_COINaction type beforeSELECTED_COINinsidereducer()function.
    // ...

    // Add new coin
    case 'ADDED_COIN': {
      const { symbol, name } = action;

      // Coin is already in the list
      if (state.list.find(coin => coin.symbol === symbol)) {
        return state;
      }

      return {
        ...state,
        list: [
          ...state.list,
          { symbol, name },
        ],
      };
    }

    // ...
Adding Row component
Before starting with the container, let’s build a presentational component that renders each row in the list.
This is a pretty strait-forward component that shows coin symbol and name, and calls onPress function passing coin symbol and name as arguments. We’re going to pass this function from Add container that we’ll build in the next step.
- Create a new file called
row.jswithinsrc/components/coinfolder.
// @flow

import React, { Component } from 'react';
import {
  StyleSheet,
  Text,
  TouchableHighlight,
  View
} from 'react-native';

export default class Row extends Component {

  props: {
    symbol: string,
    name: string,
    onPress: Function,
  };

  onPress = () => {
    const {
      symbol,
      name,
      onPress,
    } = this.props;
    onPress(symbol, name);
  };

  render() {
    const {
      symbol,
      name,
    } = this.props;
    return (
      <TouchableHighlight
        onPress={this.onPress}
        underlayColor="#7E57C2"
        style={styles.container}
      >
        <View>
          <Text style={styles.text} numberOfLines={1}>
            {symbol}
          </Text>
          <Text style={[styles.text, styles.name]} numberOfLines={1}>
            {name}
          </Text>
        </View>
      </TouchableHighlight>
    );
  }

}

const styles = StyleSheet.create({
  container: {
    flex: 1,
    borderBottomColor: 'rgba(255,255,255,0.25)',
    borderBottomWidth: StyleSheet.hairlineWidth,
    padding: 10,
  },
  text: {
    color: '#FFFFFF',
    fontFamily: 'Avenir',
    fontSize: 16,
    fontWeight: '500',
  },
  name: {
    color: 'rgba(255,255,255,0.5)',
    fontSize: 12,
    fontWeight: '300',
  },
});
Building Add container
Almost there! The last thing we need to build is the container that queries the API to get the list of all available coins and renders those as a list using Row component we added in the previous step.
- Create a new file called
add.jswithinsrc/containersfolder.
// @flow

import React, { Component } from 'react';
import {
  ListView,
  RefreshControl
} from 'react-native';
import { connect } from 'react-redux';
import { bindActionCreators } from 'redux';
import { addCoin } from '../redux/coins';
import Row from '../components/coin/row';

// Type API response shape
type Response = {
  Data: {
    [symbol: string]: {
      CoinName: string,
      Name: string,
    },
  },
};

// Type coin object
type Coin = {
  symbol: string,
  name: string,
};

@connect(
  (state) => ({}),
  (dispatch) => bindActionCreators({ addCoin }, dispatch)
)
export default class Add extends Component {

  props: {
    onAddedCoin: () => void,
  };

  state = {
    // Used to show activity indicator when the data is being loaded
    loading: true,
    // Holds the data for ListView
    dataSource: new ListView.DataSource({ rowHasChanged: (r1, r2) => r1 !== r2 })
  };

  // Load list data when component is about to get mounted
  componentWillMount() {
    this.loadListData();
  };

  // Load the data, transform it, and update the list
  loadListData = async () => {
    const response = await this.fetchCoinList();
    const coins = this.transformAPIResponse(response);
    this.updateDataSource(coins);
  };

  // Query API and return raw response
  fetchCoinList = async (): Promise<Response> => {
    const response = await fetch('https://www.cryptocompare.com/api/data/coinlist');
    return response.json();
  };

  // Transform API response into Array<{ symbol, name }> format
  transformAPIResponse = (response: Response): Array<Coin> => {
    const coins = response.Data;
    return Object.keys(coins).map(symbol => ({
      symbol: coins[symbol].Name,
      name: coins[symbol].CoinName,
    }));
  };

  // Update the state with coin data
  updateDataSource(coins: Array<Coin>) {
    this.setState({
      dataSource: this.state.dataSource.cloneWithRows(coins),
      loading: false,
    });
  }

  // Render each row using Row component
  renderRow = (coin: Coin) => {
    const { symbol, name } = coin;
    return <Row
      symbol={symbol}
      name={name}
      onPress={this.onAddCoin}
    />
  };

  // Handle row presses
  onAddCoin = (symbol: string, name: string) => {
    const { addCoin, onAddedCoin } = this.props;
    addCoin(symbol, name); // redux action
    onAddedCoin(); // closes the modal
  };

  render() {
    const { loading } = this.state;
    return (
      <ListView
        dataSource={this.state.dataSource}
        renderRow={this.renderRow}
        refreshControl={
          <RefreshControl
            refreshing={loading}
            onRefresh={this.loadListData}
            tintColor="#FFFFFF"
          />
        }
      />
    );
  }

}
Updating Add Coin screen
- Open
add.jsfile withinsrc/screensfolder to make a couple of changes. - Import
Addcontainer that we created in the previous step.
// ... existing imports
import Add from '../containers/add';
- Replace todo note that we left earlier inside
render()with<Add onAddedCoin={this.onClose} />
// ...
        </TouchableOpacity>
        <Add onAddedCoin={this.onClose} /> // add this instead of todo
// ...
Checking out the result
Let’s pull up the simulator to see how it all works together. When you tap on a coin in the list, it’s getting added to the main list, and the prices are being updated.
Wrapping up
And that’s it for the series. I hope you’ve enjoyed the process and have learned a lot! Don’t forget to subscribe to get notified about new tutorials. And if you have any questions or ideas for new tutorials, just leave a comment below the post.