We’ll be building an app that shows a list of pets available for adoption in US with details about each one. To get that list we’ll use petfinder.com API. Let’s jump right into it.
If you don’t have any experience with React Native please refer to a blog post 3 Steps to Build Your First Mobile App with React Native which explains React Native basics and how to set up all of the required software
Table of contents
Checkout Source Code
I highly recommend you to read the whole tutorial before to get better understanding of how things work. But if you want to you can get the full source code for this tutorial by launching Terminal App and running this command
git clone --branch part-1 https://github.com/rationalappdev/adopt-me.git
If you want to launch the app, open downloaded folder
cd adopt-me
Install react-native and required npm modules
npm install
And launch it
react-native run-ios
If you don’t have git installed, run
brew install gitin terminal
Create New Project
Run these commands in Terminal App and keep it open. We’re going to need to run more commands later.
react-native init AdoptMe;
cd AdoptMe;
Enable Debugging
To make you programming life easier let’s enable remote debugging. This way you’ll be able to see all of the errors and what caused them in Chrome console log. Let’s launch our app first.
react-native run-ios;
And once it’s launched press ⌘D and select Debug JS Remotely
Enable HTTP Requests to API
By default all http requests to remote hosts are disabled for security reasons. But, since Petfinder doesn’t support https for images, we’re going to need to enable http request to photos.petfinder.com domain. Otherwise none of the images won’t show up.
Open ios/AdoptMe/Info.plist file and find these lines
<dict>
	<key>localhost</key>
	<dict>
		<key>NSTemporaryExceptionAllowsInsecureHTTPLoads</key>
		<true/>
	</dict>
You can see that localhost, which is you computer, is an exception, and http request are allowed for localhost. Add the following right after those lines to enable http requests to photos.petfinder.com
       <dict>
		<key>NSTemporaryExceptionAllowsInsecureHTTPLoads</key>
		<true/>
	</dict>
Install Modules
Run this in terminal to install Lodash library. This library will help you to work with API data.
npm install lodash --save;
There are tons of different modules available through
npmhttps://www.npmjs.com/browse/star
List Component
Create new file called App.js with the following code. That would be our app main screen with a list of pets.
'use strict';

import React, { Component } from 'react';
import {
  ActivityIndicator,
  ListView,
  Platform,
  StyleSheet,
  Text,
  View
} from 'react-native';
import _ from 'lodash';
import PetCell from './PetCell';

const API_KEY = 'cb55e117215c6eb73506d7164b0a3b6d';

const convert = (obj) => {
  let result = {};
  _.map(obj, (item, key) => {
    let value;
    if (typeof (item) === 'object') {
      if (item.$t) { value = item.$t; }
      else { value = convert(item); }
    }
    else { value = item; }
    result[key] = value;
  });
  return result;
};

let resultsCache = [];

export default class App extends Component {

  state = {
    isLoading: false,
    isLoadingTail: false,
    lastOffset: 0,
    dataSource: new ListView.DataSource({
      rowHasChanged: (row1, row2) => row1 !== row2,
    }),
  };

  componentDidMount() {
    this.fetchPets();
  }

  fetchPets = () => {

    const offset = this.state.lastOffset,
      URL = `https://api.petfinder.com/pet.find?location=US&format=json&offset=${offset}&key=${API_KEY}`;

    if (_.isEmpty(resultsCache)) {
      this.setState({isLoading: true});
    }

    fetch(URL)
      .then((response) => response.json())
      .catch((error) => {
        this.setState({
          dataSource: this.getDataSource([]),
          isLoading: false,
        });
      })
      .then((data) => {
        resultsCache = _.concat(resultsCache, _.toArray(convert(data.petfinder.pets.pet)));
        this.setState({
          isLoading: false,
          isLoadingTail: false,
          lastOffset: data.petfinder.lastOffset.$t,
          dataSource: this.getDataSource(resultsCache),
        });
      })
      .done();
  }

  getDataSource = (pets: Array<any>): ListView.DataSource => {
    return this.state.dataSource.cloneWithRows(pets);
  }

  onEndReached = () => {
    // We're already fetching
    if (this.state.isLoadingTail) {
      return;
    }
    this.setState({
      isLoadingTail: true,
    });
    this.fetchPets();
  }

  renderRow = (
    pet: Object,
    sectionID: number | string,
    rowID: number | string,
    highlightRowFunc: (sectionID: ?number | string, rowID: ?number | string) => void
  ) => {
    return (
      <PetCell
        key={pet.id}
        onHighlight={() => highlightRowFunc(sectionID, rowID)}
        onUnhighlight={() => highlightRowFunc(null, null)}
        pet={pet}
      />
    );
  }

  renderFooter = () => {
    if (!this.state.isLoadingTail) {
      return <View style={styles.scrollSpinner} />;
    }

    return <ActivityIndicator style={styles.scrollSpinner} />;
  }

  render() {
    const { isLoading } = this.state;
    return (
      <View style={styles.container}>
        {isLoading
          ? <View style={styles.loading}><Text>Loading...</Text></View>
          : <ListView
            dataSource={this.state.dataSource}
            renderFooter={this.renderFooter}
            renderRow={this.renderRow}
            onEndReached={this.onEndReached}
            automaticallyAdjustContentInsets={false}
            keyboardDismissMode="on-drag"
            keyboardShouldPersistTaps={true}
            showsVerticalScrollIndicator={false}
          />
        }
      </View>
    );
  }

}

const styles = StyleSheet.create({
  container: {
    marginTop: Platform.OS === 'ios' ? 64 : 0,
    flex: 1,
    backgroundColor: 'white',
  },
  loading: {
    flex: 1,
    alignItems: 'center',
    justifyContent: 'center',
  },
  scrollSpinner: {
    marginVertical: 20,
  },
});
Let’s walk through this code to see what are we doing in detail.
Import components
First of all, we import all of the modules including React, React Native, our own, and 3rd party npm modules and components that we’re going to use in App.js files.
import React, { Component } from 'react';
import {
  ActivityIndicator,
  ListView,
  Platform,
  StyleSheet,
  Text,
  View
} from 'react-native';
import _ from 'lodash';
import PetCell from './PetCell';
We import React and Component components from react modules to create our own App component, which we can export and import on other files.
Next we import ActivityIndicator, ListView, Platform, StyleSheet, Text and View components from react-native module. Let’s see what each of these components does.
ActivityIndicatorshows animated loading indicator when scroll to the bottom of the list and fetching more data from the API.ListViewrenders a list of pets. Each row of a list is rendered by a separate componentPetCell.Platformdetects on what platform, either iOS or Android, our app is running.StyleSheetallows us to style our components, set different colors, background, sizes etc.Textrenders any kind of text.Viewis a building block for any app. You can have nested components insideViewcomponents. You can position other components on the screen usingView. For example, you can haveViewcomponent to take the whole screen and then addTextcomponent and center it vertically and horizontally insideView. Or you can have twoViewcomponents to take equal amount of space on the screen to divide it into two sections and then position components inside eachViewrelatively to them.
Then we import Lodash, which is a 3rd party module, that will help us to work with arrays of API data to convert it to format that our components understand.
And last, but not least we import PetCell component, which would render each row in ListView component. We’ll create PetCell.js file for this component later.
Constants and functions
Next we define API_KEY constant, which is an API key to get access to pet finder.com API.
const API_KEY = 'cb55e117215c6eb73506d7164b0a3b6d';
You can define two types or variables in JavaScript,
constfor immutable variables, which values are predefined once and can not be changed later andletorvarfor mutable ones, which values you can change as you go.
Next, we define a recursive function that would help us to convert the data we get from the API to a simple array of objects that we can use for our ListView.
const convert = (obj) => {
  let result = {};
  _.map(obj, (item, key) => {
    let value;
    if (typeof (item) === 'object') {
      if (item.$t) { value = item.$t; }
      else { value = convert(item); }
    }
    else { value = item; }
    result[key] = value;
  });
  return result;
};
If you’re wondering what’s going on in this function I encourage you to use
console.log()function which outputs whatever you pass to it to Chrome’s console. To open console in Chrome click View menu, then Developer and JavaScript Console or just press ⌥⌘J.So, you can and
console.log(obj);insideconvertfunction to see what data we passed to the function and, before returning the result of the function, addconsole.log(result);to see what our function did to the data.
We also define an empty array to store the data from the API. Once user scrolls to the bottom of the list we want to keep the existing data in the array and append more data once we fetch it.
let resultsCache = [];
Once we pass the data fetched from API to convert function it’ll return an array of data objects which we’ll use later to build the list.
[
  {
    "status": "A",
    "contact": {
      "phone": "8705773744",
      "state": "NH",
      "address2": {},
      "email": "[email protected]",
      "city": "Portsmouth",
      "zip": "03801",
    },
    "age": "Adult",
    "size": "L",
    "media": {
      "photos": {
        "photo": {
          "0": "http://photos.petfinder.com/photos/pets/36205030/1/?bust=1473690660&width=60&-pnt.jpg",
          "1": "http://photos.petfinder.com/photos/pets/36205030/1/?bust=1473690660&width=95&-fpm.jpg",
          ...
        }
      }
    },
    "id": "36205030",
    "breeds": {
      "breed": {
        "0": "Boxer",
        "1": "Husky"
      }
    },
    "name": "Moxie",
    "sex": "F",
    "description": "Meet Moxie!  She is a wonderful girl...",
    "mix": "yes",
    "shelterId": "AR316",
    "lastUpdate": "2016-09-12T14:31:02Z",
    "animal": "Dog"
  },
  {
    "status": "A",
    "contact": {
      "phone": "8705773744",
      "state": "NH",
      "address2": {},
      "email": "[email protected]",
      "city": "Portsmouth",
      "zip": "03801",
    },
    "age": "Adult",
    "size": "S",
    "media": {
      "photos": {
        "photo": {
          "0": "http://photos.petfinder.com/photos/pets/36255743/1/?bust=1474137330&width=60&-pnt.jpg",
          "1": "http://photos.petfinder.com/photos/pets/36255743/1/?bust=1474137330&width=95&-fpm.jpg",
          ...
        }
      }
    },
    "id": "36255743",
    "breeds": {
      "breed": "Chihuahua"
    },
    "name": "Lorenzo",
    "sex": "M",
    "description": "Meet Lorenzo! He is looking for a wonderful home...",
    "mix": "yes",
    "shelterId": "AR316",
    "lastUpdate": "2016-09-17T18:35:31Z",
    "animal": "Dog"
  },
  ...
]
Component class
It’s time to define our main App component
export default class App extends Component {

}
For now it’s just an empty class called App which does nothing, but exports itself, so other component can import and use it.
Every component in React required to have at least one method render(), which renders the component. In our case it would render a list of pets. Component can also have as many other methods and properties as you want, but usually you would want to keep you components short for better readability and break them down into smaller components once they get too big.
So, let’s go ahead and start developing our component by adding code in our component between curly braces { }.
State
First, we define component state
state = {
    isLoading: false,
    isLoadingTail: false,
    lastOffset: 0,
    dataSource: new ListView.DataSource({
      rowHasChanged: (row1, row2) => row1 !== row2,
    }),
  };
State is where our component stores the data that changes over time. We have four values in the state
isLoadingis a boolean value, true or false, which set to true when we’re loading data from the API.isLoadingTailis set to true when we already have some data fetched from the API and loading more.lastOffsetin as integer value to store number of already fetched items and pass it to the API when we need more data, so it would return the data, that we already have.dataSourceis an instance ofDataSourceto hold the data forListViewcomponent.
And the best part about state is when you change any of values in the state, your component gets re-rendered automatically. Let’s say we fetched more data and updated the state, then
ListViewwould add more rows with fetched data to the list automatically. Isn’t that great?
Data fetching
Next, we want to fetch data from the API once component loaded
componentDidMount() {
    this.fetchPets();
  }
We added this.fetchPets() into componentDidMount() method, which gets executed when component is mounted. fetchPets() is another method of our component, which would actually fetch the data, and we define it next.
When you want to execute a method within a component you would reference it as
this.method(), wherethisis a reference to the component itself. So you can access all of its methods, properties and state inside a component throughthis.
Each
React Nativecomponent has a few methods available, which get executed during different stages of its lifecycle. Those methods are:componentWillMount,componentDidMount,componentWillReceiveProps,shouldComponentUpdate,componentWillUpdate,componentDidUpdate,componentWillUnmount.
Here comes fetchPets method
fetchPets = () => {

    const offset = this.state.lastOffset,
      URL = `https://api.petfinder.com/pet.find?location=US&format=json&offset=${offset}&key=${API_KEY}`;
So far we defined offset and URL constants. We just took offset value from the state. And then we added offset and API_KEY to URL, which we’ll use later to fetch the data.
You can access state values through
this.state.NAME, whereNAMEis variable name. To set our update state values you should usethis.setState({ NAME: VALUE }), whereVALUEis new value.
if (_.isEmpty(resultsCache)) {
      this.setState({isLoading: true});
    }
Then we use _.isEmpty function from lodash module to check if it is empty, which means that we haven’t fetched any data yet. In this case we want to set isLoading in the state to true, which would let the component know that it supposed to show loading screen. We’ll get to that later.
There are plenty of very helpful functions in Lodash library. I encourage you to check out its documentation
fetch(URL)
      .then((response) => response.json())
      .catch((error) => {
        this.setState({
          dataSource: this.getDataSource([]),
          isLoading: false,
        });
      })
      .then((data) => {
        resultsCache = _.concat(resultsCache, _.toArray(convert(data.petfinder.pets.pet)));
        this.setState({
          isLoading: false,
          isLoadingTail: false,
          lastOffset: data.petfinder.lastOffset.$t,
          dataSource: this.getDataSource(resultsCache),
        });
      })
      .done();
  }
And finally, we pass URL to fetch function and convert API response to json format with .then((response) => response.json()).
jsonis an open standard format that uses human-readable text to transmit data objects consisting of attribute–value pairs. It is used primarily to transmit data between a server and web application.JSON, Wikipedia
If there was an error .catch((error) => { ... } block gets executed, where we pass an empty array to dataSource in the state and set isLoading to false.
If requests went well .then((data) => { ... } gets executed. We convert fetched data using _.toArray from lodash and convert function, that we defined before, concatenate converted data with resultsCache array, and update the state. To update dataSource in the state we use another method of our component this.getDataSource(resultsCache) which we’ll define next.
That’s all for fetchPets method, so let’s move on.
Helper methods
Let’s define getDataSource method, which takes in an array of pets as an argument and returns an instance of ListView.DataSource after concatenating new and existing data.
getDataSource = (pets: Array<any>): ListView.DataSource => {
    return this.state.dataSource.cloneWithRows(pets);
  }
And onEndReached method gets executed once the end of the list reached. It sets isLoadingTail in the state to true, and calls this.fetchPets() to fetch more data if this.state.isLoadingTail is not true, to avoid multiple calls simultaneously.
onEndReached = () => {
    // We're already fetching
    if (this.state.isLoadingTail) {
      return;
    }
    this.setState({
      isLoadingTail: true,
    });
    this.fetchPets();
  }
Rendering methods
Let’s define a few methods that would be in charge of rendering our component.
First one renderRow renders each row in ListView component.
renderRow = (
    pet: Object,
    sectionID: number | string,
    rowID: number | string,
    highlightRowFunc: (sectionID: ?number | string, rowID: ?number | string) => void
  ) => {
    return (
      <PetCell
        key={pet.id}
        onHighlight={() => highlightRowFunc(sectionID, rowID)}
        onUnhighlight={() => highlightRowFunc(null, null)}
        pet={pet}
      />
    );
  }
We’re going to pass this method to ListView component to handle rows rendering. It takes in a few arguments passed by ListView component and returns PetCell component, which does the rendering. We’ll define PetCell component later. For now, we just pass an uniq pet.id as key prop, onHighlight and onUnhighlight props to handle animation when user clicks a row, and a data object with pet details to pet prop to PetCell component.
Whenever you want to render any component you have to use JSX tags. That means you just put your component name in angle brackets like so
<Component />. You can also pass any number of properties (or props) to a components<Component prop={value} anotherProp="string value" />. And you can render other components inside a component as such<Component><AnotherComponent /></Component>
Next, let’s define renderFooter method.
renderFooter = () => {
    if (!this.state.isLoadingTail) {
      return <View style={styles.scrollSpinner} />;
    }

    return <ActivityIndicator style={styles.scrollSpinner} />;
  }
We’re going to pass this method to ListView component to handle footer rendering. All it does it just checks if this.state.isLoadingTail is true and renders ActivityIndicator if so. So, whenever we’re loading more data from API it would render that spinning activity indicator.
And finally, let’s define main render method, which would put it all together and render ListView component.
render() {
    const { isLoading } = this.state;
    return (
      <View style={styles.container}>
        {isLoading
          ? <View style={styles.loading}><Text>Loading...</Text></View>
          : <ListView
            dataSource={this.state.dataSource}
            renderFooter={this.renderFooter}
            renderRow={this.renderRow}
            onEndReached={this.onEndReached}
            automaticallyAdjustContentInsets={false}
            keyboardDismissMode="on-drag"
            keyboardShouldPersistTaps={true}
            showsVerticalScrollIndicator={false}
          />
        }
      </View>
    );
  }
First, we define const { isLoading } = this.state; to get isLoading out of the state.
You can still use
this.state.isLoading, but if you re-using values from the state, it makes sense to assign those values to constants to make your code shorter. So, if you define constants like soconst { var1, var2 } = this.stateyou can usevar1andvar2in your code, instead ofthis.state.var1orthis.state.var2.
Then we return <View style={styles.container}> with applied styles, which we’ll define later.
And inside View we check whether isLoading is true or false. If it is true we return <View style={styles.loading}><Text>Loading...</Text></View>, which would show blank screen with Loading… text in the center while data is being fetched, or <ListView ... />, which would render the list once we get the data.
{isLoading
  ? <View style={styles.loading}><Text>Loading...</Text></View>
  : <ListView
    ...
  />
}
In JavaScript you can use this notation
{ contidion ? true : false }to check for any conditions and execute different expressions depending on whether condition turns out to be true or false
And we pass the data this.state.dataSource and various methods that we defined earlier such as this.renderFooter, this.renderRow, and this.onEndReached as props to ListView component.
<ListView
  dataSource={this.state.dataSource}
  renderFooter={this.renderFooter}
  renderRow={this.renderRow}
  onEndReached={this.onEndReached}
  automaticallyAdjustContentInsets={false}
  keyboardDismissMode="on-drag"
  keyboardShouldPersistTaps={true}
  showsVerticalScrollIndicator={false}
/>
Styles
Lastly, let’s define our styles.
const styles = StyleSheet.create({
  container: {
    marginTop: Platform.OS === 'ios' ? 64 : 0,
    flex: 1,
    backgroundColor: 'white',
  },
  loading: {
    flex: 1,
    alignItems: 'center',
    justifyContent: 'center',
  },
  scrollSpinner: {
    marginVertical: 20,
  },
});
That’s just an object with styles that we can apply to any component. One part that might seem tricky is marginTop: Platform.OS === 'ios' ? 64 : 0,. We’re using condition ? true : false notation again. The condition Platform.OS === 'ios' returns true if platform is iOS and false if it is not. We want to add some padding to our view on iOS, because of NavigatorIOS component we’re going to use later and which adds a header with our app name on top of the screen. That header takes 64 points in height, and we don’t want our list to be overlapped by that header, that’s why we need add marginTop of 64 points to move the list a little bit down from top of the screen.
And that’s it for App.js.
Row Component
It’s time to create PetCell component, which would render each row with pet name, picture, location, etc. in the list.

Create a file called PetCell.js.
'use strict';

import React, { Component } from 'react';
import {
  Image,
  StyleSheet,
  Text,
  View
} from 'react-native';
import _ from 'lodash';
import getImage from './getImage';

export default class PetCell extends Component {

  render({ pet } = this.props) {
    const image = getImage(pet);
    return (
      <View>
        <View style={styles.row}>
          <View style={styles.imageContainer}>
            {image
              ? <Image source={image} style={styles.petImage} />
              : <View style={styles.noImage}><Text style={styles.noImageText}>No image</Text></View>
            }
          </View>
          <View style={styles.textContainer}>
            <Text style={styles.petName} numberOfLines={1}>
              {pet.name}
            </Text>
            <Text style={styles.petBreed} numberOfLines={1}>
              {pet.breeds && pet.breeds.breed
                ? (
                  _.isObject(pet.breeds.breed)
                    ? _.join(_.toArray(pet.breeds.breed), '/')
                    : pet.breeds.breed
                )
                : null
              }
            </Text>
            <Text style={styles.petDescription} numberOfLines={2}>
              {pet.description}
            </Text>
            <Text style={styles.petLocation}>
              {pet.contact.city}, {pet.contact.state}, {pet.contact.zip}
            </Text>
          </View>
        </View>
      </View>
    );
  }

}

const styles = StyleSheet.create({
  row: {
    alignItems: 'center',
    backgroundColor: 'white',
    flexDirection: 'row',
    borderStyle: 'solid',
    borderBottomColor: '#dddddd',
    borderBottomWidth: StyleSheet.hairlineWidth,
    padding: 5,
  },
  imageContainer: {
    backgroundColor: '#dddddd',
    width: 90,
    height: 90,
    marginRight: 10
  },
  textContainer: {
    flex: 1,
  },
  noImage: {
    flex: 1,
    alignItems: 'center',
    justifyContent: 'center',
  },
  noImageText: {
    color: '#aaaaaa',
  },
  petImage: {
    width: 90,
    height: 90,
  },
  petName: {
    flex: 1,
    fontSize: 16,
    fontWeight: '500',
  },
  petBreed: {
    fontSize: 13,
  },
  petDescription: {
    fontSize: 12,
    marginTop: 5,
    marginBottom: 5,
  },
  petLocation: {
    fontSize: 12,
    color: 'gray',
  },
});
Let’s see what’s going on here in detail. Fist, we import all of the components we’re going to need and getImage function, which doesn’t exist yet. We’ll create it later on.
Next, we define PetCell component class as usual with only one method render.
export default class PetCell extends Component {

  render({ pet } = this.props) {
    const image = getImage(pet);
    return (
      <View>
        <View style={styles.row}>
          ...
        </View>
      </View>
    );
  }
}
We define two constants pet, which is pet data object that we passed as a prop to our component in renderRow method of App component, and image, which is a result of executing getImage function. And return View component with applied styles, which we’ll define later.
You can access component props through
this.props.PROP-NAME. Andrender({ pet } = this.props)is just an equivalent ofconst { pet } = this.props);. We can also accesspetprop directlythis.props.pet.this.propsis an object that contains all of the props that you passed to a component. You can useconsole.log(this.props)to see what props available and what their values are.
And then we output some data from pet object.
<View style={styles.imageContainer}>
  {image
    ? <Image source={image} style={styles.petImage} />
    : <View style={styles.noImage}><Text style={styles.noImageText}>No image</Text></View>
  }
</View>
Image goest first. We wrap it into View with styles.imageContainer style to apply certain width and height. We use {image ? ... : ...} condition to check if image exists, and if it’s doesn’t then we render View with Text component that reads No image.
Then, we wrap all of the rest in another View with styles.textContainer style.
<Text style={styles.petName} numberOfLines={1}>
    {pet.name}
  </Text>
  <Text style={styles.petBreed} numberOfLines={1}>
    {pet.breeds && pet.breeds.breed
      ? (
        _.isObject(pet.breeds.breed)
          ? _.join(_.toArray(pet.breeds.breed), '/')
          : pet.breeds.breed
      )
      : null
    }
  </Text>
  <Text style={styles.petDescription} numberOfLines={2}>
    {pet.description}
  </Text>
  <Text style={styles.petLocation}>
    {pet.contact.city}, {pet.contact.state}, {pet.contact.zip}
  </Text>
</View>
And we use a bunch of Text components to output name, breeds, description and location. As you noticed we’re using {pet.name} notation to output data. That works great with simple values like strings, integers, etc. But pet.breeds.breed may be a string or an object with multiple breeds. So, we have to check for that.
{pet.breeds && pet.breeds.breed
  ? (
    _.isObject(pet.breeds.breed)
      ? _.join(_.toArray(pet.breeds.breed), '/')
      : pet.breeds.breed
  )
  : null
}
First of all we use {pet.breeds && pet.breeds.breed ? (true) : false} condition to make sure it even defined and then we use nested condition {_.isObject(pet.breeds.breed) ? true : false} to check if it’s an object and if it is, we convert it to array and use _.join to join all array elements into a single string separated with / as a separator _.join(_.toArray(pet.breeds.breed), '/')
Styles
And the last step, an object with styles for different parts of our component.
const styles = StyleSheet.create({
  row: {
    alignItems: 'center',
    backgroundColor: 'white',
    flexDirection: 'row',
    borderStyle: 'solid',
    borderBottomColor: '#dddddd',
    borderBottomWidth: StyleSheet.hairlineWidth,
    padding: 5,
  },
row white background for a row, padding of 5 points and border at the bottom.
 imageContainer: {
    backgroundColor: '#dddddd',
    width: 90,
    height: 90,
    marginRight: 10
  },
imageContainer sets gray background, width, heigh and margin of 10 point on right side.
 textContainer: {
    flex: 1,
  },
We set flex: 1 for textContainer which means that it’ll take all of the screen space that available after imageContainer and till the right edge of the screen.
 noImage: {
    flex: 1,
    alignItems: 'center',
    justifyContent: 'center',
  },
  noImageText: {
    color: '#aaaaaa',
  },
We use flex: 1 again to have noImage take the whole imageContainer, and alignItems: 'center' with justifyContent: 'center' to center noImageText both horizontally and vertically inside noImage.
 petImage: {
    width: 90,
    height: 90,
  },
 petName: {
    flex: 1,
    fontSize: 16,
    fontWeight: '500',
  },
  petBreed: {
    fontSize: 13,
  },
  petDescription: {
    fontSize: 12,
    marginTop: 5,
    marginBottom: 5,
  },
  petLocation: {
    fontSize: 12,
    color: 'gray',
  },
});
And those are various text styles to make pet name bigger and bolder, pet descriptions smaller, etc.
getImage Function
Create getImage.js file.
export default function getImage(pet: Object): {uri: ?string} {
  let uri = pet && pet.media.photos && pet.media.photos.photo ? pet.media.photos.photo[3] : null;
  return uri ? { uri } : null;
}
This function takes in a pet data object and returns an object, that we can pass to Image component to render images, and which looks like { uri: "http://link.to/image.jpg" }.
We could put this code into
PetCell.jsfile, but we’ll need it later in a separate component, so it makes sense to not repeat the same code in different components, but to have in a separate file and then import when needed.
iOS Version
Open index.ios.js file in a text editor and replace its content with the following code. That code gets executed when we run iOS version of out app.
'use strict';

import React, { Component } from 'react';
import {
  AppRegistry,
  NavigatorIOS,
  StyleSheet
} from 'react-native';
import App from './App';

class AdoptMe extends Component {

  render() {
    return (
      <NavigatorIOS
        style={styles.container}
        initialRoute={{
          title: 'Adopt Me',
          component: App,
        }}
      />
    );
  }
}

const styles = StyleSheet.create({
  container: {
    flex: 1,
    backgroundColor: 'white',
  }
});

AppRegistry.registerComponent('AdoptMe', () => AdoptMe);
This component has only one render method which returns NavigatorIOS component that renders a header with Adopt Me title on top of the screen and then App component below.
Android Version
Open index.android.js file in a text editor and replace its content with the following code. That code gets executed when we run Android version of out app.
'use strict';

import React, { Component } from 'react';
import {
  AppRegistry,
  Navigator,
  StyleSheet
} from 'react-native';
import App from './App';

class AdoptMe extends Component {

  render() {
    return (
      <Navigator
        style={styles.container}
        initialRoute={{name: 'app'}}
        configureScene={() => Navigator.SceneConfigs.FadeAndroid}
        renderScene={(route, navigationOperations, onComponentRef) => <App navigator={navigationOperations} />}
      />
    );
  }
}

const styles = StyleSheet.create({
  container: {
    flex: 1,
    backgroundColor: 'white',
  }
});

AppRegistry.registerComponent('AdoptMe', () => AdoptMe);
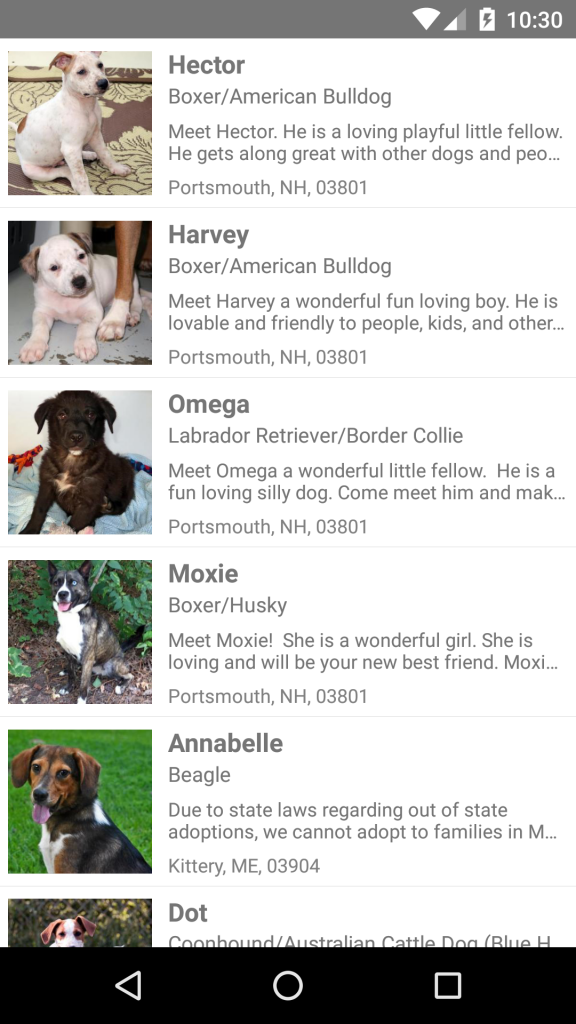
Almost the same thing, but we use different component Navigator, because iOS and Android platform have differences in how they do navigation between different screens.
Launch the App
To launch iOS version run in terminal
react-native run-ios;
To launch Android version
react-native run-android;
And there it is. A list of adorable pets looking for home.
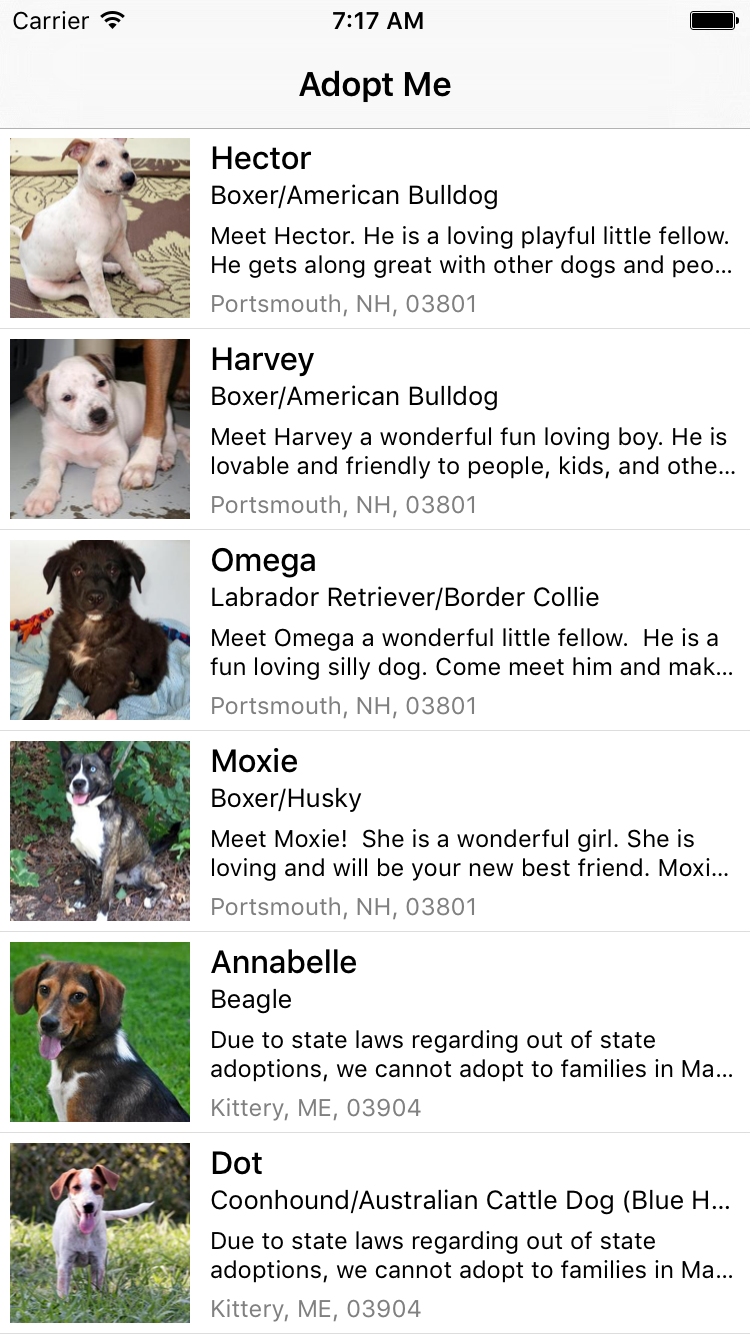
I hope you enjoyed the tutorial. Subscribe to find out about new tutorials and learn how to build amazing apps!


Pingback: Build a List of Pets for Adoption App with React Native – Part 2 | Rational App Development()