Learn how to build slick animated UIs with React Native by building movie tickets booking app.
Table of contents
- What We Will Be Building
- Outlining the App Structure
- Let’s Get Started
- Data
- Movies Component
- App Component
- Index Files
- Check Out the Progress
- Shared Styles File
- Movie Poster Component
- Update Movies Component
- Update Movies Component Some More
- Movie Popup Component
- Update Movies Component
- Improving Movie Popup
- Show Days and Times
- Movie Ticket Booking
- Update App Component
- And Voila
- Wrapping Up
What We Will Be Building
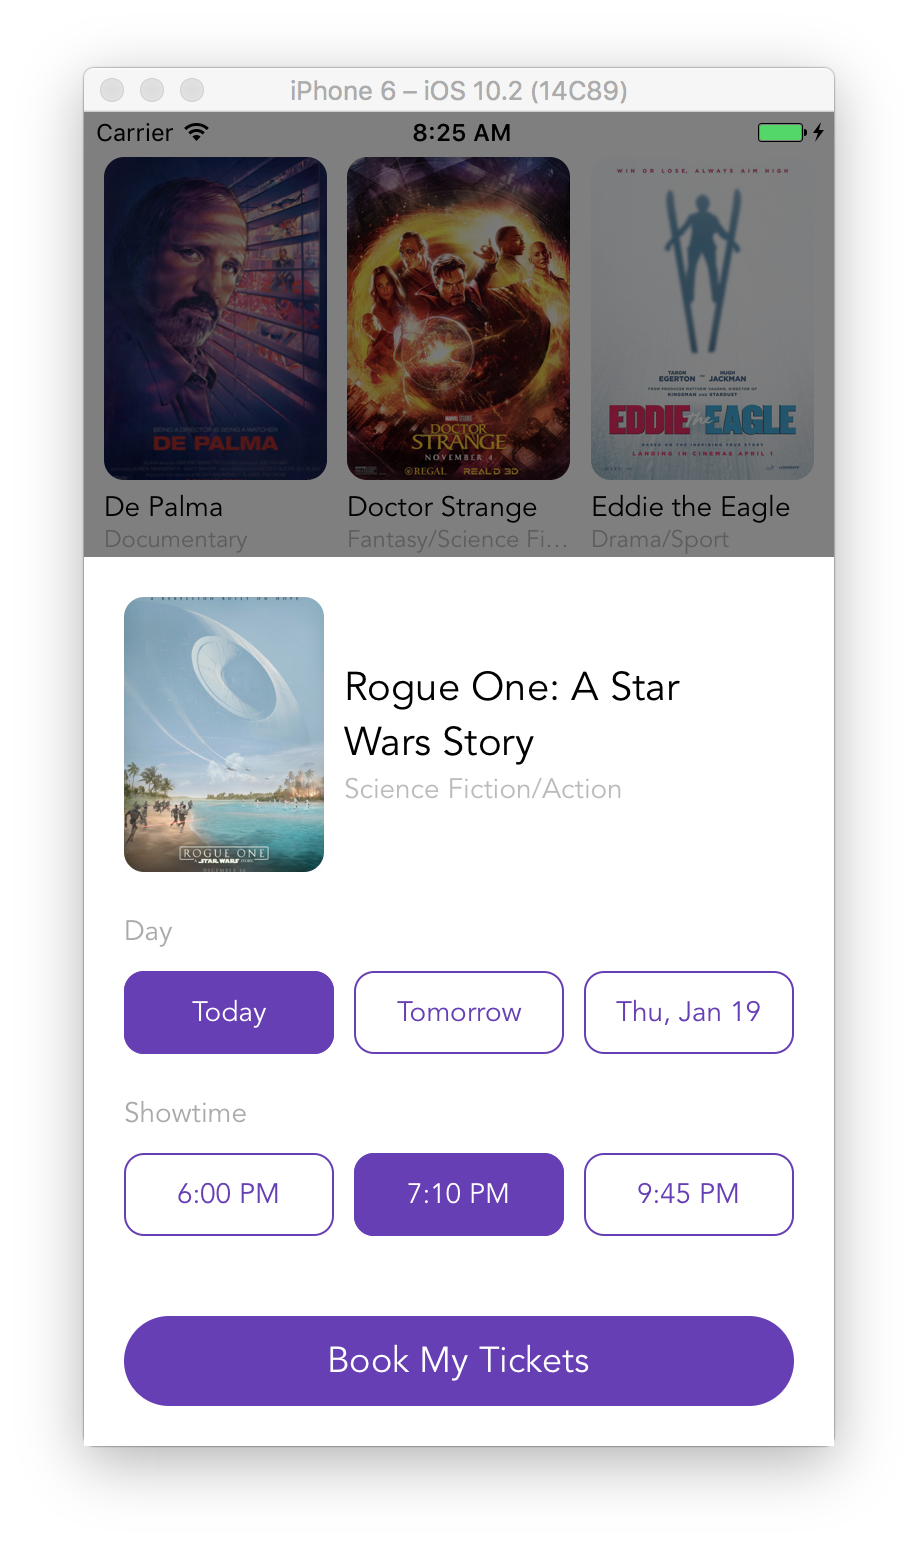
We’re going to be building an app for booking movie tickets using a slick animated UI. That’s how it’s going to look like.
For your reference, the final code for the app we’re building can be found in this GitHub repo.
To download the source code execute:
git clone --branch part-1 https://github.com/rationalappdev/MovieTickets.git
Outlining the App Structure
It’s always a good idea to plan you app code structure in advance. Let’s list the files that we’re going to need to build all of the components for the app.
index.ios.jsorindex.android.js. Entry points into the app for iOS or Android platforms respectively. Both are going to render just one component calledApp.src/data.js. Stores movie data that includes movie title, poster, genre, available days and showtimes.src/styles.js. Contains some common styles shared across multiple components.src/app.js. Responsible for navigation betweenMoviesandConfirmationscreens.src/Movies.js. Scrollable list of movie posters rendered withMoviePostercomponent.src/MoviePoster.js. Renders a movie poster.src/MoviePopup.js. The window that pops up from the bottom of the screen and contains days and showtimes for selection.src/Options.js. Renders a row of options for days and showtimes.src/Option.js. Renders each option.src/Confirmation.js. A confirmation screen with a confirmation code.
Let’s Get Started
Let’s start off by creating a new app. Open Terminal App and run these commands to initialize a new project.
react-native init MovieTickets;
cd MovieTickets;
Install Dependencies
Next, install moment NPM module, which will help us with formatting dates. Run the following command to install it and save the dependency in package.json.
npm install moment --save
Launch the Simulator
Now, launch the app in the simulator.
react-native run-ios;
Enable Hot Reloading
Once your app is up and running, press ⌘D and select Enable Hot Reloading. This will save you some time having to reload the app manually every time you make a change.
Data
Let’s start off with the data. We’re going to store all of the movie data in one file to make thing easier for the sake of this tutorial. In a real world app, you would use an API to fetch the data.
- Create a folder called
srcinside your project folder. - Create a new file called
data.jsinsidesrcfolder with the following content.
import moment from 'moment';

// Hardcode days for the sake of simplicity
const days = [ 'Today', 'Tomorrow', moment().add(2, 'days').format('ddd, MMM D') ];
// Same for times
const times = [ '9:00 AM', '11:10 AM', '12:00 PM', '1:50 PM', '4:30 PM', '6:00 PM', '7:10 PM', '9:45 PM' ];

export const movies = [
  {
    title: 'La La Land',
    poster: 'https://i.imgur.com/po7UezG.jpg',
    genre: 'Drama/Romance',
    days,
    times,
  },
  {
    title: 'Paterson',
    poster: 'https://i.imgur.com/pE0C9E0.jpg',
    genre: 'Drama/Comedy',
    days,
    times,
  },
  {
    title: 'Jackie',
    poster: 'https://i.imgur.com/VqUi1sw.jpg',
    genre: 'Drama/Biography',
    days,
    times,
  },
  {
    title: 'Lo and Behold Reveries of the Connected World',
    poster: 'https://i.imgur.com/s106X7S.jpg',
    genre: 'Documentary',
    days,
    times,
  },
  {
    title: '10 Cloverfield Lane',
    poster: 'https://i.imgur.com/kV2BVdH.jpg',
    genre: 'Drama',
    days,
    times,
  },
  {
    title: 'Birth of a Nation',
    poster: 'https://i.imgur.com/a6HJj8S.jpg',
    genre: 'Fantasy/Myster',
    days,
    times,
  },
  {
    title: 'De Palma',
    poster: 'https://i.imgur.com/oOIa73M.jpg',
    genre: 'Documentary',
    days,
    times,
  },
  {
    title: 'Doctor Strange',
    poster: 'https://i.imgur.com/kyHDVOk.jpg',
    genre: 'Fantasy/Science Fiction',
    days,
    times,
  },
  {
    title: 'Eddie the Eagle',
    poster: 'https://i.imgur.com/GNrdAuF.jpg',
    genre: 'Drama/Sport',
    days,
    times,
  },
  {
    title: 'Pride and prejudice and zombies',
    poster: 'https://i.imgur.com/KhbG0Lw.jpg',
    genre: 'Thriller/Action',
    days,
    times,
  },
  {
    title: 'Finding Dory',
    poster: 'https://i.imgur.com/BTexHYJ.jpg',
    genre: 'Comedy/Adventure',
    days,
    times,
  },
  {
    title: 'Green Room',
    poster: 'https://i.imgur.com/Q0Ysh7L.jpg',
    genre: 'Crime/Thriller',
    days,
    times,
  },
  {
    title: 'Kubo and the Two Strings',
    poster: 'https://i.imgur.com/uTFCKZc.jpg',
    genre: 'Fantasy/Adventure',
    days,
    times,
  },
  {
    title: 'In a Valley of Violence',
    poster: 'https://i.imgur.com/DTtJ62G.jpg',
    genre: 'Drama/Western',
    days,
    times,
  },
  {
    title: 'O.J.: Made in America',
    poster: 'https://i.imgur.com/T8uc6x8.jpg',
    genre: 'Documentary',
    days,
    times,
  },
  {
    title: 'Rogue One: A Star Wars Story',
    poster: 'https://i.imgur.com/zOF2iYc.jpg',
    genre: 'Science Fiction/Action',
    days,
    times,
  },
  {
    title: 'Sing Street',
    poster: 'https://i.imgur.com/C3ExEb6.jpg',
    genre: 'Drama/Romance',
    days,
    times,
  },
  {
    title: 'Zoolander 2',
    poster: 'https://i.imgur.com/ejlIijD.jpg',
    genre: 'Comedy',
    days,
    times,
  },
];
Movies Component
Next, let’s create Movies component that will be rendering a scrollable list of movie posters.
- Create a new file called
Movies.jswithinsrcfolder with the following content.
import React, { Component } from 'react';
import {
  ScrollView,
  Text,
  View
} from 'react-native';
import { movies } from './data';

export default class Movies extends Component {
  render() {
    return (
      <View>
        <ScrollView>
          {movies.map((movie, index) => <Text>{movie.title}</Text>)}
        </ScrollView>
      </View>
    );
  }
}
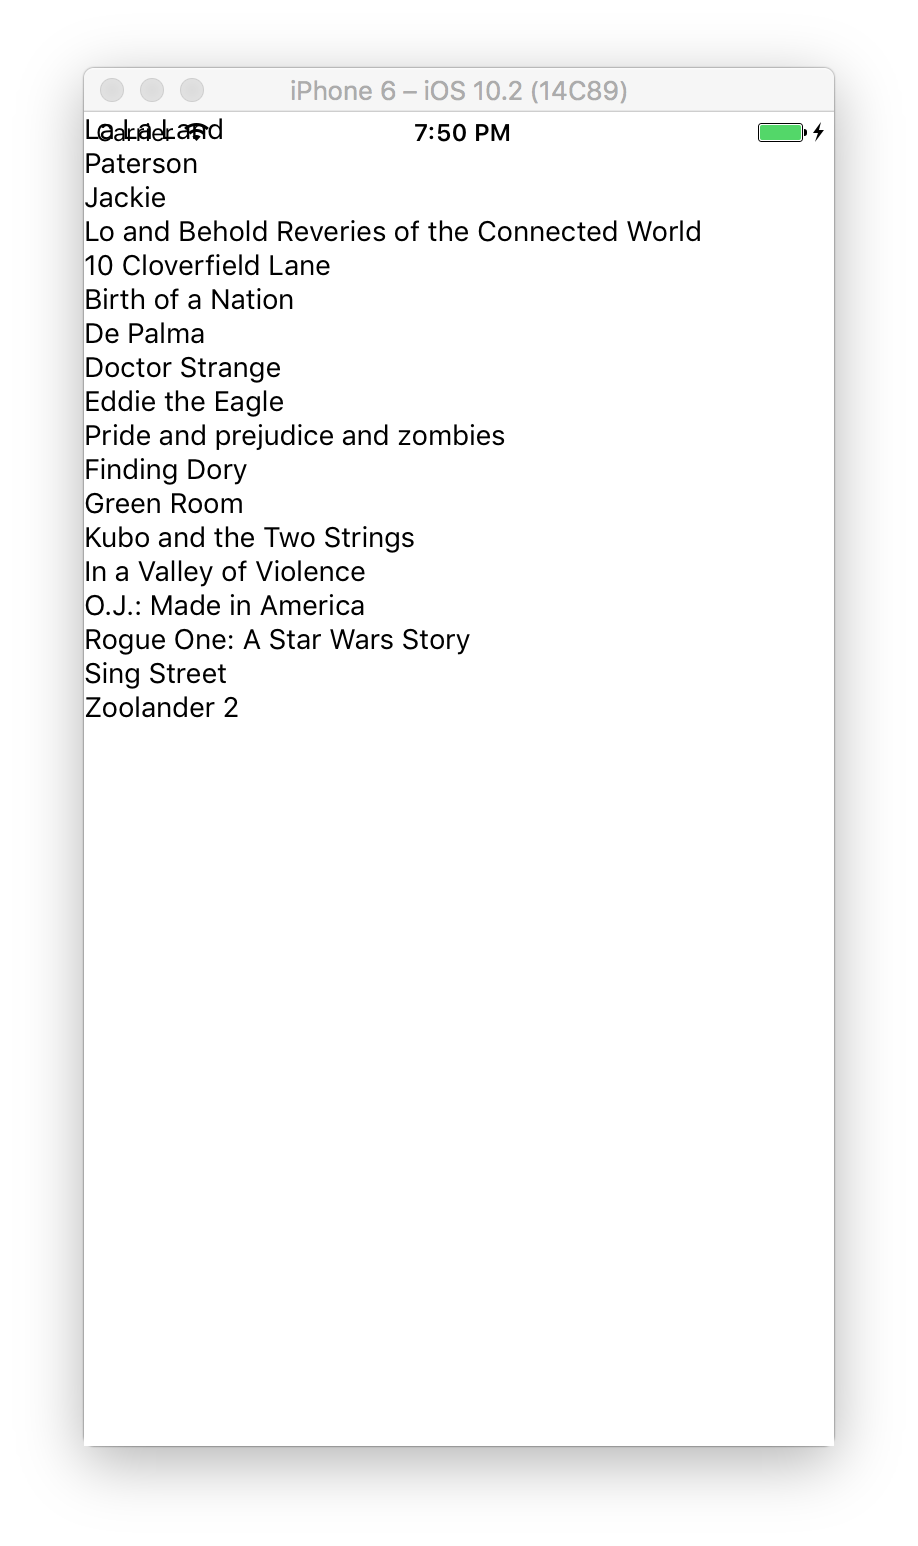
For now, it simply imports movies from data.js file and renders their titles in a ScrollView component.
App Component
Next, let’s create App component that will be responsible for navigation between Movies and Confirmation screens.
- Create a new file called
app.jswithinsrcfolder with the following content.
import React, { Component } from 'react';
import {
  Navigator,
} from 'react-native';
import Movies from './Movies';

const RouteMapper = (route, navigator) => {
  if (route.name === 'movies') {
    return <Movies navigator={navigator} />;
  }
};

export default class App extends Component {
  render() {
    return (
      <Navigator
        // Default to movies route
        initialRoute={{ name: 'movies' }}
        // Use FloatFromBottom transition between screens
        configureScene={(route, routeStack) => Navigator.SceneConfigs.FloatFromBottom}
        // Pass a route mapper functions
        renderScene={RouteMapper}
      />
    );
  }
}
For now, it has only one route and renders Movies component which we’ll create in the next step. And we’ll add a route for Confirmation component later, once we build it.
Index Files
Next, let’s update our index files. Since we’re going to re-use the same code for both, iOS and Android, so we don’t need two different index files. We’ll be using the same App component in both index files.
- Open
index.ios.jsfile and scrap all of the React Native boilerplate code to start from scratch. Do the same forindex.android.js. And add the following code to both of index files.
import { AppRegistry } from 'react-native';
import App from './src/app';

AppRegistry.registerComponent('MovieTickets', () => App);
This code imports App component from src/app.js file and registers it as main app container.
Check Out the Progress
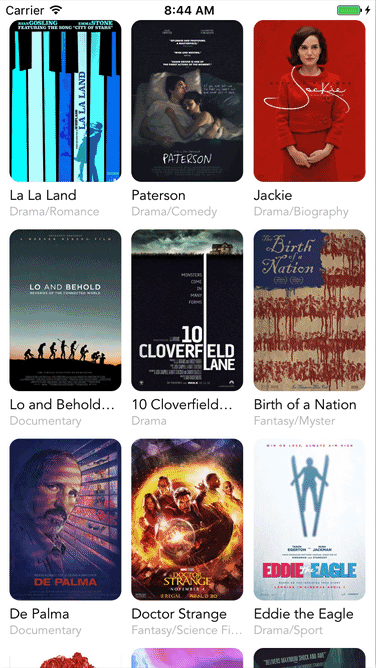
Bring up the simulator window and see what we’ve got so far. You should be able to see a simple, scrollable list of movie title if you followed all of the steps. We’re getting closer.
Next, let’s create a file for styles that we are going to re-use in multiple components.
- Create a new file called
styles.jswithinsrcfolder with the following content.
export const defaultStyles = {
  text: {
    fontFamily: 'Avenir',
  }
};
We don’t want to add fontFamily to every text style in every controller, don’t we?
Movie Poster Component
Next, let’s create MoviePoster component that will be rendering pretty movie posters in our list. It takes in two props:
movie. A movie object stored insrc/data.jsthat contains movie title, genre, and poster.onOpen. A function that is being called when a user taps on a poster.
When user taps on a poster it calls a function passed from parent Movies component.
- Create a new file called
MoviePoster.jswithinsrcfolder with the following content.
import React, { Component, PropTypes } from 'react';
import {
  Dimensions,
  Image,
  StyleSheet,
  Text,
  TouchableOpacity,
  View
} from 'react-native';
import { defaultStyles } from './styles';

// Get screen dimensions
const { width, height } = Dimensions.get('window');
// How many posters we want to have in each row and column
const cols = 3, rows = 3;

export default class MoviePoster extends Component {
  // Component prop types
  static propTypes = {
    // Movie object with title, genre, and poster
    movie: PropTypes.object.isRequired,
    // Called when user taps on a poster
    onOpen: PropTypes.func.isRequired,
  }
  render() {
    const { movie, movie: { title, genre, poster }, onOpen } = this.props;
    return (
      <TouchableOpacity style={styles.container} onPress={() => onOpen(movie)}>
        <View style={styles.imageContainer}>
          <Image source={{ uri: poster }} style={styles.image} />
        </View>
        <Text style={styles.title} numberOfLines={1}>{title}</Text>
        <Text style={styles.genre} numberOfLines={1}>{genre}</Text>
      </TouchableOpacity>
    );
  }
}

const styles = StyleSheet.create({
  container: {
    marginLeft: 10,
    marginBottom: 10,
    height: (height - 20 - 20) / rows - 10,
    width: (width - 10) / cols - 10,
  },
  imageContainer: {
    flex: 1,                          // take up all available space
  },
  image: {
    borderRadius: 10,                 // rounded corners
    ...StyleSheet.absoluteFillObject, // fill up all space in a container
  },
  title: {
    ...defaultStyles.text,
    fontSize: 14,
    marginTop: 4,
  },
  genre: {
    ...defaultStyles.text,
    color: '#BBBBBB',
    fontSize: 12,
    lineHeight: 14,
  },
});
Update Movies Component
Now, let’s update Movie component, so it uses MoviePopup instead of just Text to render a movie.
- Open
Movies.jsfile insrcfolder and update a few things:
Step 1. Import MoviePoster component:
// existing import statements
import MoviePoster from './MoviePoster';
You can delete Text from import because we’re going to replace it.
Step 2. Replace:
{movies.map((movie, index) => <Text>{movie.title}</Text>)}
With:
{movies.map((movie, index) => <MoviePoster
  movie={movie}
  onOpen={this.openMovie}
  key={index}
/>)}
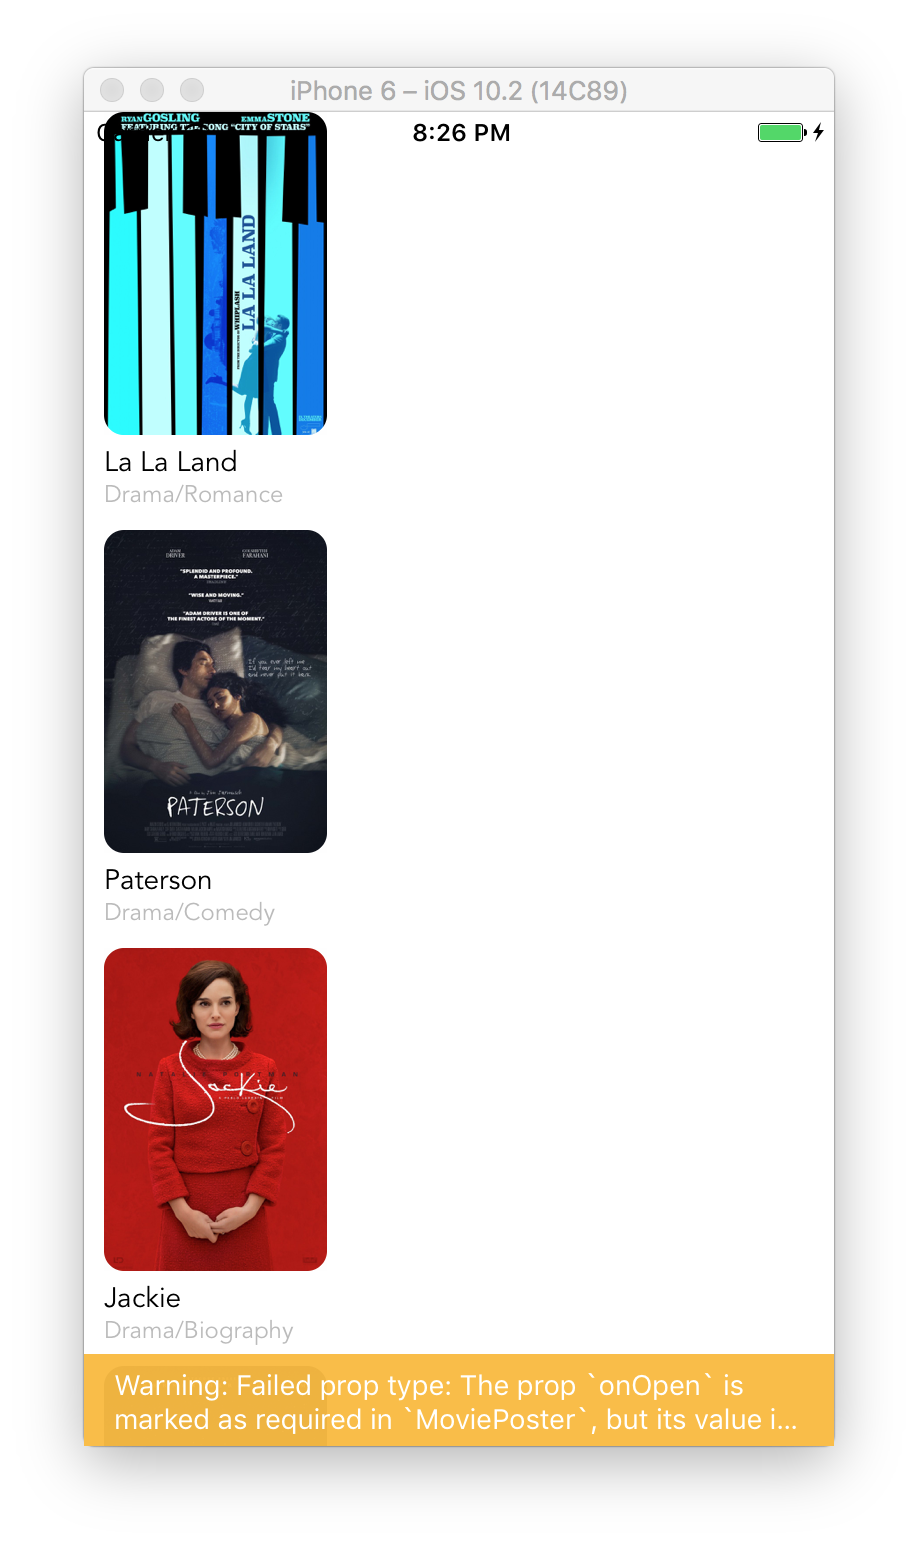
Let’s bring up the simulator window to check how is it going so far. We can see nice posters instead of ugly text. That’s great. We can also see a warning about missing required prop. That’s because we have onOpen set a required prop in MoviePoster component, but we didn’t pass it.
It’s always a good idea to spec out what prop are required and what type each prop should be. This way you won’t forget what’s going on in your components and what’s required for a component to work properly in the future.
Update Movies Component Some More
Now, let’s update Movie component with some styles to make it prettier.
- Open
Movies.jsfile insrcfolder and replace its content with the following:
import React, { Component } from 'react';
import {
  ScrollView,
  StyleSheet,
  View
} from 'react-native';
import { movies } from './data';
import MoviePoster from './MoviePoster';

export default class Movies extends Component {
  render() {
    return (
      <View style={styles.container}>
        <ScrollView
          contentContainerStyle={styles.scrollContent}
		  // Hide all scroll indicators
          showsHorizontalScrollIndicator={false}
          showsVerticalScrollIndicator={false}
        >
          {movies.map((movie, index) => <MoviePoster
            movie={movie}
            onOpen={this.openMovie}
            key={index}
          />)}
        </ScrollView>
      </View>
    );
  }
}

const styles = StyleSheet.create({
  container: {
    paddingTop: 20,         // start below status bar
  },
  scrollContent: {
    flexDirection: 'row',   // arrange posters in rows
    flexWrap: 'wrap',       // allow multiple rows
  },
});
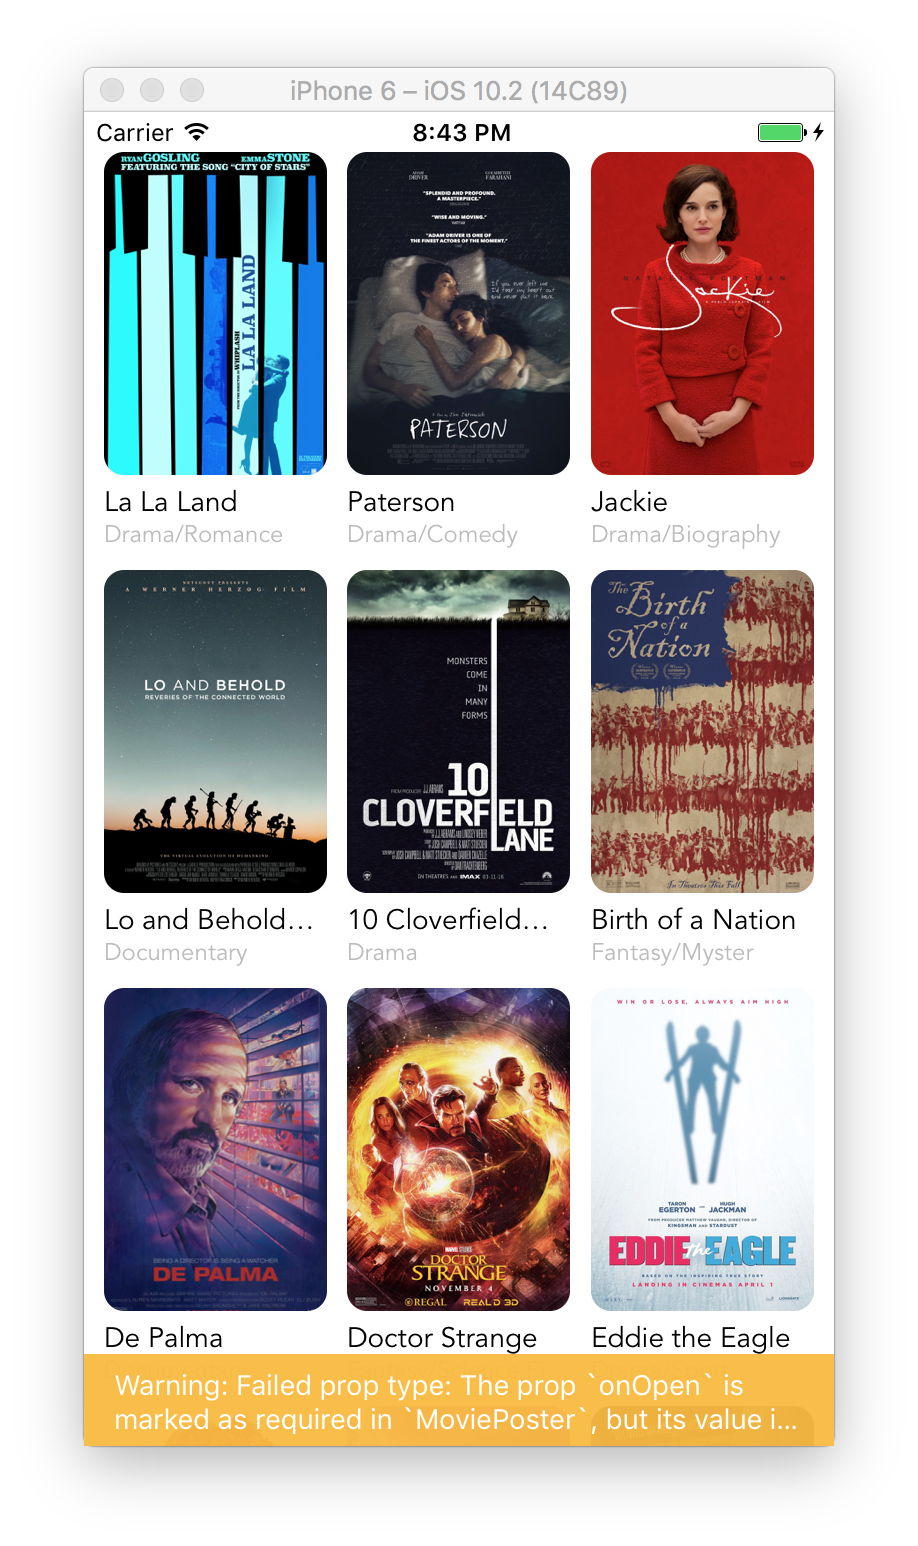
We added styles and updated <View/> and <ScrollView/> to use those styles.
Let’s bring up the simulator window again. Looks much better now.
Movie Popup Component
Let’s move on to MoviePopup component which pops up from the bottom of the screen and contains days and showtimes for selection once user taps on a movie poster.
- Create a new file called
MoviePopup.jswithinsrcfolder with the following content.
import React, { Component } from 'react';
import {
Animated,
Dimensions,
StyleSheet,
Text,
TouchableWithoutFeedback,
View
} from 'react-native';
const { width, height } = Dimensions.get('window');
export default class MoviePopup extends Component {
state = {
position: new Animated.Value(this.props.isOpen ? 0 : height),
// height: height / 2,
visible: this.props.isOpen,
};
// Handle isOpen changes to either open or close popup
componentWillReceiveProps(nextProps) {
// isOpen prop changed to true from false
if (!this.props.isOpen && nextProps.isOpen) {
this.animateOpen();
}
// isOpen prop changed to false from true
else if (this.props.isOpen && !nextProps.isOpen) {
this.animateClose();
}
}
// Open popup
animateOpen() {
// Update state first
this.setState({ visible: true }, () => {
// And slide up
Animated.timing(
this.state.position, { toValue: 0 } // top of the screen
).start();
});
}
// Close popup
animateClose() {
// Slide down
Animated.timing(
this.state.position, { toValue: height } // bottom of the screen
).start(() => this.setState({ visible: false }));
}
render() {
// Render nothing if not visible
if (!this.state.visible) {
return null;
}
return (
<View style={styles.container}>
{/* Closes popup if user taps on semi-transparent backdrop */}
<TouchableWithoutFeedback onPress={this.props.onClose}>
<Animated.View style={styles.backdrop}/>
</TouchableWithoutFeedback>
<Animated.View
style={[styles.modal, {
// Animates position on the screen
transform: [{ translateY: this.state.position }, { translateX: 0 }]
}]}
>
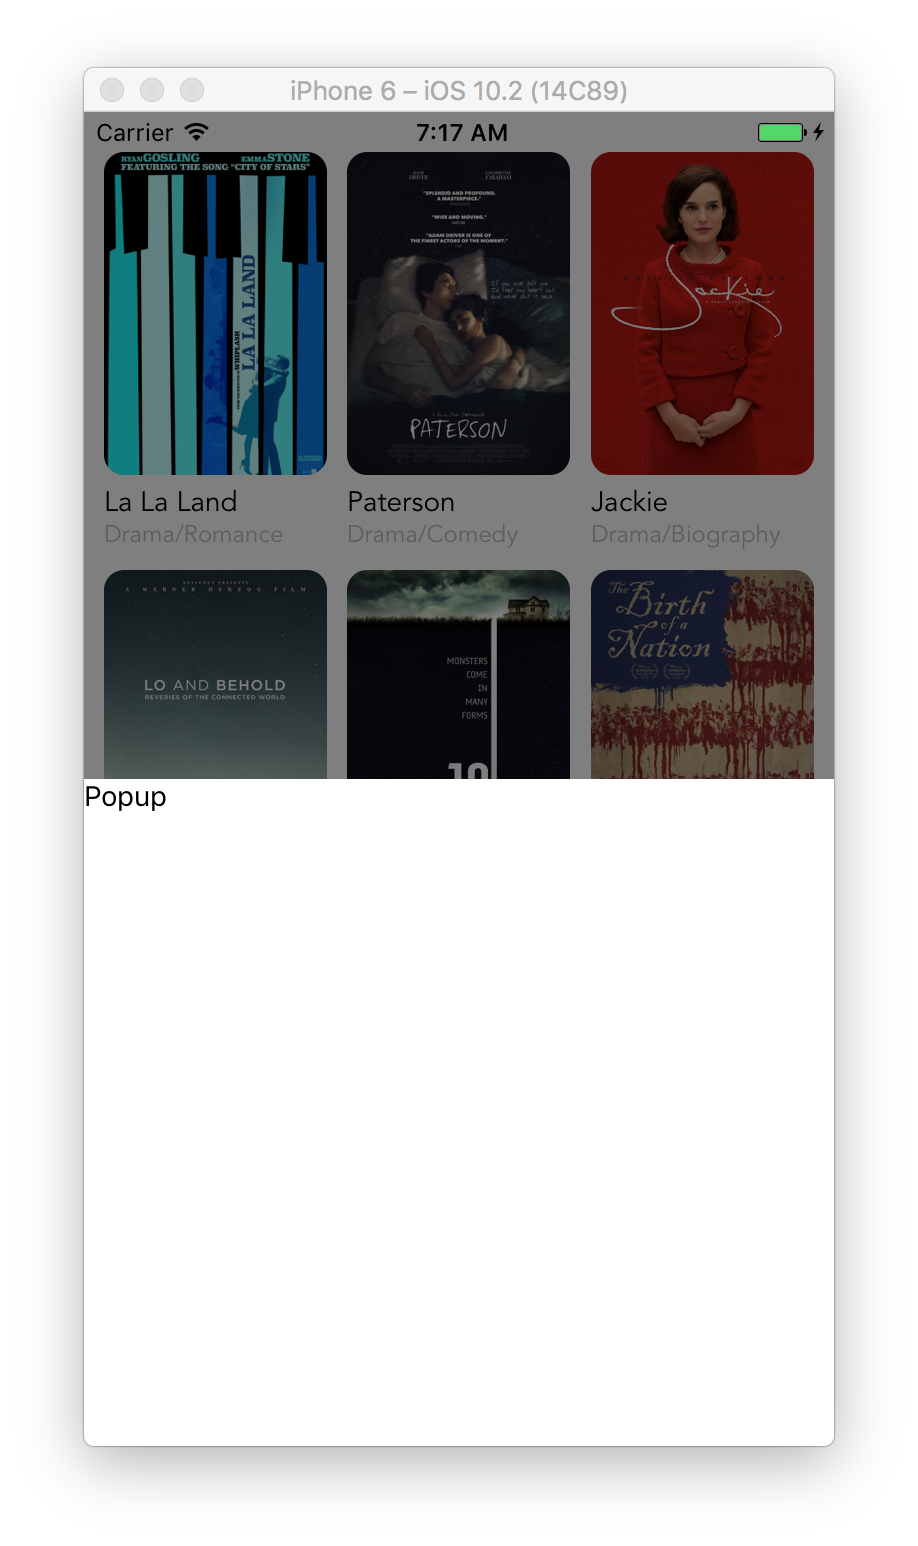
<Text>Popup</Text>
</Animated.View>
</View>
);
}
}
const styles = StyleSheet.create({
// Main container
container: {
...StyleSheet.absoluteFillObject, // fill up all screen
justifyContent: 'flex-end', // align popup at the bottom
backgroundColor: 'transparent', // transparent background
},
// Semi-transparent background below popup
backdrop: {
...StyleSheet.absoluteFillObject, // fill up all screen
backgroundColor: 'black',
opacity: 0.5,
},
// Popup
modal: {
height: height / 2, // take half of screen height
backgroundColor: 'white',
},
});
Update Movies Component
Now, we need to update Movies component again to use MoviePopup to handle movie poster taps.
- Open
Movies.jsfile insrcfolder and add a few things:
Step 1. Add state and helper methods to open or close a popup before render() method.
export default class Movies extends Component {
  // Add starting here
  state = {
    popupIsOpen: false,
  }

  openMovie = (movie) => {
    this.setState({
      popupIsOpen: true,
      movie,
    });
  }

  closeMovie = () => {
    this.setState({
      popupIsOpen: false,
    });
  }
  // Untill here
  render() {
Step 2. Add <MoviePopup/> inside render() method right below </ScrollView>.
  render() {
    return (
      <View style={styles.container}>
        // ...
        </ScrollView>
        // Add this
        <MoviePopup
          movie={this.state.movie}
          isOpen={this.state.popupIsOpen}
          onClose={this.closeMovie}
        />
      </View>
    );
  }
Now, bring up the simulator window and try taping on movie posters and outside of a popup. You’ll see how it smoothly slides up and down. Great job so far. Almost there.
Improving Movie Popup
Now, let’s improve our popup. First of all, we want to add movie data, show days and times for a user to select, and a button to book their tickets. Second, we want to make it expandable so they could pull the popup up, and it would expand to full screen.
I’m not going to go into to much detail here, and just give you the updated code with lots of comments. If you have any question, fell free to leave a comment below the post.
- Open
MoviePopup.jsfile insrcfolder and add replace its content with the following:
import React, { Component, PropTypes } from 'react';
import {
  Animated,
  Dimensions,
  Image,
  LayoutAnimation,
  PanResponder,
  StyleSheet,
  Text,
  TouchableHighlight,
  TouchableWithoutFeedback,
  View
} from 'react-native';
import { defaultStyles } from './styles';

// Get screen dimensions
const { width, height } = Dimensions.get('window');
// Set default popup height to 67% of screen height
const defaultHeight = height * 0.67;

export default class MoviePopup extends Component {

  static propTypes = {
	isOpen: PropTypes.bool.isRequired,
    // Movie object that has title, genre, poster, days and times
    movie: PropTypes.object,
    // Index of chosen day
    chosenDay: PropTypes.number,
    // Index of chosem show time
    chosenTime: PropTypes.number,
    // Gets called when user chooses day
    onChooseDay: PropTypes.func,
    // Gets called when user chooses time
    onChooseTime: PropTypes.func,
    // Gets called when user books their ticket
    onBook: PropTypes.func,
    // Gets called when popup closed
    onClose: PropTypes.func,
  }

  state = {
    // Animates slide ups and downs when popup open or closed
    position: new Animated.Value(this.props.isOpen ? 0 : height),
    // Backdrop opacity
    opacity: new Animated.Value(0),
    // Popup height that can be changed by pulling it up or down
    height: defaultHeight,
    // Expanded mode with bigger poster flag
    expanded: false,
    // Visibility flag
    visible: this.props.isOpen,
  };

  // When user starts pulling popup previous height gets stored here
  // to help us calculate new height value during and after pulling
  _previousHeight = 0

  componentWillMount() {
    // Initialize PanResponder to handle move gestures
    this._panResponder = PanResponder.create({
      onStartShouldSetPanResponder: (evt, gestureState) => true,
      onMoveShouldSetPanResponder: (evt, gestureState) => {
        const { dx, dy } = gestureState;
        // Ignore taps
        if (dx !== 0 && dy === 0) {
          return true;
        }
        return false;
      },
      onPanResponderGrant: (evt, gestureState) => {
        // Store previous height before user changed it
        this._previousHeight = this.state.height;
      },
      onPanResponderMove: (evt, gestureState) => {
        // Pull delta and velocity values for y axis from gestureState
        const { dy, vy } = gestureState;
        // Subtract delta y from previous height to get new height
        let newHeight = this._previousHeight - dy;

        // Animate heigh change so it looks smooth
        LayoutAnimation.easeInEaseOut();

        // Switch to expanded mode if popup pulled up above 80% mark
        if (newHeight > height - height / 5) {
          this.setState({ expanded: true });
        } else {
          this.setState({ expanded: false });
        }

        // Expand to full height if pulled up rapidly
        if (vy < -0.75) {
          this.setState({
            expanded: true,
            height: height
          });
        }

        // Close if pulled down rapidly
        else if (vy > 0.75) {
          this.props.onClose();
        }
        // Close if pulled below 75% mark of default height
        else if (newHeight < defaultHeight * 0.75) {
          this.props.onClose();
        }
        // Limit max height to screen height
        else if (newHeight > height) {
          this.setState({ height: height });
        }
        else {
          this.setState({ height: newHeight });
        }
      },
      onPanResponderTerminationRequest: (evt, gestureState) => true,
      onPanResponderRelease: (evt, gestureState) => {
        const { dy } = gestureState;
        const newHeight = this._previousHeight - dy;

        // Close if pulled below default height
        if (newHeight < defaultHeight) {
          this.props.onClose();
        }

        // Update previous height
        this._previousHeight = this.state.height;
      },
      onShouldBlockNativeResponder: (evt, gestureState) => {
        // Returns whether this component should block native components from becoming the JS
        // responder. Returns true by default. Is currently only supported on android.
        return true;
      },
    });
  }

  // Handle isOpen changes to either open or close popup
  componentWillReceiveProps(nextProps) {
    // isOpen prop changed to true from false
    if (!this.props.isOpen && nextProps.isOpen) {
      this.animateOpen();
    }
    // isOpen prop changed to false from true
    else if (this.props.isOpen && !nextProps.isOpen) {
      this.animateClose();
    }
  }

  // Open popup
  animateOpen() {
    // Update state first
    this.setState({ visible: true }, () => {
      Animated.parallel([
        // Animate opacity
        Animated.timing(
          this.state.opacity, { toValue: 0.5 } // semi-transparent
        ),
        // And slide up
        Animated.timing(
          this.state.position, { toValue: 0 } // top of the screen
        ),
      ]).start();
    });
  }

  // Close popup
  animateClose() {
    Animated.parallel([
      // Animate opacity
      Animated.timing(
        this.state.opacity, { toValue: 0 } // transparent
      ),
      // Slide down
      Animated.timing(
        this.state.position, { toValue: height } // bottom of the screen
      ),
    ]).start(() => this.setState({
      // Reset to default values
      height: defaultHeight,
      expanded: false,
      visible: false,
    }));
  }

  // Dynamic styles that depend on state
  getStyles = () => {
    return {
      imageContainer: this.state.expanded ? {
        width: width / 2,         // half of screen widtj
      } : {
        maxWidth: 110,            // limit width
        marginRight: 10,
      },
      movieContainer: this.state.expanded ? {
        flexDirection: 'column',  // arrange image and movie info in a column
        alignItems: 'center',     // and center them
      } : {
        flexDirection: 'row',     // arrange image and movie info in a row
      },
      movieInfo: this.state.expanded ? {
        flex: 0,
        alignItems: 'center',     // center horizontally
        paddingTop: 20,
      } : {
        flex: 1,
        justifyContent: 'center', // center vertically
      },
      title: this.state.expanded ? {
        textAlign: 'center',
      } : {},
    };
  }

  render() {
    const {
      movie,
      chosenDay,
      chosenTime,
      onChooseDay,
      onChooseTime,
      onBook
    } = this.props;
    // Pull out movie data
    const { title, genre, poster, days, times } = movie || {};
    // Render nothing if not visible
    if (!this.state.visible) {
      return null;
    }
    return (
      <View style={styles.container}>
        {/* Closes popup if user taps on semi-transparent backdrop */}
        <TouchableWithoutFeedback onPress={this.props.onClose}>
          <Animated.View style={[styles.backdrop, { opacity: this.state.opacity }]}/>
        </TouchableWithoutFeedback>
        <Animated.View
          style={[styles.modal, {
            // Animates height
            height: this.state.height,
            // Animates position on the screen
            transform: [{ translateY: this.state.position }, { translateX: 0 }]
          }]}
        >

          {/* Content */}
          <View style={styles.content}>
            {/* Movie poster, title and genre */}
            <View
              style={[styles.movieContainer, this.getStyles().movieContainer]}
              {...this._panResponder.panHandlers}
            >
              {/* Poster */}
              <View style={[styles.imageContainer, this.getStyles().imageContainer]}>
                <Image source={{ uri: poster }} style={styles.image} />
              </View>
              {/* Title and genre */}
              <View style={[styles.movieInfo, this.getStyles().movieInfo]}>
                <Text style={[styles.title, this.getStyles().title]}>{title}</Text>
                <Text style={styles.genre}>{genre}</Text>
              </View>
            </View>

            {/* Showtimes */}
            <View>
              {/* Day */}
              <Text style={styles.sectionHeader}>Day</Text>
              {/* TODO: Add day options here */}
              <Text>Add day options here</Text>
              {/* Time */}
              <Text style={styles.sectionHeader}>Showtime</Text>
              {/* TODO: Add show time options here */}
              <Text>Add show time options here</Text>
            </View>

          </View>

          {/* Footer */}
          <View style={styles.footer}>
            <TouchableHighlight
              underlayColor="#9575CD"
              style={styles.buttonContainer}
              onPress={onBook}
            >
              <Text style={styles.button}>Book My Tickets</Text>
            </TouchableHighlight>
          </View>

        </Animated.View>
      </View>
    );
  }

}

const styles = StyleSheet.create({
  // Main container
  container: {
    ...StyleSheet.absoluteFillObject,   // fill up all screen
    justifyContent: 'flex-end',         // align popup at the bottom
    backgroundColor: 'transparent',     // transparent background
  },
  // Semi-transparent background below popup
  backdrop: {
    ...StyleSheet.absoluteFillObject,   // fill up all screen
    backgroundColor: 'black',
  },
  // Popup
  modal: {
    backgroundColor: 'white',
  },
  content: {
    flex: 1,
    margin: 20,
    marginBottom: 0,
  },
  // Movie container
  movieContainer: {
    flex: 1,                            // take up all available space
    marginBottom: 20,
  },
  imageContainer: {
    flex: 1,                            // take up all available space
  },
  image: {
    borderRadius: 10,                   // rounded corners
    ...StyleSheet.absoluteFillObject,   // fill up all space in a container
  },
  movieInfo: {
    backgroundColor: 'transparent',     // looks nicier when switching to/from expanded mode
  },
  title: {
    ...defaultStyles.text,
    fontSize: 20,
  },
  genre: {
    ...defaultStyles.text,
    color: '#BBBBBB',
    fontSize: 14,
  },
  sectionHeader: {
    ...defaultStyles.text,
    color: '#AAAAAA',
  },
  // Footer
  footer: {
    padding: 20,
  },
  buttonContainer: {
    backgroundColor: '#673AB7',
    borderRadius: 100,
    paddingVertical: 10,
    paddingHorizontal: 15,
    alignItems: 'center',
  },
  button: {
    ...defaultStyles.text,
    color: '#FFFFFF',
    fontSize: 18,
  },
});
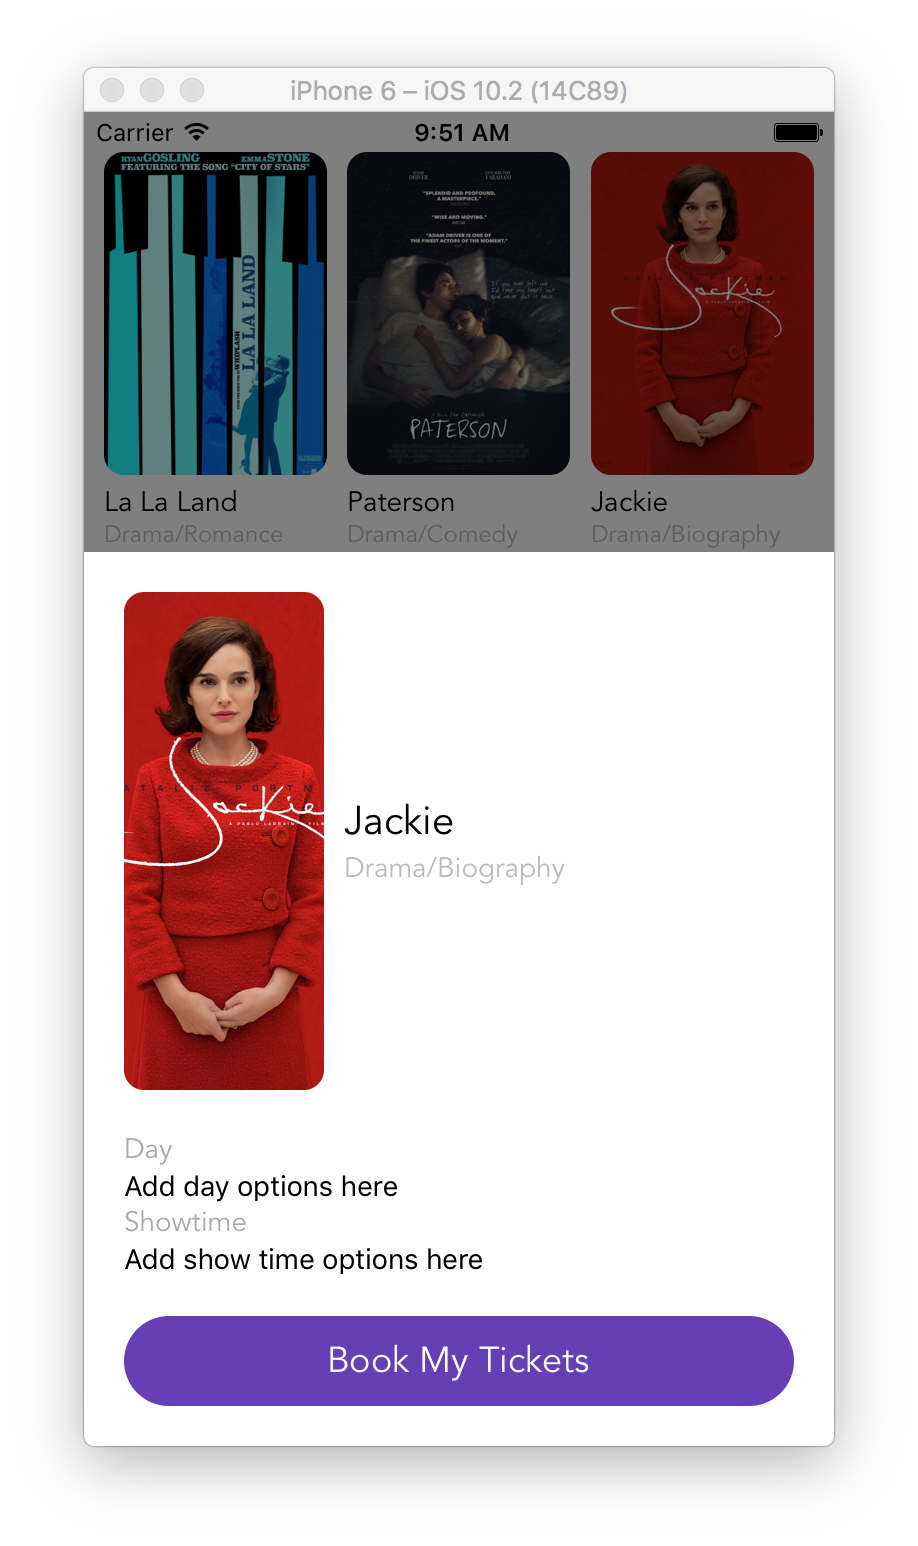
Let’s bring up the simulator window and click on any poster. Looks much better now, right? Poster look weird, though. That’s because we have not implemented show days and times yet.
Show Days and Times
These two components are pretty much identical. They both show some options that user can choose from. So we’re going to build Options component that would render each option with Option and would work for both, show days and times.
But first, let’s add a couple of thing to Movies component.
Update Movies Component
- Open
Movies.jsfile insrcfolder and add a few things:
Step 1. Add chosenDay and chosenTime to state.
So, this:
  state = {
    popupIsOpen: false,
  }
Becomes this:
  state = {
    popupIsOpen: false,
    // Day chosen by user
    chosenDay: 0,       // choose first day by default
    // Time chosen by user
    chosenTime: null,
  }
Step 2. Update closeMovie() method.
Find and replace this:
  closeMovie = () => {
    this.setState({
      popupIsOpen: false,
    });
  }
With this:
  closeMovie = () => {
    this.setState({
      popupIsOpen: false,
      // Reset values to default ones
      chosenDay: 0,
      chosenTime: null,
    });
  }
Step 3. Add chooseDay() and chooseTime() methods for handling user choices right after closeMovie() method.
  chooseDay = (day) => {
    this.setState({
      chosenDay: day,
    });
  }

  chooseTime = (time) => {
    this.setState({
      chosenTime: time,
    });
  }
Step 4. Pass new state values and methods down to <MoviePopup/>.
Find and replace this:
<MoviePopup
  movie={this.state.movie}
  isOpen={this.state.popupIsOpen}
  onClose={this.closeMovie}
/>
With this:
<MoviePopup
  movie={this.state.movie}
  isOpen={this.state.popupIsOpen}
  onClose={this.closeMovie}
  chosenDay={this.state.chosenDay}
  chosenTime={this.state.chosenTime}
  onChooseDay={this.chooseDay}
  onChooseTime={this.chooseTime}
/>
Option Component
This component renders an option that user can select or deselect by choosing another option.
- Create a new file called
Option.jswithinsrcfolder with the following content.
import React, { Component, PropTypes } from 'react';
import {
  Animated,
  StyleSheet,
  Text,
  TouchableOpacity,
} from 'react-native';
import { defaultStyles } from './styles';

// Colors for smooth transition when user chosess an option
const colorDefault = 'rgba(255, 255, 255, 1)',  // white
  colorSelected = 'rgba(103,58,183, 1)';        // purple

export default class Options extends Component {

  static propTypes = {
    // Value to display
    value: PropTypes.string.isRequired,
    // Wheter this values was chosen by user or not
    isChosen: PropTypes.bool.isRequired,
    // Gets called when user choses this value
    onChoose: PropTypes.func.isRequired,
  }

  state = {
    // Animate background color change when value gets chosen
    background: new Animated.Value(0)
  }

  // Animate option selection if value was already chosen not by a user
  componentWillMount() {
    if (this.props.isChosen) {
      this.animateSelect();
    }
  }

  // Handle isChosen prop changes
  componentWillReceiveProps(nextProps) {
    if (!this.props.isChosen && nextProps.isChosen) {
      this.animateSelect();
    } else if (this.props.isChosen && !nextProps.isChosen) {
      this.animateDeselect();
    }
  }

  animateSelect() {
    Animated.timing(this.state.background, {
      toValue: 100,
      duration: 200,
    }).start();
  }

  animateDeselect() {
    Animated.timing(this.state.background, {
      toValue: 0,
      duration: 200,
    }).start();
  }

  render() {
    const { value, isChosen, onChoose } = this.props;
    const backgroundColorAnimation = this.state.background.interpolate({
      inputRange: [0, 100],
      outputRange: [colorDefault, colorSelected],
    });
    return (
      <TouchableOpacity
        activeOpacity={1}
        onPress={onChoose}
      >
        <Animated.View
          style={[styles.container, { backgroundColor: backgroundColorAnimation }]}
        >
          <Text style={{ color: isChosen ? colorDefault : colorSelected }}>
            {value}
          </Text>
        </Animated.View>
      </TouchableOpacity>
    );
  }

}

const styles = StyleSheet.create({
  container: {
    alignItems: 'center',
    borderColor: colorSelected,
    borderWidth: 1,
    borderRadius: 10,
    padding: 10,
    marginRight: 10,
  },
  text: {
    ...defaultStyles.text,
  }
});
Options Component
Renders Option components inside ScrollView, so a user can swipe between them if there is more than fits on the screen.
- Create a new file called
Options.jswithinsrcfolder with the following content.
import React, { Component, PropTypes } from 'react';
import {
  Dimensions,
  ScrollView,
  StyleSheet,
  View
} from 'react-native';
import Option from './Option';

const { width } = Dimensions.get('window');
const optionWith = (width - 0) / 3 - 10;

export default class Options extends Component {

  static propTypes = {
    // Set of values to choose from
    values: PropTypes.array.isRequired,
    // Chosen value index
    chosen: PropTypes.number,
    // Gets called when user choses a value
    onChoose: PropTypes.func.isRequired,
  }

  render() {
    const { values, chosen, onChoose } = this.props;
    return (
      <View style={styles.container}>
        <ScrollView
          ref={(scrollView) => { this._scrollView = scrollView; }}
          // Horizontall scrolling
          horizontal={true}
          // Decelerate fast after the user lifts their finger
          decelerationRate={0.1}
          // Hide all scroll indicators
          showsHorizontalScrollIndicator={false}
          showsVerticalScrollIndicator={false}
          // Do not adjust content automatically
          automaticallyAdjustContentInsets={false}
          // Snap interval to stop at option edges
          snapToInterval={optionWith}
          style={styles.options}
        >
          {values.map((value, index) =>
            <View style={{ width: optionWith }} key={index}>
              <Option
                value={value}
                isChosen={index === chosen}
                onChoose={() => onChoose(index)}
              />
            </View>
          )}
        </ScrollView>
      </View>
    );
  }

}

const styles = StyleSheet.create({
  container: {
    marginTop: 10,
    marginBottom: 20,
  },
  options: {
    flexDirection: 'row',
    marginRight: -10,
  },
});
Update Movie Popup Component
Now, we need to update MoviePopup component to use Options.js for rendering available options for users to choose from.
- Open
MoviePopup.jsfile insrcfolder and add a few things:
Step 1. Add import statement for Options component.
// ... existing imports
import Options from './Options';
Step 2. Add <Options> component to render show days.
Find and replace this:
{/* TODO: Add day options here */}
<Text>Add day options here</Text>
With this:
<Options
  values={days}
  chosen={chosenDay}
  onChoose={onChooseDay}
/>
Step 3. Add <Options> component to render showtimes.
Find and replace this:
{/* TODO: Add show time options here */}
<Text>Add show time options here</Text>
With this:
<Options
  values={times}
  chosen={chosenTime}
  onChoose={onChooseTime}
/>
Check Out the Progress
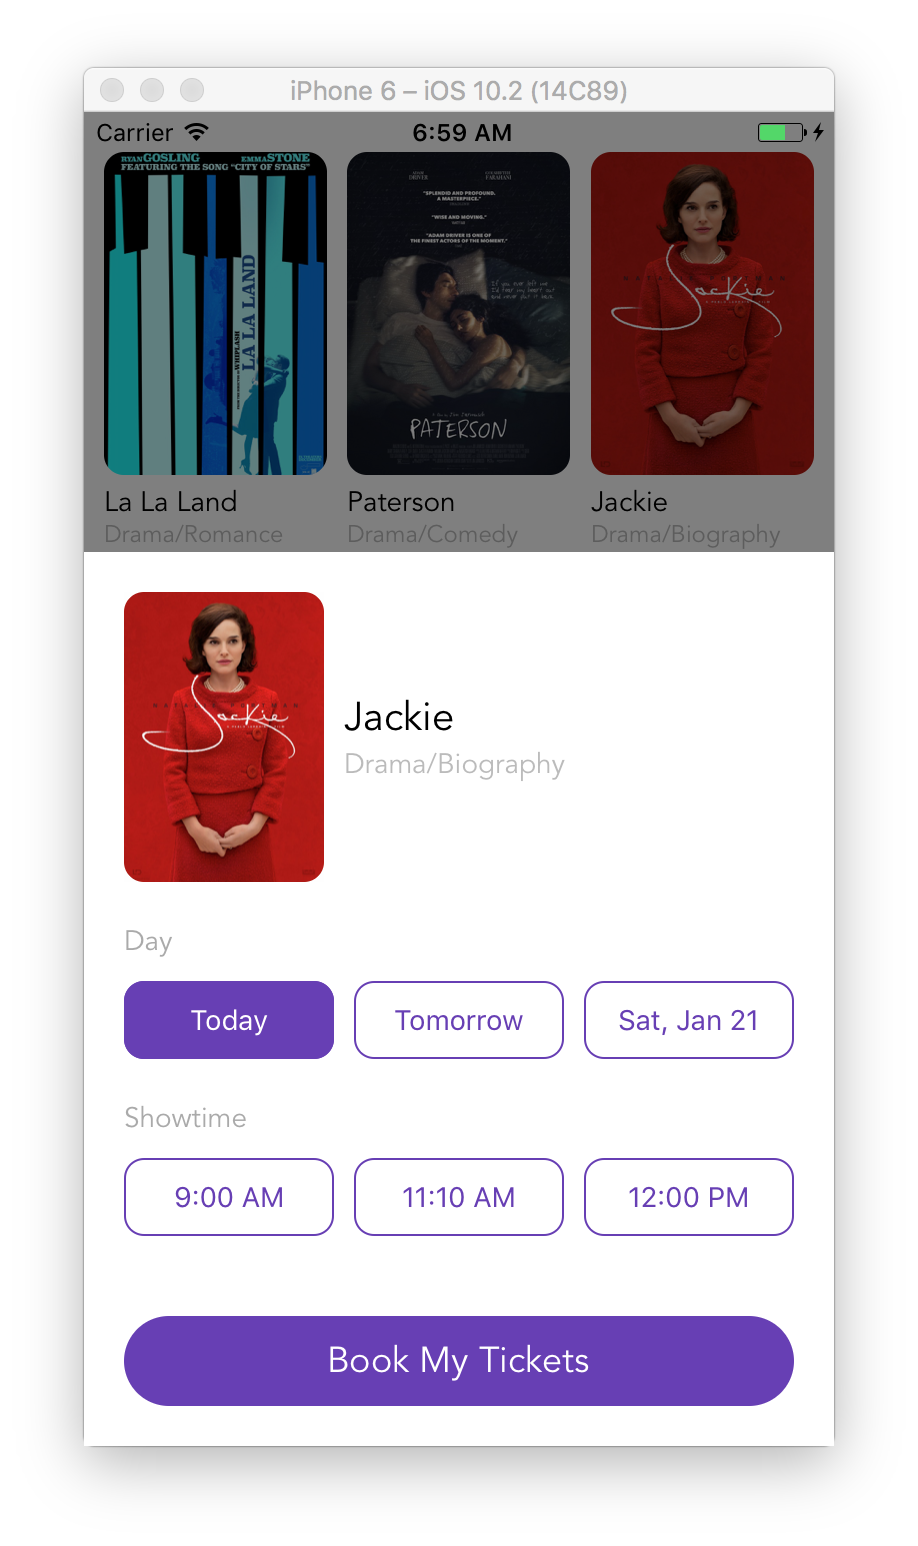
Let’s bring up the simulator window and see how does it look now. Now we have our days and times, and Today is preselected because we have chosenDay: 0 in Movie component’s state. We could have also preselected the time depending on what time it is now, disable times in past for selection, and maybe scroll options the way that the preselected option is the first one in the list to improve a user experience. But, I’ll leave it to you so that you could practice on your own.
Movie Ticket Booking
That’s the last step. We want to show confirmation screen with a confirmation code when a user taps Book My Ticket in movie popup.
Confirmation Component
That’s the last component. It just renders a confirmation code along with a button to close that screen and go back to movie list.
- Create a new file called
Confirmation.jswithinsrcfolder with the following content.
import React, { Component, PropTypes } from 'react';
import {
  StyleSheet,
  Text,
  TouchableOpacity,
  View
} from 'react-native';
import { defaultStyles } from './styles';

export default class Confirmation extends Component {

  static propTypes = {
    code: PropTypes.string.isRequired,
  }

  render() {
    const { code } = this.props;
    return (
      <View style={styles.container}>
        <Text style={styles.header}>Your confirmation code</Text>
        <Text style={styles.code}>{code}</Text>
        <TouchableOpacity
          style={styles.buttonContainer}
          // Go back when pressed
          onPress={() => this.props.navigator.pop() }
        >
          <Text style={styles.button}>Done</Text>
        </TouchableOpacity>
      </View>
    );
  }
}

const styles = StyleSheet.create({
  container: {
    flex: 1,
    justifyContent: 'center',
    alignItems: 'center',
  },
  header: {
    ...defaultStyles.text,
    color: '#333',
    fontSize: 20,
  },
  code: {
    ...defaultStyles.text,
    color: '#333',
    fontSize: 36,
  },
  buttonContainer: {
    alignItems: 'center',
    backgroundColor: '#673AB7',
    borderRadius: 100,
    margin: 20,
    paddingVertical: 10,
    paddingHorizontal: 30,
  },
  button: {
    ...defaultStyles.text,
    color: '#FFFFFF',
    fontSize: 18,
  },
});
Update Movies Component
Now, let’s update Movies component to add a method that will handle Book My Tickets button taps and navigate them to Confirmation component that we just created.
- Open
Movies.jsfile insrcfolder and add a few things:
Step 1. Add bookTicket() handler that gets called the user taps Book My Ticket in movie popup. Find chooseTime and add the following code right after.
  bookTicket = () => {
    // Make sure they selected time
    if (!this.state.chosenTime) {
      alert('Please select show time');
    } else {
      // Close popup
      this.closeMovie();
      // Navigate away to Confirmation route
      this.props.navigator.push({
        name: 'confirmation',
        // Generate random string
        code: Math.random().toString(36).substring(6).toUpperCase(),
      });
    }
  }
Step 2. Pass bookTicket() handler as onBook prop down to <MoviePopup/>. Find <MoviePopup/> inside render() and add one more prop
<MoviePopup
  // ... existing props
  onBook={this.bookTicket}
/>
Update App Component
The final step would be to update App component to handle navigation to Confirmation component that we just created.
- Open
app.jsfile insrcfolder and add a few things:
Step 1. Add import statement for Confirmation component.
// ... existing imports
import Confirmation from './Confirmation';
Step 2. Update RouteMapper to render Confirmation component with passed code if current route name is confirmation.
Find and replace this:
const RouteMapper = (route, navigator) => {
  if (route.name === 'movies') {
    return <Movies navigator={navigator} />;
  }
};
With this:
const RouteMapper = (route, navigator) => {
  if (route.name === 'movies') {
    return (
      <Movies navigator={navigator} />
    );
  } else if (route.name === 'confirmation') {
    return (
      <Confirmation code={route.code} navigator={navigator} />
    );
  }
};
And Voila
We’re done. Let’s bring up the simulator window and play around with the app we’ve just built. You did a great job.
Wrapping Up
Hopefully, you’ve learned a lot on how to create slick UIs with smooth animated transitions. Subscribe to get notified about new tutorials. And if you have any questions or ideas for new tutorials, just leave a comment below the post.


Pingback: API Backend with Node.js, Express, and MongoDB for React Native App | Rational App Development()
Pingback: Storing Data From API with Redux in React Native Apps | Rational App Development()