In this tutorial we’ll continue building our Adopt Me app that we started in Part 1 and add detail screen for each pet, which would show up when row clicked.

Table of contents
Checkout Source Code
You can checkout source code for this tutorial with git. But I highly recommend you to read the whole tutorial before you do so, to get better understanding and learn how things work.
To get the source code just run in your terminal
git clone --branch part-2 https://github.com/rationalappdev/adopt-me.git
And to launch the app run
cd adopt-me;
npm install;
react-native run-ios;
Detail Screen
Let’s start off by creating a new file PetScreen.js for detail screen. We want to display a bigger picture, full description, breeds, location, contact details and also a link to pet detail page on petfinder.com. We’re going to use ScrollView component in case if there is a long description and all of the stuff, that we want to show won’t fit on a screen. We’ll also use Linking component to handle click on detail link and open it in Safari app.
'use strict';

import React, { Component } from 'react';
import {
  Image,
  Linking,
  ScrollView,
  StyleSheet,
  Text,
  View
} from 'react-native';
import getImage from './getImage';
import getBreeds from './getBreeds';

export default class PetScreen extends Component {

  render({ pet } = this.props) {
    const image = getImage(pet);
    const url = `https://www.petfinder.com/petdetail/${pet.id}`;
    return (
      <ScrollView contentContainerStyle={styles.contentContainer}>
        <View style={styles.imageContainer}>
          {image
            ? <Image source={image} style={styles.petImage} />
            : <View style={styles.noImage}><Text style={styles.noImageText}>No image</Text></View>
          }
        </View>
        <View style={styles.mainSection}>
          <Text style={styles.petDecsription}>{pet.description}</Text>
          <Text>{' '}</Text>
          <Text>Age: {pet.age}</Text>
          <Text>Breeds: {getBreeds(pet)}</Text>
          <Text>Location: {pet.contact.city}, {pet.contact.state}, {pet.contact.zip}</Text>
          <Text>Email: {pet.contact.email}</Text>
          <Text>{' '}</Text>
          <Text style={{color: 'blue'}} onPress={() => Linking.openURL(url)}>
            {url}
          </Text>
        </View>
      </ScrollView>
    );
  }

}

const styles = StyleSheet.create({
  contentContainer: {
    flex: 1,
  },
  imageContainer: {
    backgroundColor: '#dddddd',
    flex: 1,
  },
  petImage: {
    position: 'absolute',
    top: 0,
    left: 0,
    bottom: 0,
    right: 0,
  },
  noImage: {
    flex: 1,
    alignItems: 'center',
    justifyContent: 'center',
  },
  noImageText: {
    color: '#aaaaaa',
  },
  mainSection: {
    flex: 1,
    padding: 10,
  },
});
Let’s walk through this code to see what are we doing in detail.
Import Components
First of all, we import all of the components including React, React Native, our own, and 3rd party npm modules and components that we’re going to use within a component.
Define Component
Then, we define component class and render method. We use getImage function to extract image url from the API data and build url to pet detail page, using pet.id.
export default class PetScreen extends Component {
  render({ pet } = this.props) {
    const image = getImage(pet);
    const url = `https://www.petfinder.com/petdetail/${pet.id}`;
    return (

    );
  }
}
ScrollView
Next, we return <ScrollView> from render method.
return (
  <ScrollView contentContainerStyle={styles.contentContainer}>
    <View style={styles.imageContainer}>
      {image
        ? <Image source={image} style={styles.petImage} />
        : <View style={styles.noImage}><Text style={styles.noImageText}>No image</Text></View>
      }
    </View>
    <View style={styles.mainSection}>
      <Text style={styles.petDecsription}>{pet.description}</Text>
      <Text>{' '}</Text>
      <Text>Age: {pet.age}</Text>
      <Text>Breeds: {getBreeds(pet)}</Text>
      <Text>Location: {pet.contact.city}, {pet.contact.state}, {pet.contact.zip}</Text>
      <Text>Email: {pet.contact.email}</Text>
      <Text>{' '}</Text>
      <Text style={{color: 'blue'}} onPress={() => Linking.openURL(url)}>
        {url}
      </Text>
    </View>
  </ScrollView>
);
There is two primary sections: image and section with pet description.
For image we used a View with styles.imageContainer style and a condition {image ? ... : ... } to show either Image component if image exists or No image text if it doesn’t.
<View style={styles.imageContainer}>
  {image
    ? <Image source={image} style={styles.petImage} />
    : <View style={styles.noImage}><Text style={styles.noImageText}>No image</Text></View>
  }
</View>
And for description section we used a bunch of Text containers to output all of the pet data we want.
Styles
It’s time to style our component. Let’s start off by making main container flexible to take up all of the available space on the screen.
const styles = StyleSheet.create({
  contentContainer: {
    flex: 1,
  },
Next, we style image. Fist, we need to make imageContainer flexible.
  imageContainer: {
    backgroundColor: '#dddddd',
    flex: 1,
  },
And then, do a little css trick to fit our image inside a container by setting position to absolute and top, left, bottom and right to zeros.
  petImage: {
    position: 'absolute',
    top: 0,
    left: 0,
    bottom: 0,
    right: 0,
  },
In case, there is no image available, we want to show No Image text centered inside imageContainer container.
  noImage: {
    flex: 1,
    alignItems: 'center',
    justifyContent: 'center',
  },
  noImageText: {
    color: '#aaaaaa',
  },
And section with pet description, age, breeds etc.
  mainSection: {
    flex: 1,
    padding: 10,
  },
});
Get Breeds Function
We want to display pet breed list on detail screen, and since we already have code to build slash separated list in PetCell.js file, it would make sense to put that code into a separate file, instead of repeating it again.
In software engineering, don’t repeat yourself (DRY) is a principle of software development, aimed at reducing repetition of information of all kinds, especially useful in multi-tier architectures.
Don’t repeat yourself, Wikipedia
So, let’s create getBreeds.js and put our code into that file
import isObject from 'lodash/isObject';
import toArray from 'lodash/toArray';
import join from 'lodash/join';

export default function getBreeds(pet: Object): string {
  return pet.breeds && pet.breeds.breed
    ? (
      isObject(pet.breeds.breed)
        ? join(toArray(pet.breeds.breed), '/')
        : pet.breeds.breed
    )
    : null;
}
Update Row Component
Let’s update PetCell.js to use getBreeds function we just created and to make each row tappable. We just need to wrap each row into TouchableElement component to make it tappable and pass onPress={this.props.onSelect} prop to it with a callback function that would handle clicks.
'use strict';

import React, { Component } from 'react';
import {
  Image,
  Platform,
  StyleSheet,
  Text,
  TouchableHighlight,
  TouchableNativeFeedback,
  View
} from 'react-native';
import getImage from './getImage';
import getBreeds from './getBreeds';

export default class PetCell extends Component {

  render({ pet } = this.props) {
    const image = getImage(pet);
    let TouchableElement = TouchableHighlight;
    if (Platform.OS === 'android') {
      TouchableElement = TouchableNativeFeedback;
    }
    return (
      <View>
        <TouchableElement
          onPress={this.props.onSelect}
          onShowUnderlay={this.props.onHighlight}
          onHideUnderlay={this.props.onUnhighlight}>
          <View style={styles.row}>
            <View style={styles.imageContainer}>
              {image
                ? <Image source={image} style={styles.petImage} />
                : <View style={styles.noImage}><Text style={styles.noImageText}>No image</Text></View>
              }
            </View>
            <View style={styles.textContainer}>
              <Text style={styles.petName} numberOfLines={1}>
                {pet.name}
              </Text>
              <Text style={styles.petBreed} numberOfLines={1}>
                {getBreeds(pet)}
              </Text>
              <Text style={styles.petDescription} numberOfLines={2}>
                {pet.description}
              </Text>
              <Text style={styles.petLocation}>
                {pet.contact.city}, {pet.contact.state}, {pet.contact.zip}
              </Text>
            </View>
          </View>
        </TouchableElement>
      </View>
    );
  }

}

const styles = StyleSheet.create({
  row: {
    alignItems: 'center',
    backgroundColor: 'white',
    flexDirection: 'row',
    borderStyle: 'solid',
    borderBottomColor: '#dddddd',
    borderBottomWidth: StyleSheet.hairlineWidth,
    padding: 5,
  },
  imageContainer: {
    backgroundColor: '#dddddd',
    width: 90,
    height: 90,
    marginRight: 10
  },
  textContainer: {
    flex: 1,
  },
  noImage: {
    flex: 1,
    alignItems: 'center',
    justifyContent: 'center',
  },
  noImageText: {
    color: '#aaaaaa',
  },
  petImage: {
    width: 90,
    height: 90,
  },
  petName: {
    flex: 1,
    fontSize: 16,
    fontWeight: '500',
  },
  petBreed: {
    fontSize: 13,
  },
  petDescription: {
    fontSize: 12,
    marginTop: 5,
    marginBottom: 5,
  },
  petLocation: {
    fontSize: 12,
    color: 'gray',
  },
});
We imported 3 extra components: Platform, TouchableHighlight and TouchableNativeFeedback from react-native module.
import {
  ...
  Platform,
  TouchableHighlight,
  TouchableNativeFeedback,
  ...
} from 'react-native';
Added TouchableElement variable to handle row clicks, which holds either TouchableHighlight or TouchableNativeFeedback component depending on platform.
let TouchableElement = TouchableHighlight;
if (Platform.OS === 'android') {
  TouchableElement = TouchableNativeFeedback;
}
Replaced all of this code
{pet.breeds && pet.breeds.breed
  ? (
    _.isObject(pet.breeds.breed)
      ? _.join(_.toArray(pet.breeds.breed), '/')
      : pet.breeds.breed
  )
  : null
}
with much more elegant getBreeds function, that we defined earlier.
{getBreeds(pet)}
And wrapped <View style={styles.row}> with <TouchableElement> to make each row tappable. When row is pressed, this.props.onSelect, passed as onPress props, gets executed with pet object, passed as an argument. We’ll define that next in App.js component.
<TouchableElement
  onPress={this.props.onSelect}
  onShowUnderlay={this.props.onHighlight}
  onHideUnderlay={this.props.onUnhighlight}>
  <View style={styles.row}>
    ...
  </View>
</TouchableElement>
Update List Component
Let’s update App.js next. We’ll add selectPet function to handle row clicks and pass it as a prop onSelect={() => this.selectPet(pet)} to <PetCell> component to pass this function down to each row.
'use strict';

import React, { Component } from 'react';
import {
  ActivityIndicator,
  ListView,
  Platform,
  StyleSheet,
  Text,
  View
} from 'react-native';
import _ from 'lodash';
import PetCell from './PetCell';
import PetScreen from './PetScreen';

import dismissKeyboard from 'dismissKeyboard';

const API_KEY = 'cb55e117215c6eb73506d7164b0a3b6d';

const convert = (obj) => {
  let result = {};
  _.map(obj, (item, key) => {
    let value;
    if (typeof (item) === 'object') {
      if (item.$t) { value = item.$t; }
      else { value = convert(item); }
    }
    else { value = item; }
    result[key] = value;
  });
  return result;
};

let resultsCache = [];

export default class App extends Component {

  state = {
    isLoading: false,
    isLoadingTail: false,
    lastOffset: 0,
    dataSource: new ListView.DataSource({
      rowHasChanged: (row1, row2) => row1 !== row2,
    }),
  };

  componentDidMount() {
    this.fetchPets();
  }

  fetchPets = () => {

    const offset = this.state.lastOffset,
      URL = `https://api.petfinder.com/pet.find?location=US&format=json&offset=${offset}&key=${API_KEY}`;

    if (_.isEmpty(resultsCache)) {
      this.setState({isLoading: true});
    }

    fetch(URL)
      .then((response) => response.json())
      .catch((error) => {
        this.setState({
          dataSource: this.getDataSource([]),
          isLoading: false,
        });
      })
      .then((data) => {
        resultsCache = _.concat(resultsCache, _.toArray(convert(data.petfinder.pets.pet)));
        this.setState({
          isLoading: false,
          isLoadingTail: false,
          lastOffset: data.petfinder.lastOffset.$t,
          dataSource: this.getDataSource(resultsCache),
        });
      })
      .done();
  }

  getDataSource = (pets: Array<any>): ListView.DataSource => {
    return this.state.dataSource.cloneWithRows(pets);
  }

  selectPet = (pet: Object) => {
    if (Platform.OS === 'ios') {
      this.props.navigator.push({
        title: pet.name,
        component: PetScreen,
        passProps: {pet},
      });
    } else {
      dismissKeyboard();
      this.props.navigator.push({
        title: pet.name,
        name: 'pet',
        pet: pet,
      });
    }
  }

  onEndReached = () => {
    // We're already fetching
    if (this.state.isLoadingTail) {
      return;
    }
    this.setState({
      isLoadingTail: true,
    });
    this.fetchPets();
  }

  renderRow = (
    pet: Object,
    sectionID: number | string,
    rowID: number | string,
    highlightRowFunc: (sectionID: ?number | string, rowID: ?number | string) => void
  ) => {
    return (
      <PetCell
        key={pet.id}
        onSelect={() => this.selectPet(pet)}
        onHighlight={() => highlightRowFunc(sectionID, rowID)}
        onUnhighlight={() => highlightRowFunc(null, null)}
        pet={pet}
      />
    );
  }

  renderFooter = () => {
    if (!this.state.isLoadingTail) {
      return <View style={styles.scrollSpinner} />;
    }

    return <ActivityIndicator style={styles.scrollSpinner} />;
  }

  render() {
    const { isLoading } = this.state;
    return (
      <View style={styles.container}>
        {isLoading
          ? <View style={styles.loading}><Text>Loading...</Text></View>
          : <ListView
            dataSource={this.state.dataSource}
            renderFooter={this.renderFooter}
            renderRow={this.renderRow}
            onEndReached={this.onEndReached}
            automaticallyAdjustContentInsets={false}
            keyboardDismissMode="on-drag"
            keyboardShouldPersistTaps={true}
            showsVerticalScrollIndicator={false}
          />
        }
      </View>
    );
  }

}

const styles = StyleSheet.create({
  container: {
    marginTop: Platform.OS === 'ios' ? 64 : 0,
    flex: 1,
    backgroundColor: 'white',
  },
  loading: {
    flex: 1,
    alignItems: 'center',
    justifyContent: 'center',
  },
  scrollSpinner: {
    marginVertical: 20,
  },
});
We imported 2 more components. PetScreen would show a detail pet screen when a row in the list is tapped. And dismissKeyboard to hide soft keyboard on Android when a row is tapped.
import PetScreen from './PetScreen';
import dismissKeyboard from 'dismissKeyboard';
Then we added selectPet to handle row taps inside App component definition. It uses navigator component to mount PetScreen component, instead of App one, when row is tapped and passes pet object to it.
  selectPet = (pet: Object) => {
    if (Platform.OS === 'ios') {
      this.props.navigator.push({
        title: pet.name,
        component: PetScreen,
        passProps: {pet},
      });
    } else {
      dismissKeyboard();
      this.props.navigator.push({
        title: pet.name,
        name: 'pet',
        pet: pet,
      });
    }
  }
Next, we added this function () => this.selectPet(pet) as onSelect prop to <PetCell> component to handle row taps.
renderRow = (...) => {
  return (
    <PetCell
      key={pet.id}
      onSelect={() => this.selectPet(pet)}
      onHighlight={() => highlightRowFunc(sectionID, rowID)}
      onUnhighlight={() => highlightRowFunc(null, null)}
      pet={pet}
    />
  );
}
This
() => this.selectPet(pet)is a fat arrow function, which is just a more concise syntax for writingfunction() { return this.selectPet(pet) }. Fat arrow function also changesthiskeyword inside function to point toAppclass, so we are able to usethis.selectPetto callselectPetmethod ofAppclass. If you were to use a regular function you would have to bindthiskeyword to a function outside of your function definition, let’s say in class’s constructor. If you use a lot of those functions it might get messy and you might forget to bindthisand end up having a hard time debugging that. So, It’s preferred to use fat arrow functions.
Update Android Version
We need to update android version of our app to handle detail screen route and to use hardware back button in case if phone that runs the app has it.
'use strict';

import React, { Component } from 'react';
import {
  AppRegistry,
  BackAndroid,
  Navigator,
  StyleSheet,
  ToolbarAndroid,
  View,
} from 'react-native';
import App from './App';
import PetScreen from './PetScreen';

let _navigator;
BackAndroid.addEventListener('hardwareBackPress', () => {
  if (_navigator && _navigator.getCurrentRoutes().length > 1) {
    _navigator.pop();
    return true;
  }
  return false;
});

const RouteMapper = function(route, navigationOperations, onComponentRef) {
  _navigator = navigationOperations;
  if (route.name === 'app') {
    return (
      <App navigator={navigationOperations} />
    );
  } else if (route.name === 'pet') {
    return (
      <View style={{flex: 1}}>
        <ToolbarAndroid
          actions={[]}
          onIconClicked={navigationOperations.pop}
          style={styles.toolbar}
          titleColor="white"
          title={route.pet.name} />
        <PetScreen
          style={{flex: 1}}
          navigator={navigationOperations}
          pet={route.pet}
        />
      </View>
    );
  }
};

class AdoptMe extends Component {

  render() {
    return (
      <Navigator
        style={styles.container}
        initialRoute={{name: 'app'}}
        configureScene={() => Navigator.SceneConfigs.FadeAndroid}
        renderScene={RouteMapper}
      />
    );
  }
}

const styles = StyleSheet.create({
  container: {
    flex: 1,
    backgroundColor: 'white',
  },
  toolbar: {
    backgroundColor: '#a9a9a9',
    height: 56,
  },
});

AppRegistry.registerComponent('AdoptMe', () => AdoptMe);
Launch The App
To launch iOS version run in terminal
react-native run-ios;
To launch Android version
react-native run-android;
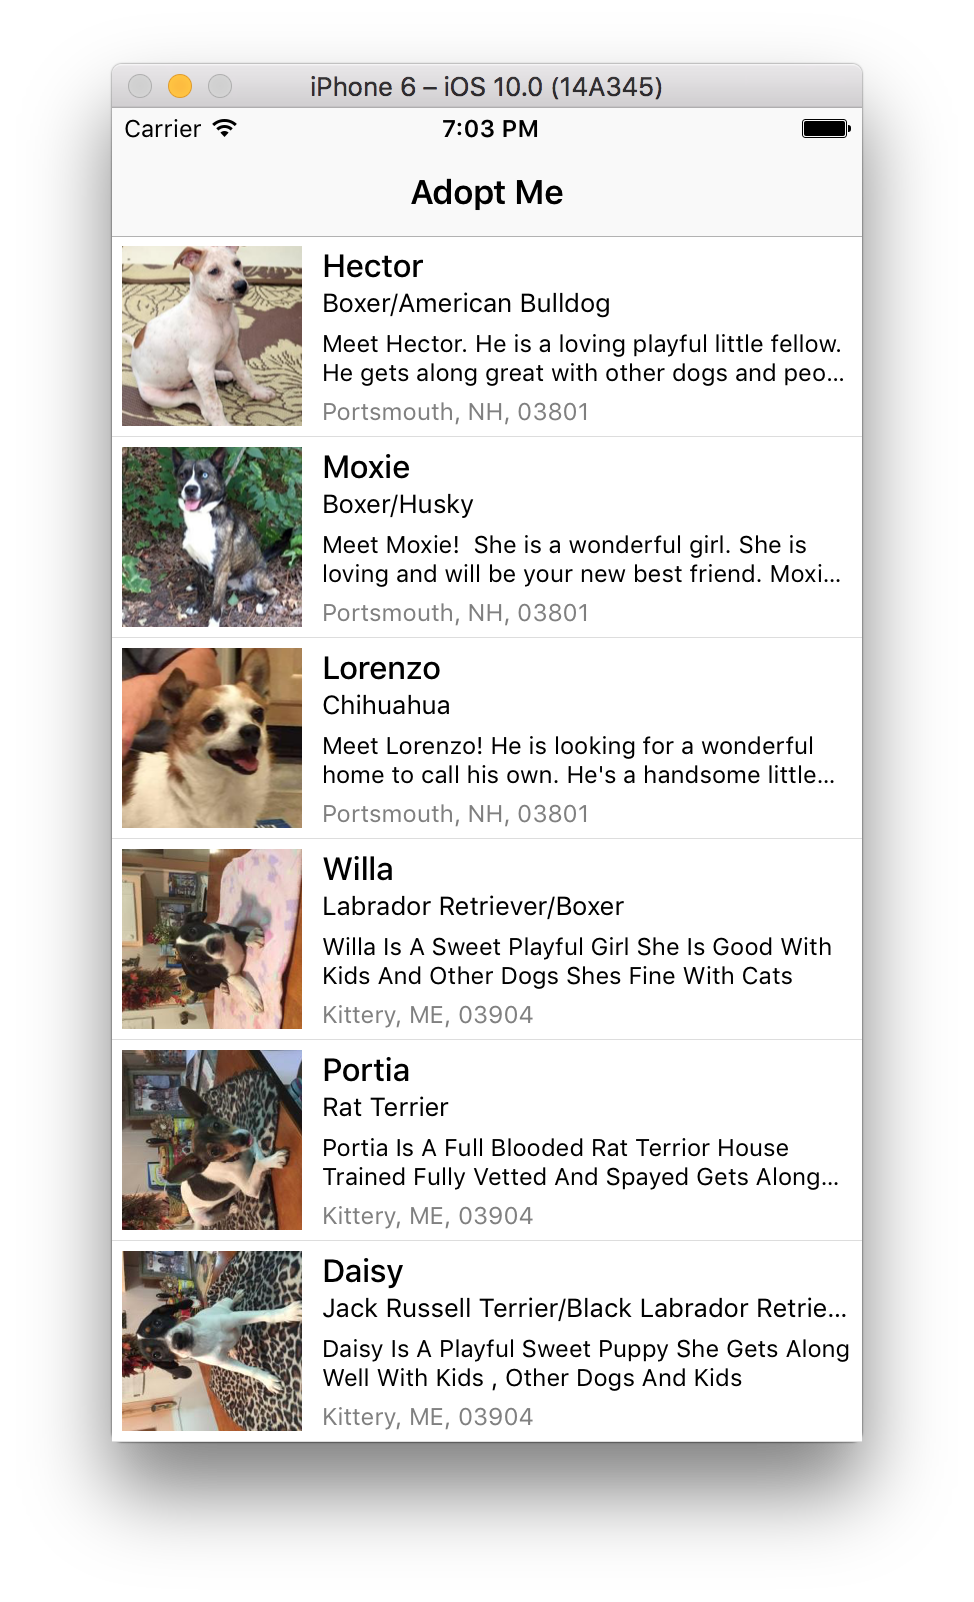
And there it is. A list of adorable pets looking for home with all of the details for each.

I hope you enjoyed the tutorial. Subscribe to find out about new tutorials and learn how to build amazing apps!