Table of contents
What We Will Be Building
We’re going to build a component that shows a little teaser box at the bottom of the screen, and once tapped or pulled up, expands to full screen and show all messages in a scrollable container. That’s how it’s going to look like.

For your reference, the final code for the app we’re building can be found in this GitHub repo.
Let’s Outline the App Structure First
It’s always a good idea to plan you app code structure in advance. Let’s list the files that we’re going to need to build all of the components for the app.
index.ios.jsorindex.android.js. Entry points into the app for iOS or Android platforms respectively. Both are going to render just one component calledApp.src/app.js. The main component that renders the main screen and usesMessagescomponent to show some messages usingSimpleMessagecomponent.src/Messages/index.js. ExportsMessagesandSimpleMessage.jscomponents.src/Messages/Messages. Shows a little teaser of the first message at the bottom of the screen and once tapped or pulled up expands to full screen.src/Messages/SimpleMessage.js. A simple component that renders a message with a title and a body in a box.
Initialize New Project
Let’s start off by creating a new app. Open Terminal App and run these commands to initialize a new project.
react-native init MessagesComponent;
cd MessagesComponent;
Install Dependencies
We’re going to need react-native-vector-icons module to add an icon to our header. Let’s install it and link its dependencies.
npm install react-native-vector-icons --save;
react-native link;
Launch the Simulator
Now, let’s run the app in the simulator.
react-native run-ios;
Enable Hot Reloading
Once your app is up and running, press ⌘D and select Enable Hot Reloading. This will save you some time having to reload the app manually every time you make a change.
Index Files
Next, let’s update our index files. Since we’re going to re-use the same code for both, iOS and Android, we don’t need two different index files. We’ll be using the same App component in both index files.
- Open
index.ios.jsfile and scrap all of the React Native boilerplate code to start from scratch. Do the same forindex.android.js. And add the following code to both of index files.
import { AppRegistry } from 'react-native';
import App from './src/app';

AppRegistry.registerComponent('MessagesComponent', () => App);
This code imports App component from app.js file and registers it as main app container.
App Component
Let’s start off with the main App component. It will just show a background image for now.
- Create a folder called
srcinside your project folder. - Create a new file called
app.jsinsidesrcfolder with the following content.
import React, { Component } from 'react';
import {
  Image,
  StatusBar,
  StyleSheet,
  View
} from 'react-native';

export default class App extends Component {
  render() {
    return (
      <View style={styles.container}>
        <StatusBar barStyle={"light-content"} />
        <Image style={styles.image} source={{uri: 'https://i.imgur.com/Ew8AIQ3.jpg'}}>
        </Image>
      </View>
    );
  }
}

const styles = StyleSheet.create({
  container: {
    flex: 1,  // take up the whole screen
  },
  image: {
    flex: 1,  // take up the whole screen
  },
});
Let’s see how it looks so far. Bring up the simulator window. You should see this.
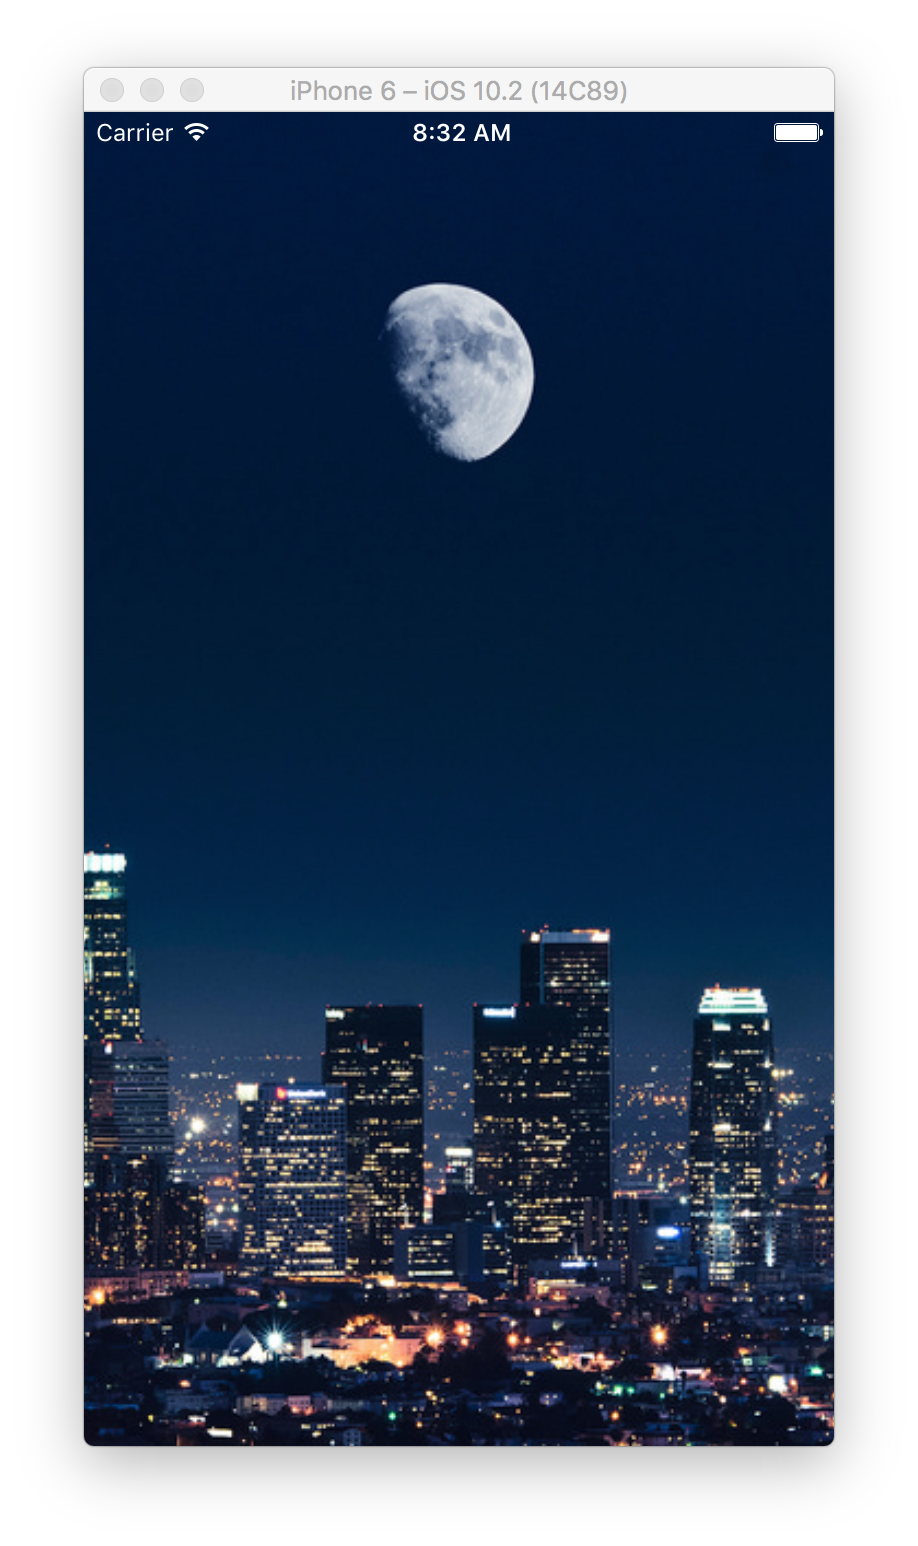
Looks pretty good, huh? I think it’s a great start. Let’s keep going.
Messages Component
Let’s start building Messages component. It’s going to be pretty big, so let’s take it slowly, step by step.
- Create a folder called
Messagesinsidesrcfolder. - Create a new file called
Messages.jsinsideMessagesfolder.
First of all, import all components that we’re going to need.
import React, { Component, PropTypes } from 'react';
import {
  Animated,
  Dimensions,
  PanResponder,
  Platform,
  ScrollView,
  StyleSheet,
  StatusBar,
  Text,
  TouchableWithoutFeedback,
  View
} from 'react-native';
import Icon from 'react-native-vector-icons/Ionicons';

// Get screen dimensions
const { width, height } = Dimensions.get('window');
Next, define Messages class.
export default class Messages extends Component {
  // todo: replace me with the code
}
And continue adding the following code inside curly brackets {}.
Let’s define all props that we’re going to need for our component.
  // Define prop types
  static propTypes = {
    // Pass messages to show as children
    children: PropTypes.any,
    // Whether the window is open or not
    isOpen: PropTypes.bool,
    // Header that shows up on top the screen when opened
    header: PropTypes.string,
    // Header height
    headerHeight: PropTypes.number,
    // Height of the visible teaser area at the bottom of the screen
    teaserHeight: PropTypes.number,
  };
Next, define default values for those props.
  // Set default prop values
  static defaultProps = {
    isOpen: false,
    header: 'Messages',
    headerHeight: 70,
    teaserHeight: 75,
  };
Then define our component’s state.
  // Define state
  state = {
    // Whether it's open or not
    open: false,
    // Whether the window is being pulled up/down or not
    pulling: false,
    // Zero means user haven't scrolled the content yet
    scrollOffset: 0,
  };
And animations config that would define how we want to animate things, what are the start and end values, what animations depend on others, etc.
  // Configure animations
  config = {
    // Window position
    position: {
      // maximum possible value - the bottom edge of the screen
      max: height,
      // starting value - teaserHeight higher than the bottom of the screen
      start: height - this.props.teaserHeight,
      // end value - headerHeight lower than the top of the screen
      end: this.props.headerHeight,
      // minimal possible value - a bit lower the top of the screen
      min: this.props.headerHeight,
      // When animated triggers these value updates
      animates: [
        () => this._animatedOpacity,
        () => this._animatedWidth
      ]
    },
    // Window width
    width: {
      end: width,         // takes full with once opened
      start: width - 20,  // slightly narrower than screen when closed
    },
    // Window backdrop opacity
    opacity: {
      start: 0,   // fully transparent when closed
      end: 1      // not transparent once opened
    },
  };
Next, let’s initialize some variables that will help us with gestures and animations.
  // Pan responder to handle gestures
  _panResponder = {};

  // Animates backdrop opacity
  _animatedOpacity = new Animated.Value(this.config.opacity.start);

  // Animates window width
  _animatedWidth = new Animated.Value(this.config.width.start);

  // Animates window position
  _animatedPosition = new Animated.Value(this.props.isOpen
    ? this.config.position.end
    : this.config.position.start);
Next, let’s initialize _currentPosition variable, add event listener to update depending animations on _animatedPosition changes, and configure _panResponder to handle gestures using componentWillMount event.
  componentWillMount() {
    // Set current position
    this._currentPosition = this._animatedPosition._value;
    // Listen for this._animatedPosition changes
    this._animatedPosition.addListener((value) => {
      // Update _currentPosition
      this._currentPosition = value.value;
      // Animate depending values
      this.config.position.animates.map(item => {
        item().setValue(value.value);
      })
    });
    // Reset value once listener is registered to update depending animations
    this._animatedPosition.setValue(this._animatedPosition._value);
    // Initialize PanResponder to handle gestures
    this._panResponder = PanResponder.create({
      onStartShouldSetPanResponder: this._grantPanResponder,
      onStartShouldSetPanResponderCapture: this._grantPanResponder,
      onMoveShouldSetPanResponder: this._grantPanResponder,
      onMoveShouldSetPanResponderCapture: this._grantPanResponder,
      onPanResponderGrant: this._handlePanResponderGrant,
      onPanResponderMove: this._handlePanResponderMove,
      onPanResponderTerminationRequest: (evt, gestureState) => true,
      onPanResponderRelease: this._handlePanResponderEnd,
      onPanResponderTerminate: this._handlePanResponderEnd,
      onShouldBlockNativeResponder: (evt, gestureState) => true,
    });
  }
Next, using componentWillReceiveProps event we’ll listen for isOpen prop changes and either open or close the window if was changed.
  // Handle isOpen prop changes to either open or close the window
  componentWillReceiveProps(nextProps) {
    // isOpen prop changed to true from false
    if (!this.props.isOpen && nextProps.isOpen) {
      this.open();
    }
    // isOpen prop changed to false from true
    else if (this.props.isOpen && !nextProps.isOpen) {
      this.close();
    }
  }
Next, define our render() method.
  render() {
    const { children, header } = this.props,
      // Interpolate position value into opacity value
      animatedOpacity = this._animatedOpacity.interpolate({
        inputRange: [this.config.position.end, this.config.position.start],
        outputRange: [this.config.opacity.end, this.config.opacity.start],
      }),
      // Interpolate position value into width value
      animatedWidth = this._animatedWidth.interpolate({
        inputRange: [this.config.position.min,// top of the screen
          this.config.position.start - 50,    // 50 pixels higher than next point
          this.config.position.start,         // a bit higher than the bottom of the screen
          this.config.position.max            // the bottom of the screen
        ],
        outputRange: [this.config.width.end,  // keep max width after next point
          this.config.width.end,              // end: max width at 50 pixel higher
          this.config.width.start,            // start: min width at the bottom
          this.config.width.start             // keep min width before previous point
        ],
      });
    return (
      <Animated.View style={[styles.container, this.getContainerStyle()]}>
        {/* Use light status bar because we have dark background */}
        <StatusBar barStyle={"light-content"} />
        {/* Backdrop with animated opacity */}
        <Animated.View style={[styles.backdrop, { opacity: animatedOpacity }]}>
          {/* Close window when tapped on header */}
          <TouchableWithoutFeedback onPress={this.close}>
            <View style={[styles.header, this.getHeaderStyle()]}>
              {/* Icon */}
              <View style={styles.headerIcon}>
                <Icon name="md-arrow-up" size={24} color="white" />
              </View>
              {/* Header */}
              <View style={styles.headerTitle}>
                <Text style={styles.headerText}>{header}</Text>
              </View>
            </View>
          </TouchableWithoutFeedback>
        </Animated.View>
        {/* Content container */}
        <Animated.View
          style={[styles.content, {
            // Add padding at the bottom to fit all content on the screen
            paddingBottom: this.props.headerHeight,
            // Animate width
            width: animatedWidth,
            // Animate position on the screen
            transform: [{ translateY: this._animatedPosition }, { translateX: 0 }]
          }]}
          // Handle gestures
          {...this._panResponder.panHandlers}
        >
          {/* Put all content in a scrollable container */}
          <ScrollView
            ref={(scrollView) => { this._scrollView = scrollView; }}
            // Enable scrolling only when the window is open
            scrollEnabled={this.state.open}
            // Hide all scrolling indicators
            showsHorizontalScrollIndicator={false}
            showsVerticalScrollIndicator={false}
            // Trigger onScroll often
            scrollEventThrottle={16}
            onScroll={this._handleScroll}
          >
            {/* Render children components */}
            {children}
          </ScrollView>
        </Animated.View>
      </Animated.View>
    );
  }
Next, add a function to decide whether we want PanReponder to proceed and handle user’s gesture or not.
  // Either allow or deny gesture handler
  _grantPanResponder = (evt, gestureState) => {
    // Allow if is not open
    if (!this.state.open) {
      return true;
    }
    // Allow if user haven't scroll the content yet
    else if (this.pulledDown(gestureState) && this.state.scrollOffset <= 0) {
      return true;
    }
    // Allow if pulled down rapidly
    else if (this.pulledDown(gestureState) && this.pulledFast(gestureState)) {
      return true;
    }
    // Deny otherwise
    return false;
  };
And this one to call it after permission to handle gesture is granted.
  // Called when granted
  _handlePanResponderGrant = (evt, gestureState) => {
    // Update the state so we know we're in the middle of pulling it
    this.setState({ pulling: true });
    // Set offset and initialize with 0 so we update it
    // with relative values from gesture handler
    this._animatedPosition.setOffset(this._currentPosition);
    this._animatedPosition.setValue(0);
  };
Add this one to update _animatedPosition when a user pulls the window.
  // Called when being pulled
  _handlePanResponderMove = (evt, gestureState) => {
    // Update position unless we go outside of allowed range
    if (this.insideAllowedRange()) {
      this._animatedPosition.setValue(gestureState.dy);
    }
  };
And this one to be called after the user ends pulling the window.
  // Called when gesture ended
  _handlePanResponderEnd = (evt, gestureState) => {
    // Reset offset
    this._animatedPosition.flattenOffset();
    // Reset pulling state
    this.setState({ pulling: false });
    // Pulled down and far enough to trigger close
    if (this.pulledDown(gestureState) && this.pulledFar(gestureState)) {
      return this.close();
    }
    // Pulled up and far enough to trigger open
    else if (this.pulledUp(gestureState) && this.pulledFar(gestureState)) {
      return this.open();
    }
    // Toggle if tapped
    else if (this.tapped(gestureState)) {
      return this.toggle();
    }
    // Restore back to appropriate position otherwise
    else {
      this.restore();
    }
  };
We’re also going to need to track whether the user has scrolled content inside the window or not with this one.
  // Handle content scrolling
  _handleScroll = event => {
    const { y } = event.nativeEvent.contentOffset;
    this.setState({ scrollOffset: y });
  };
Next, let’s add a few methods to help us finding out what kind of gestures we’re dealing with.
  // Check if gesture was a tap
  tapped = (gestureState) => gestureState.dx === 0 && gestureState.dy === 0;

  // Check if pulled up
  pulledUp = (gestureState) => gestureState.dy < 0;

  // Check if pulled down
  pulledDown = (gestureState) => gestureState.dy > 0;

  // Check if pulled rapidly
  pulledFast = (gestureState) => Math.abs(gestureState.vy) > 0.75;

  // Check if pulled far
  pulledFar = (gestureState) => Math.abs(gestureState.dy) > 50;

  // Check if current position is inside allowed range
  insideAllowedRange = () =>
    this._currentPosition >= this.config.position.min
    && this._currentPosition <= this.config.position.max;
And a few helper methods to help us out with manipulating the window state.
  // Open up the window on full screen
  open = () => {
    this.setState({ open: true }, () => {
      Animated.timing(this._animatedPosition, {
        toValue: this.config.position.end,
        duration: 400,
      }).start();
    });
  };

  // Minimize window and keep a teaser at the bottom
  close = () => {
    this._scrollView.scrollTo({ y: 0 });
    Animated.timing(this._animatedPosition, {
      toValue: this.config.position.start,
      duration: 400,
    }).start(() => this.setState({
      open: false,
    }));
  };

  // Toggle window state between opened and closed
  toggle = () => {
    if (!this.state.open) {
      this.open();
    }
    else {
      this.close();
    }
  };

  // Either open or close depending on the state
  restore = () => {
    if (this.state.open) {
      this.open();
    }
    else {
      this.close();
    }
  };
And lastly, add these to help out with styles that depend on either props or state.
  // Get header style
  getHeaderStyle = () => ({
    height: Platform.OS === 'ios'
      ? this.props.headerHeight
      : this.props.headerHeight - 40, // compensate for the status bar
  });

  // Get container style
  getContainerStyle = () => ({
    // Move the view below others if not open or moving
    // to not block gesture handlers on other views
    zIndex: this.state.pulling || this.state.open ? 1 : -1,
  });
Ok, we’re done with Messages class. The last step is to define styles after Messages class closing curly bracket }.
export default class Messages extends Component {
  // ...
}

const styles = StyleSheet.create({
  // Main container
  container: {
    ...StyleSheet.absoluteFillObject,   // fill up all screen
    alignItems: 'center',               // center children
    justifyContent: 'flex-end',         // align popup at the bottom
    backgroundColor: 'transparent',     // transparent background
  },
  // Semi-transparent background below popup
  backdrop: {
    ...StyleSheet.absoluteFillObject,   // fill up all screen
    alignItems: 'center',               // center children
    justifyContent: 'flex-start',       // align popup at the bottom
    backgroundColor: 'black',
  },
  // Body
  content: {
    backgroundColor: 'black',
    height: height,
  },
  // Header
  header: {
    flexDirection: 'row',               // arrange children in a row
    alignItems: 'center',               // center vertically
    paddingTop: 20,
    paddingHorizontal: 20,
  },
  headerIcon: {
    marginRight: 10,
  },
  headerTitle: {
    flex: 1,                            // take up all available space
  },
  headerText: {
    color: 'white',
    fontFamily: 'Avenir',
    fontWeight: '600',
    fontSize: 16,
  },
});
Let’s Hook it Up
Let’s hook Messages into App component.
- Open
app.jsfile insrcfolder to add couple of things. - First, Import
TextandMessagescomponent that we just created.
import {
  ...
  Text,
  ...
} from 'react-native';
import Messages from './Messages/Messages';
- And add
<Messages>with some text inside<Image>component.
  render() {
    return (
      <View style={styles.container}>
        <StatusBar barStyle={"light-content"} />
        <Image style={styles.image} source={{uri: 'https://i.imgur.com/Ew8AIQ3.jpg'}}>
          <Messages>
            <View style={{
              backgroundColor: '#3F51B5',
               padding: 20,
            }}>
              <Text>Message</Text>
              <Text>Read me...</Text>
            </View>
          </Messages>
        </Image>
      </View>
    );
  }
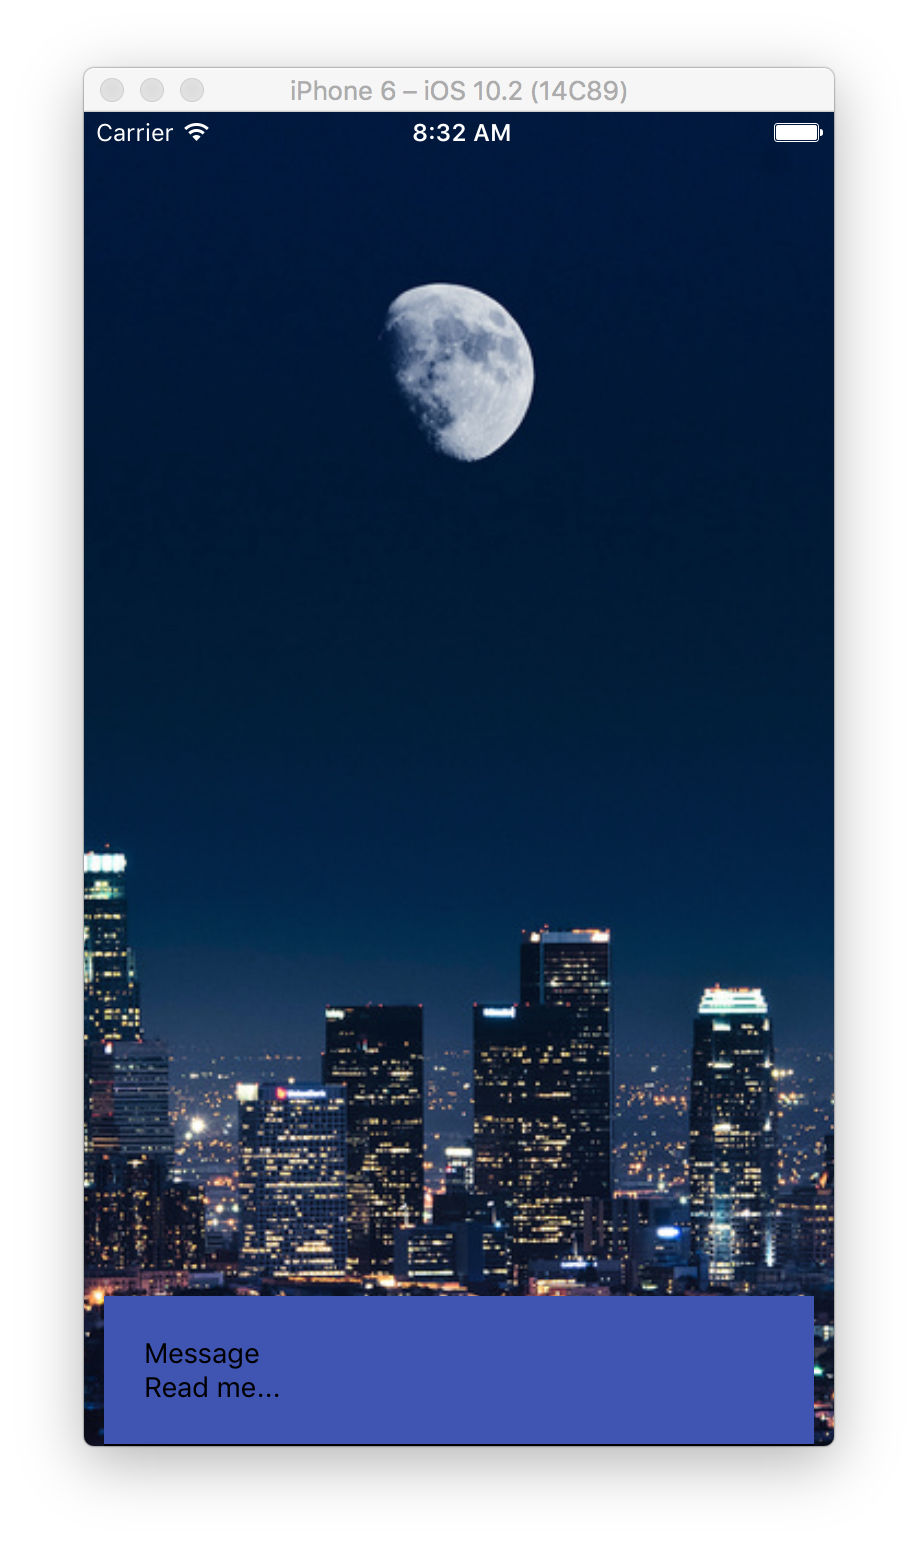
And here’s the result. Our messages window has two states: close and open. Play around with it. Try pulling up and down.

Simple Message Component
Ok, let’s add some more messages. We could just copy and paste this code and change the text:
<View style={{
  backgroundColor: '#3F51B5',
  padding: 20,
}}>
  <Text>Message</Text>
  <Text>Read me...</Text>
</View>
But that’d be silly. Let’s create a re-usable component for this. It will take in title and message as props and render a message box for us.
- Create a new file called
SimpleMessage.jsinsideMessagesfolder with the following content.
import React, { PureComponent } from 'react';
import {
  StyleSheet,
  Text,
  View
} from 'react-native';

export default class SimpleMessage extends PureComponent {
  render() {
    const { title, message } = this.props;
    return (
      <View style={styles.container}>
        <Text style={[styles.text, styles.title]}>
          {title}
        </Text>
        <Text style={styles.text}>
          {message}
        </Text>
      </View>
    );
  }
}

const styles = StyleSheet.create({
  container: {
    backgroundColor: '#3F51B5',
    marginBottom: 10,
    padding: 15,
  },
  text: {
    color: '#fff',
    fontFamily: 'Avenir',
  },
  title: {
    fontWeight: 'bold',
    marginBottom: 10,
  },
});
It’s a pretty straightforward component. It doesn’t have any state or any functionally. It just renders a box with some text. That’s why we extended it from React.PureComponent. PureComponent implements shouldComponentUpdate() with a shallow prop and state comparison, which prevents the component from re-rendering when parent component gets re-rendered, but none of the props or state values of PureComponent have been changed.
You can read more on
React.PureComponentat React documentation website.
Better Export
Now that we have two components in our Messages module let’s export those differently so that we could do this:
import Messages, { SimpleMessage } from './Messages';
Instead of this:
import Messages from './Messages/Messages';
import SimpleMessage from './Messages/SimpleMessage';
To achieve this, we’re going to need to create index.js file inside Messages folder and re-export both components.
- Create a new file called
index.jsinsideMessagesfolder with the following content.
export { default } from './Messages';
export { default as SimpleMessage } from './SimpleMessage';
Update App Component
Let’s update our App component to add more messages with SimpleMessage that we just built.
- Open
app.jsfile insrcfolder to change couple of things. - First, replace this:
import Messages from './Messages/Messages';
with:
import Messages, { SimpleMessage } from './Messages';
- And replace this:
		  <Messages>
            <View style={{
              backgroundColor: '#3F51B5',
              padding: 20,
            }}>
              <Text>Message</Text>
              <Text>Read me...</Text>
            </View>
          </Messages>
with:
		  <Messages>
            <SimpleMessage
              title="World Agrees To Just Take Down Internet For A While Until They Can Find A Good Use For It"
              message="NEW YORK—Saying the global computer network will cease to be available to users as of midnight tonight, the people of the world announced plans Wednesday to shut down the entire internet until such time as a good use for it can be found. According to the earth’s 7.5 billion inhabitants, the internet—a technology that allows every human on the face of the planet to communicate and share data with every other human—seemed like an excellent idea at first. But while limited parts of the internet were deemed beneficial and may one day be salvaged, the global populace concluded that the overwhelming majority of it is really awful, and in some cases, even dangerous."
            />
            <SimpleMessage
              title="Middle Eastern Man Not Sure How Many Days’ Worth Of Airport Detention Clothes To Pack"
              message="MUSCAT, OMAN—Sifting through various items in his dresser and closet, 36-year-old Omani graduate student Raed Saleh told reporters Monday that he was not sure how many days’ worth of airport detention clothes to bring for his upcoming trip to the United States. “I definitely want to pack enough to last me the entire time I’m detained at Newark International Airport, but I also don’t want to overdo it,” said Saleh, adding that five T-shirts would likely be enough to avoid having to do laundry while he is being held for questioning by Immigration and Customs Enforcement agents..."
            />
            <SimpleMessage
              title="DAY 45: Jeff Sessions Spits In Face Of FBI Interrogator Trying To Get Him To Turn On Trump"
              message="WASHINGTON—Angrily dismissing offers of a plea deal if he would agree to cooperate with an investigation into the current administration’s ties to Russia, Attorney General Jeff Sessions reportedly spit in the face of an FBI interrogator Thursday who was attempting to convince him to turn on President Trump. “If you goddamn Feds want to know whether I’ll turn rat: Here’s my answer,” said Sessions, shortly before leaning over the small wooden table separating him and his interrogator and spitting directly into the FBI official’s eyes. “I’m not gonna crack, so you G-men can threaten me with whatever the hell you want—you’re just wasting your time. I’ll fucking die before I flip, so you got the balls to kill me?”"
            />
          </Messages>
You’re more than welcome to change those messages to whatever you like.
Final Result
Bring up the simulator window and enjoy the result.

Wrapping Up
Hopefully, you’ve learned a lot and will be able to use that knowledge when building your apps! Subscribe to get notified about new tutorials. And if you have any questions or ideas for new tutorials, just leave a comment below the post.